
下面的例子說明了如何編寫一個簡單的基于 web 的應用程序,它利用了使用 Spring 的 Web MVC 框架的 HTML 表單。為了開始使用它,讓我們在恰當的位置使用 Eclipse IDE,然后按照下面的步驟使用 Spring 的 Web 框架來開發一個動態的基于表單的 Web 應用程序:
| 步驟 | 描述 |
|---|---|
| 1 | 創建一個名稱為 HelloWeb 的動態 Web 項目,并且在已創建的項目的 src 文件夾中創建一個包 com.tutorialspoint。 |
| 2 | 將上面提到的 Spring 和其他庫拖拽到文件夾 WebContent/WEB-INF/lib 中。 |
| 3 | 在 com.tutorialspoint 包下創建一個 Java 類 Student 和 StudentController。 |
| 4 | 在 WebContent/WEB-INF 文件夾下創建 Spring 的配置文件 Web.xml 和 HelloWeb-servlet.xml。 |
| 5 | 在 WebContent/WEB-INF 文件夾下創建名稱為 jsp 的子文件夾。在這個子文件夾下創建視圖文件 student.jsp 和 result.jsp。 |
| 6 | 最后一步是創建所有的源代碼和配置文件的內容,并導出該應用程序,正如下面解釋的一樣。 |
這里是 Student.java 文件的內容:
package com.tutorialspoint;
public class Student {
   private Integer age;
   private String name;
   private Integer id;
   public void setAge(Integer age) {
      this.age = age;
   }
   public Integer getAge() {
      return age;
   }
   public void setName(String name) {
      this.name = name;
   }
   public String getName() {
      return name;
   }
   public void setId(Integer id) {
      this.id = id;
   }
   public Integer getId() {
      return id;
   }
}
下面是 StudentController.java 文件的內容:
package com.tutorialspoint;
import org.springframework.stereotype.Controller;
import org.springframework.web.bind.annotation.ModelAttribute;
import org.springframework.web.bind.annotation.RequestMapping;
import org.springframework.web.bind.annotation.RequestMethod;
import org.springframework.web.servlet.ModelAndView;
import org.springframework.ui.ModelMap;
@Controller
public class StudentController {
   @RequestMapping(value = "/student", method = RequestMethod.GET)
   public ModelAndView student() {
      return new ModelAndView("student", "command", new Student());
   }
   @RequestMapping(value = "/addStudent", method = RequestMethod.POST)
   public String addStudent(@ModelAttribute("SpringWeb")Student student,
   ModelMap model) {
      model.addAttribute("name", student.getName());
      model.addAttribute("age", student.getAge());
      model.addAttribute("id", student.getId());
      return "result";
   }
}
在這里,第一個 service 方法 student(),我們已經在名稱為 “command” 的 ModelAndView 對象中傳遞一個空的 Student 對象,因為 spring 框架需要一個名稱的 “command” 的對象,如果你在 JSP 文件中使用 <form:form> 標簽。所以,當 student() 方法被調用時,它返回 student.jsp 視圖。
第二個 service 方法 addStudent() 將調用 HelloWeb/addStudent URL 中的 POST 方法。你將根據提交的信息準備好你的模型對象。最后一個 “result” 視圖會從 service 方法中返回,它將導致呈現 result.jsp。
下面是 Spring Web 配置文件 web.xml 的內容
<web-app id="WebApp_ID" version="2.4"
    xmlns="http://java.sun.com/xml/ns/j2ee"
    xmlns:xsi="http://www.w3.org/2001/XMLSchema-instance"
    xsi:schemaLocation="http://java.sun.com/xml/ns/j2ee
    http://java.sun.com/xml/ns/j2ee/web-app_2_4.xsd">

    <display-name>Spring MVC Form Handling</display-name>

    <servlet>
        <servlet-name>HelloWeb</servlet-name>
        <servlet-class>
           org.springframework.web.servlet.DispatcherServlet
        </servlet-class>
        <load-on-startup>1</load-on-startup>
    </servlet>

    <servlet-mapping>
        <servlet-name>HelloWeb</servlet-name>
        <url-pattern>/</url-pattern>
    </servlet-mapping>

</web-app>
下面是另一個 Spring Web 配置文件 HelloWeb-servlet.xml 的內容
<beans xmlns="http://www.springframework.org/schema/beans"
   xmlns:context="http://www.springframework.org/schema/context"
   xmlns:xsi="http://www.w3.org/2001/XMLSchema-instance"
   xsi:schemaLocation="
   http://www.springframework.org/schema/beans
   http://www.springframework.org/schema/beans/spring-beans-3.0.xsd
   http://www.springframework.org/schema/context
   http://www.springframework.org/schema/context/spring-context-3.0.xsd">

   <context:component-scan base-package="com.tutorialspoint" />

   <bean class="org.springframework.web.servlet.view.InternalResourceViewResolver">
      <property name="prefix" value="/WEB-INF/jsp/" />
      <property name="suffix" value=".jsp" />
   </bean>

</beans>
下面是 Spring 視圖文件 student.jsp 的內容
<%@taglib uri="http://www.springframework.org/tags/form" prefix="form"%>
<html>
<head>
    <title>Spring MVC Form Handling</title>
</head>
<body>

<h2>Student Information</h2>
<form:form method="POST" action="/HelloWeb/addStudent">
   <table>
    <tr>
        <td><form:label path="name">Name</form:label></td>
        <td><form:input path="name" /></td>
    </tr>
    <tr>
        <td><form:label path="age">Age</form:label></td>
        <td><form:input path="age" /></td>
    </tr>
    <tr>
        <td><form:label path="id">id</form:label></td>
        <td><form:input path="id" /></td>
    </tr>
    <tr>
        <td colspan="2">
            <input type="submit" value="Submit"/>
        </td>
    </tr>
</table>
</form:form>
</body>
</html>
下面是 Spring 視圖文件 result.jsp 的內容
<%@taglib uri="http://www.springframework.org/tags/form" prefix="form"%>
<html>
<head>
    <title>Spring MVC Form Handling</title>
</head>
<body>

<h2>Submitted Student Information</h2>
   <table>
    <tr>
        <td>Name</td>
        <td>${name}</td>
    </tr>
    <tr>
        <td>Age</td>
        <td>${age}</td>
    </tr>
    <tr>
        <td>ID</td>
        <td>${id}</td>
    </tr>
</table>
</body>
</html>
最后,下面是包含在你的 web 應用程序中的 Spring 和其他庫的列表。你僅僅需要將這些文件拖拽到 WebContent/WEB-INF/lib 文件夾中。
commons-logging-x.y.z.jar
org.springframework.asm-x.y.z.jar
org.springframework.beans-x.y.z.jar
org.springframework.context-x.y.z.jar
org.springframework.core-x.y.z.jar
org.springframework.expression-x.y.z.jar
org.springframework.web.servlet-x.y.z.jar
org.springframework.web-x.y.z.jar
一旦你完成了創建源代碼和配置文件后,導出你的應用程序。右鍵單擊你的應用程序,并且使用 Export > WAR File 選項,并且在 Tomcat 的 webapps 文件夾中保存你的 HelloWeb.war 文件。
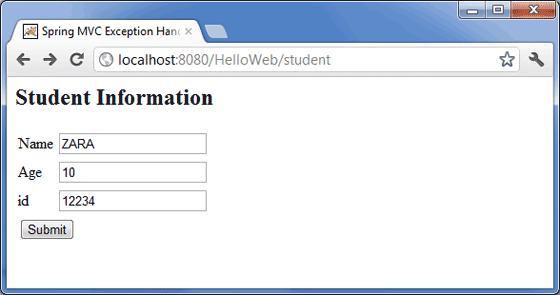
現在啟動你的 Tomcat 服務器,并且確保你能夠使用標準的瀏覽器訪問 webapps 文件夾中的其他 web 頁面。現在嘗試訪問該 URL http://localhost:8080/SpringWeb/student。如果你的 Spring Web 應用程序一切都正常,你應該看到下面的結果:
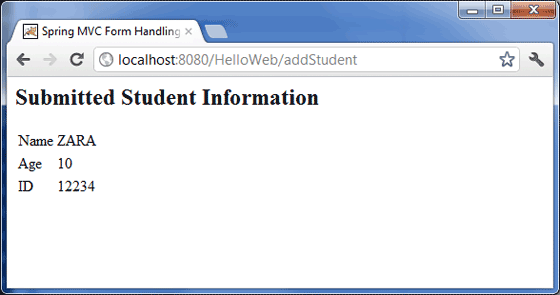
在提交必需的信息之后,單擊提交按鈕來提交這個表單。如果你的 Spring Web 應用程序一切都正常,你應該看到下面的結果:
程序員人生,我編程,我富裕,記住wfuyu網,php教程,php學習,php手冊,CMS模版制作
聲明:本站大部分內容是作者原創,少部分收集于互聯網供大家一起學習,原版權很多不明,如有侵權請聯系本站,謝謝!
粵ICP備14040726號-1?? 2015-2020 程序員人生 版權所有

