
AndFix,全稱是Android hot-fix。是阿里開源的1個熱補釘框架,允許APP在不重新發布版本的情況下修復線上的bug。支持Android 2.3 到 7.0,并且支持arm 與 X86系統架構的裝備。完善支持Dalvik與ART的Runtime,補釘文件是以 .apatch 結尾的文件,并且是立即生效的
項目地址https://github.com/alibaba/AndFix
官方ReadMe
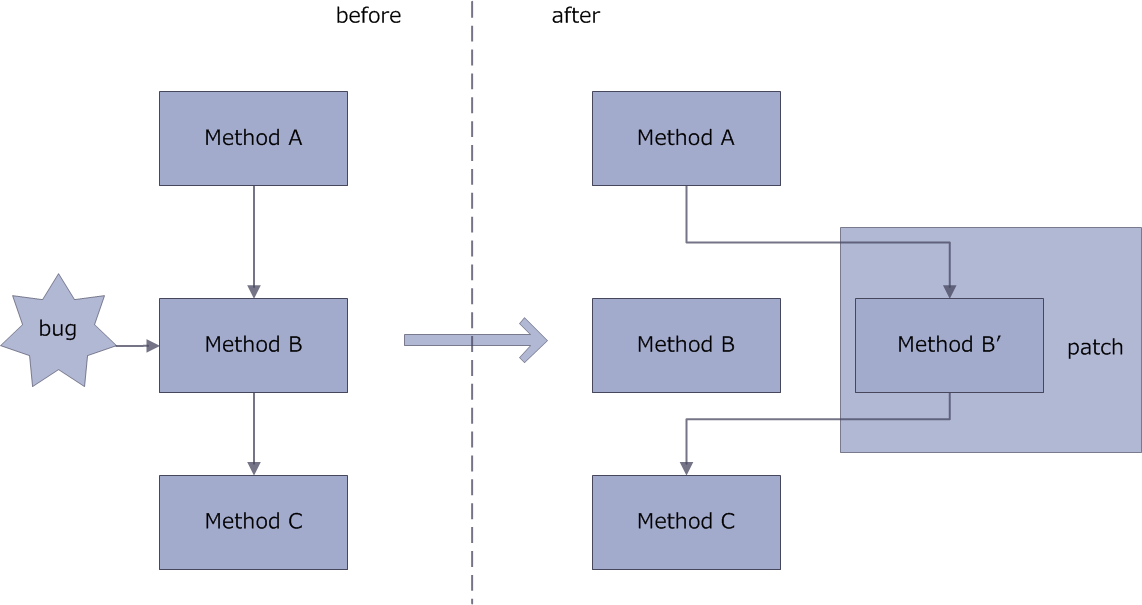
大致修復圖
How to Use(官方)
Initialize PatchManager,
`patchManager = new PatchManager(context);
 patchManager.init(appversion);//current version`
Load patch,
`patchManager.loadPatch();`
You should load patch as early as possible, generally, in the initialization phase of your application(such as Application.onCreate()).
Add patch,
`patchManager.addPatch(path);//path of the patch file that was downloaded`
When a new patch file has been downloaded, it will become effective immediately by addPatch
還有1點就是混淆需要注意
`-keep class * extends java.lang.annotation.Annotation
 -keepclasseswithmembernames class * {
  native <methods>;
  }
 -keep class com.alipay.euler.andfix.** { *; }
 `
如何制作1個apatch呢,阿里在這個開源項目中提供了1個工具https://github.com/alibaba/AndFix/blob/master/tools/apkpatch⑴.0.3.zip
,這里先大致介紹1下原理:通過diff增量比對兩個apk改變的地方,在其上通過加上注解標記,生成1個apatch
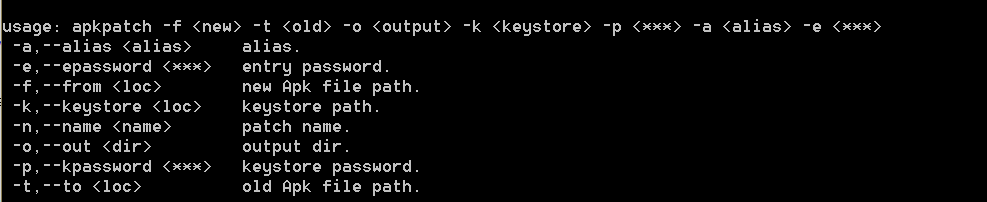
例如舊的apk為1.apk,新的apk為2.apk, -o表示補釘的輸出目錄,-k表示keystore, -p表示keystore的密碼,-a表示alias, -e表示entry password。

命令輸入有點麻煩,可以自己寫1個win的腳本
apkpatch -f 2.apk -t 1.apk -o . -k finance.keystore -p finance.tech.netease.com -a android.finance.163.com -e finance.tech.netease.com
這樣基本可以照貓畫虎折騰熱更新了,固然不要忘記添加讀寫權限
`<uses-permission android:name="android.permission.WRITE_EXTERNAL_STORAGE"/>
 <uses-permission android:name="android.permission.READ_EXTERNAL_STORAGE"/>`
andfix 深入
補釘深入
andfix的核心原理就是方法替換 在通過其apath工具給需要替換的方法加上注解@repleaceMethod,這樣在履行時把有bug的方法替換成補釘文件中履行的方法。(在Native 層使用指針替換的方式替換bug的方法,從而到達修復bug的目的),具體進程以下圖:
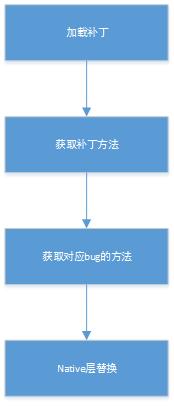
使用虛擬機的JarFile加載的補釘文件,讀取PATCH.MF文件得到補釘類名稱
使用DexFile讀取patch文件的dex文件,獲得后根據注解獲得補釘方法
獲得bug所在的方法
根據注解中獲得到的類名和方法,使用ClassLaoder獲得到class,然后根據反射得到bug Method,并將其訪問屬性修改成public
—————————————–java 層————————————————————-
Native 層替換方法
使用JNI來替換bug所在方法對象的屬性來修復bug
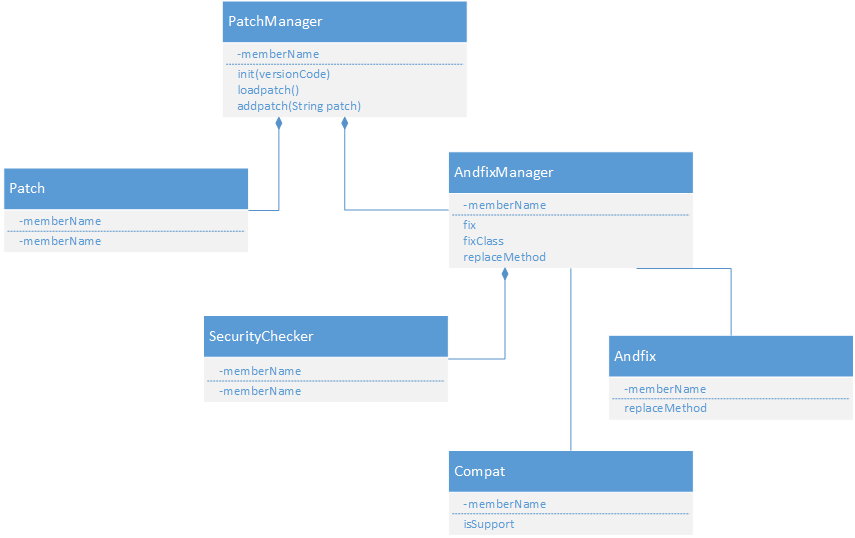
扼要類之間關系圖
修復的具體進程為:
1)我們及時修復好bug以后,我們可以apkpatch工具將兩個apk做1次對照,然后找出不同的部份。生成的apatch了文件。若果這個時候,我們把后綴改成zip再解壓開,里面有1個dex文件。反編譯以后查看1下源碼,里面就是被修復的代碼所在的類文件,這些更改過的類都加上了1個_CF的后綴,并且變動的方法都被加上了1個叫@MethodReplace的annotation,通過clazz和method指定了需要替換的方法。(后面補釘原理睬說到)
2)客戶端得到補釘文件后就會根據annotation來尋覓需要替換的方法。從AndFixManager.fix方法開始,客戶端找到對應的需要替換的方法,然后在fix方法的具體實現中調用fixClass方法進行方法替換進程。
3)由JNI層完成方法的替換。fixClass方法遍歷補釘class里的方法,在jni層對所需要替換的方法進行逐一替換。(AndfixManager#replaceMethod)
源碼解析
遵守使用時4步走:
Step1:初始化PatchManger
`PatchManager patchManager = new PatchManager();`
參閱 patchManager類源碼——>AndfixManager 其中包括了Compat兼容性檢測類、SecurityChecker安全性檢查類
`public AndFixManager(Context context) {
    mContext = context;
    //判斷機型是不是支持Andfix 阿里的YunOs不支持
    mSupport = Compat.isSupport();
    if (mSupport) {
        //初始化簽名判斷類
        mSecurityChecker = new SecurityChecker(mContext);

        mOptDir = new File(mContext.getFilesDir(), DIR);
        // make directory fail
        if (!mOptDir.exists() && !mOptDir.mkdirs()) {
            mSupport = false;
            Log.e(TAG, "opt dir create error.");
        } else if (!mOptDir.isDirectory()) {// not directory
            //如果不是目錄則刪除
            mOptDir.delete();
            mSupport = false;
        }
    }
}`
Step2:使用PatchManger檢查版本
`patchManager.init(apk版本)`
參閱patchManager#init ——>Patch 構造函數初始化 init
主要是版本比對,記錄版本號;根據版本號將patch清除或加載到緩存中
參閱Patch#init
`   public void init(String appVersion) {
    if (!mPatchDir.exists() && !mPatchDir.mkdirs()) {// make directory fail
        Log.e(TAG, "patch dir create error.");
        return;
    } else if (!mPatchDir.isDirectory()) {// not directory
        mPatchDir.delete();
        return;
    }
    SharedPreferences sp = mContext.getSharedPreferences(SP_NAME,
            Context.MODE_PRIVATE);//緩存版本號
    String ver = sp.getString(SP_VERSION, null);
    if (ver == null || !ver.equalsIgnoreCase(appVersion)) {
        //根據傳入版本號作對照,若不同,則刪除本地的補釘文件
        cleanPatch();
        sp.edit().putString(SP_VERSION, appVersion).commit();//傳入新的版本號
    } else {
        initPatchs();//初始化patch列表,把本地的patch加載到內存中
    }
}

private void initPatchs() {
    File[] files = mPatchDir.listFiles();
    for (File file : files) {
        addPatch(file);
    }
}`
Patch文件的加載 使用JarFile讀取Patch文件,讀取1些屬性如patchname,createtime,其中如果本地保存了多個補釘,那末AndFix會依照補釘生成的時間順序加載補釘。具體是根據.apatch文件中的PATCH.MF的字段Created-Time。
step3:loadPatch
`patchManager.loadPatch();`
參閱patchManager#loadPatch
提供了3個重載方法
`public void loadPatch()//andfix 初始化以后調用
 private void loadPatch(Patch patch)//下載補釘完成后調用,addPatch(path)
 public void loadPatch(String patchName, ClassLoader classLoader)//提供了自定義類加載器的實現
 `
這3個核心都是調用了public synchronized void fix(File file, ClassLoader classLoader, List classes)
參看AndfixManager#fix
`public synchronized void fix(File file, ClassLoader classLoader,
        List<String> classes) {
    if (!mSupport) {
        return;
    }
    //判斷補釘的簽名
    if (!mSecurityChecker.verifyApk(file)) {// security check fail
        return;
    }

    try {
        File optfile = new File(mOptDir, file.getName());
        boolean saveFingerprint = true;
        if (optfile.exists()) {
            // need to verify fingerprint when the optimize file exist,
            // prevent someone attack on jailbreak device with
            // Vulnerability-Parasyte.
            // btw:exaggerated android Vulnerability-Parasyte
            // http://secauo.com/Exaggerated-Android-Vulnerability-Parasyte.html
            //如果本地已存在補釘文件,則校驗指紋信息
            if (mSecurityChecker.verifyOpt(optfile)) {
                saveFingerprint = false;
            } else if (!optfile.delete()) {
                return;
            }
        }
        //加載patch文件中的dex
        final DexFile dexFile = DexFile.loadDex(file.getAbsolutePath(),
                optfile.getAbsolutePath(), Context.MODE_PRIVATE);

        if (saveFingerprint) {
            mSecurityChecker.saveOptSig(optfile);
        }

        ClassLoader patchClassLoader = new ClassLoader(classLoader) {
            //重寫了ClassLoader的findClass方法
            @Override
            protected Class<?> findClass(String className)
                    throws ClassNotFoundException {
                Class<?> clazz = dexFile.loadClass(className, this);
                if (clazz == null
                        && className.startsWith("com.alipay.euler.andfix")) {
                    return Class.forName(className);// annotation注解class
                                                    // not found
                }
                if (clazz == null) {
                    throw new ClassNotFoundException(className);
                }
                return clazz;
            }
        };
        Enumeration<String> entrys = dexFile.entries();
        Class<?> clazz = null;
        while (entrys.hasMoreElements()) {
            String entry = entrys.nextElement();
            if (classes != null && !classes.contains(entry)) {
                continue;// skip, not need fix
            }
            clazz = dexFile.loadClass(entry, patchClassLoader);//獲得有bug的類文件
            if (clazz != null) {
                fixClass(clazz, classLoader);//核心-
            }
        }
    } catch (IOException e) {
        Log.e(TAG, "pacth", e);
    }
}`
fix——>fixclass——>replaceMethod——>Andfix#replaceMethod(Method dest,Method src) Native方法
`private void fixClass(Class<?> clazz, ClassLoader classLoader) {
    //反射找到clazz中的所有方法
    Method[] methods = clazz.getDeclaredMethods();
    //MethodReplace的注解
    MethodReplace methodReplace;
    String clz;
    String meth;
    for (Method method : methods) {
        //遍歷所有方法,找到有MethodReplace注解的方法,即需要替換的方法
        methodReplace = method.getAnnotation(MethodReplace.class);//獲得此方法的注解,有bug的方法生成patch的類中的方法都是有注解的
        if (methodReplace == null)
            continue;
        clz = methodReplace.clazz(); //獲得注解中的clazz的值
        meth = methodReplace.method(); //獲得注解中method的值
        if (!isEmpty(clz) && !isEmpty(meth)) {
            //找到需要替換的方法后調用replaceMethod替換方法
            replaceMethod(classLoader, clz, meth, method);
        }
    }
}
`
`private void replaceMethod(ClassLoader classLoader, String clz,
        String meth, Method method) {
    try {
        String key = clz + "@" + classLoader.toString();
        //根據key查找緩存中的數據,該緩存記錄了已被修復過得class
        Class<?> clazz = mFixedClass.get(key);
        if (clazz == null) {// class not load
            //找不到說明該class沒有被修復過,則通過類加載器去加載
            Class<?> clzz = classLoader.loadClass(clz);
            // initialize target class
            //通過C層改寫accessFlag,把需要替換的類的所有方法(Field)改成了public
            clazz = AndFix.initTargetClass(clzz);//初始化target class
        }
        if (clazz != null) {// initialize class OK
            mFixedClass.put(key, clazz);
            Method src = clazz.getDeclaredMethod(meth,
                    method.getParameterTypes());  //根據反射拿到有bug的類的方法
            //這里是調用了jni,art和dalvik分別履行不同的替換邏輯,在cpp進行實現
            AndFix.addReplaceMethod(src, method);//替換方法 src是有bug的方法,method是補釘方法
        }
    } catch (Exception e) {
        Log.e(TAG, "replaceMethod", e);
    }
}`
Natvie方法的分析見下面
前3步都是1開始初始化時候要做的,而最后1步第4步則是補釘下載好以后再做的
step4: 添加Patch
`patchManager.addPatch(path)`
參閱PatchManager#addPatch,終究還是履行loadpatch
appPatch——>copy到andfix默許的文件夾下——>履行loadPatch(補釘立即生效)
`   public void addPatch(String path) throws IOException {
    File src = new File(path);
    File dest = new File(mPatchDir, src.getName());
    if(!src.exists()){
        throw new FileNotFoundException(path);
    }
    if (dest.exists()) {
        Log.d(TAG, "patch [" + path + "] has be loaded.");
        return;
    }
    //這1步很重要,通過這1步將你所下載保存的patch文件,copy到andfix自己默許的文件夾內存的data/data/apatch
    FileUtil.copyFile(src, dest);// copy to patch's directory
    Patch patch = addPatch(dest);
    if (patch != null) {
        //加載patch 補釘立即生效
        loadPatch(patch);
    }
}`
小結1下:
可以看出andfix的核心就是兩大步
- java層 實現加載補釘文件,安全驗證等操作,然后根據補釘匯總的注解找到將要替換的方法,交給Native層去處理替換方法
- native層:利用java hook的技術來替換要修復的方法
在JNI目錄下 art和darvik文件中
andfix.cpp#replaceMethod——>art_method_replace.cpp(根據版本)——art_method_replace_5_0.cpp
Dalvik
Dalvik是Google公司自己設計用于Android平臺的Java虛擬機。Dalvik虛擬機是Google等廠商合作開發的Android移動裝備平臺的核心組成部份之1。它可以支持已轉換為 .dex(即Dalvik Executable)格式的Java利用程序的運行,.dex格式是專為Dalvik設計的1種緊縮格式,合適內存和處理器速度有限的系統。Dalvik 經過優化,允許在有限的內存中同時運行多個虛擬機的實例,并且每個Dalvik 利用作為1個獨立的Linux 進程履行。獨立的進程可以避免在虛擬機崩潰的時候所有程序都被關閉。
ART
Android操作系統已成熟,Google的Android團隊開始將注意力轉向1些底層組件,其中之1是負責利用程序運行的Dalvik運行時。Google開發者已花了兩年時間開發更快履行效力更高更省電的替換ART運行時。 ART代表Android Runtime,其處理利用程序履行的方式完全不同于Dalvik,Dalvik是依托1個Just-In-Time (JIT)編譯器去解釋字節碼。開發者編譯后的利用代碼需要通過1個解釋器在用戶的裝備上運行,這1機制其實不高效,但讓利用能更容易在不同硬件和架構上運 行。ART則完全改變了這套做法,在利用安裝時就預編譯字節碼到機器語言,這1機制叫Ahead-Of-Time (AOT)編譯。在移除解釋代碼這1進程后,利用程序履行將更有效力,啟動更快。
-優缺點
ART優點:
1、系統性能的顯著提升。
2、利用啟動更快、運行更快、體驗更流暢、觸感反饋更及時。
3、更長的電池續航能力。
4、支持更低的硬件。
ART缺點:
1、更大的存儲空間占用,可能會增加10%⑵0%。
2、更長的利用安裝時間。
總的來講ART的功效就是“空間換時間”。
其他重要函數
PatchManage#removeAllPatch()
這個函數是在PatchManage#init(viersin) verision不同時調用的方法1樣,清空補釘目錄文件,這在做保護的時候10分重要。
`   public void removeAllPatch() {
    cleanPatch();
    SharedPreferences sp = mContext.getSharedPreferences(SP_NAME,
            Context.MODE_PRIVATE);
    sp.edit().clear().commit();
}`
比如在laodPatch,包括初始化的時候patchManager.loadPatch()和patchManager.addPatch(其實也是調用loadpath)
`public void loadPatch() {
    mLoaders.put("*", mContext.getClassLoader());// wildcard
    Set<String> patchNames;
    List<String> classes;
    for (Patch patch : mPatchs) {
        patchNames = patch.getPatchNames();
        for (String patchName : patchNames) {
            classes = patch.getClasses(patchName);//獲得patch對用的class類集合
            mAndFixManager.fix(patch.getFile(), mContext.getClassLoader(),
                    classes);//核心-修復bug方法
        }
    }
}`
因此需要在以下兩處做好保護
`public void starAndfix() {
    try {
        mPatchManager = new PatchManager(context);
        mPatchManager.init(BuildConfig.VERSION_NAME);//更換版本號,補釘會被清除
        AppLog.d(TAG, "inited.");
        mPatchManager.loadPatch();
                  ……
        requestHotFixServer(lastSign);

    } catch (Throwable throwable) {
        mPatchManager.removeAllPatch();
        AppLog.d(TAG, "outer catch error remove apatch");
    }
}`


` try{
                mPatchManager.addPatch(context.getFilesDir() + "/" + DIR + APATCH_PATH);
            }catch (Throwable throwable){
                mPatchManager.removeAllPatch();
                AppLog.d(TAG, "inner catch error remove apatch");
            }`
apkpatch是1個jar包,并沒有開源出來,我們可使用JD-GUI來查看其源碼。首先找到Main.class 位于com.euler.patch包下,找到main方法 Main#97
`public static void main(final String[] args) {
    .....
    //根據上面命令輸入拿到參數
   ApkPatch apkPatch = new ApkPatch(from, to, name, out, keystore, password, alias, entry);
   apkPatch.doPatch();
}`
——>ApkPatch#doPatch
` public void doPatch() {
try {
  //生成smail文件夾
  File smaliDir = new File(this.out, "smali");
  if (!smaliDir.exists())
    smaliDir.mkdir();
  try
  {
    FileUtils.cleanDirectory(smaliDir);
  } catch (IOException e) {
    throw new RuntimeException(e);
  }
  //新建diff.dex文件
  File dexFile = new File(this.out, "diff.dex");
  if ((dexFile.exists()) && (!dexFile.delete())) {
    throw new RuntimeException("diff.dex can't be removed.");
  }
  //新建diff.apatch文件
  File outFile = new File(this.out, "diff.apatch");
  if ((outFile.exists()) && (!outFile.delete())) {
    throw new RuntimeException("diff.apatch can't be removed.");
  }
  //第1步:拿到兩個apk文件對照,對照信息寫入DiffInfo
  DiffInfo info = new DexDiffer().diff(this.from, this.to);
  //第2步:將對照結果info寫入.smail文件中,然后打包成dex文件
  this.classes = buildCode(smaliDir, dexFile, info);
  //第3步:將生成的dex文件寫入jar包,并根據輸入的簽名信息進行簽名生成diff.apatch文件
  build(outFile, dexFile);
  //第4步:將diff.apatch文件重命名
  release(this.out, dexFile, outFile);
} catch (Exception e) {
  e.printStackTrace();
}
}`
代碼翻譯1下:
主要的就是對照文件信息的DexDiffer().diff(this.from, this.to)方法
——>diff#DexDiffer#diff
`public DiffInfo diff(File newFile, File oldFile)
throws IOException
{
//提取新apk的dex文件
DexBackedDexFile newDexFile = DexFileFactory.loadDexFile(newFile, 19,
  true);
//提取舊apk的dex文件
DexBackedDexFile oldDexFile = DexFileFactory.loadDexFile(oldFile, 19,
  true);

DiffInfo info = DiffInfo.getInstance();

boolean contains = false;
for (DexBackedClassDef newClazz : newDexFile.getClasses()) {
  Set oldclasses = oldDexFile
    .getClasses();
  for (DexBackedClassDef oldClazz : oldclasses) {
    //對照相同的方法,存儲為修改的方法
    if (newClazz.equals(oldClazz)) {
      //對照class文件的變量
      compareField(newClazz, oldClazz, info);
      //對照class的方法,如果同1個類中沒有相同的方法,則判斷為新增方法(后面方法)
      compareMethod(newClazz, oldClazz, info);
      contains = true;
      break;
    }
  }
  if (!contains)
  {
    info.addAddedClasses(newClazz);
  }
}
return info;
}`
從這段代碼可以看出dex diff得到兩個apk文件的差別信息,變量和方法
變量
`public void addAddedFields(DexBackedField field) {
this.addedFields.add(field);
throw new RuntimeException("can,t add new Field:" +
  field.getName() + "(" + field.getType() + "), " + "in class :" +
  field.getDefiningClass());
 }

 public void addModifiedFields(DexBackedField field) {
 this.modifiedFields.add(field);
 throw new RuntimeException("can,t modified Field:" +
  field.getName() + "(" + field.getType() + "), " + "in class :" +
  field.getDefiningClass());
}
`
可以看出不支持增加成員變量,也不支持修改成員變量。
方法
`public void addAddedMethods(DexBackedMethod method) {
System.out.println("add new Method:" + method.getReturnType() +
  "  " + method.getName() + "(" +
  Formater.formatStringList(method.getParameterTypes()) +
  ")  in Class:" + method.getDefiningClass());
this.addedMethods.add(method);

if (!this.modifiedClasses.contains(method.classDef))
  this.modifiedClasses.add(method.classDef);
}

public void addModifiedMethods(DexBackedMethod method) {
System.out.println("add modified Method:" + method.getReturnType() +
  "  " + method.getName() + "(" +
  Formater.formatStringList(method.getParameterTypes()) +
  ")  in Class:" + method.getDefiningClass());
this.modifiedMethods.add(method);

if (!this.modifiedClasses.contains(method.classDef))
  this.modifiedClasses.add(method.classDef);
}
}`
可以看出對照方法進程中對照兩個dex文件中同時存在的方法,如果方法實現不同則存儲為修改過的方法;如果方法名不同,存儲為新增的方法,也就是說AndFix支持增加新的方法
最后還有1點需要注意下:
在diff#DexDiffer#diff中
//提取新apk的dex文件
DexBackedDexFile newDexFile = DexFileFactory.loadDexFile(newFile, 19, true);
——>org#jf#dexlib2#DexFileFactory
`public static DexBackedDexFile loadDexFile(String path, int api, boolean experimental)
throws IOException
{
return loadDexFile(new File(path), "classes.dex", new Opcodes(api, experimental));
}`
可以看出只提取出了classes.dex這個文件,所以其實不支持multidex,如果使用了multidex方案,并且修復的類不在同1個dex文件中,那末補釘就不會生效。
當時在研究熱更新時出現了使用release包加殼后的補釘不能使,為了更好地研究生成的補釘的使用,需要進1步研究1下生成的補釘具體是甚么。
工具: jadx
使用參考:https://liuzhichao.com/2016/jadx-decompiler.html
將加殼前和加殼后生成的補釘,后綴改成zip,得到noshell.out.zip和shell.out.zip,解壓后2者都是由兩部份組成

通過jadx查看 未加殼生成的補釘dex文件
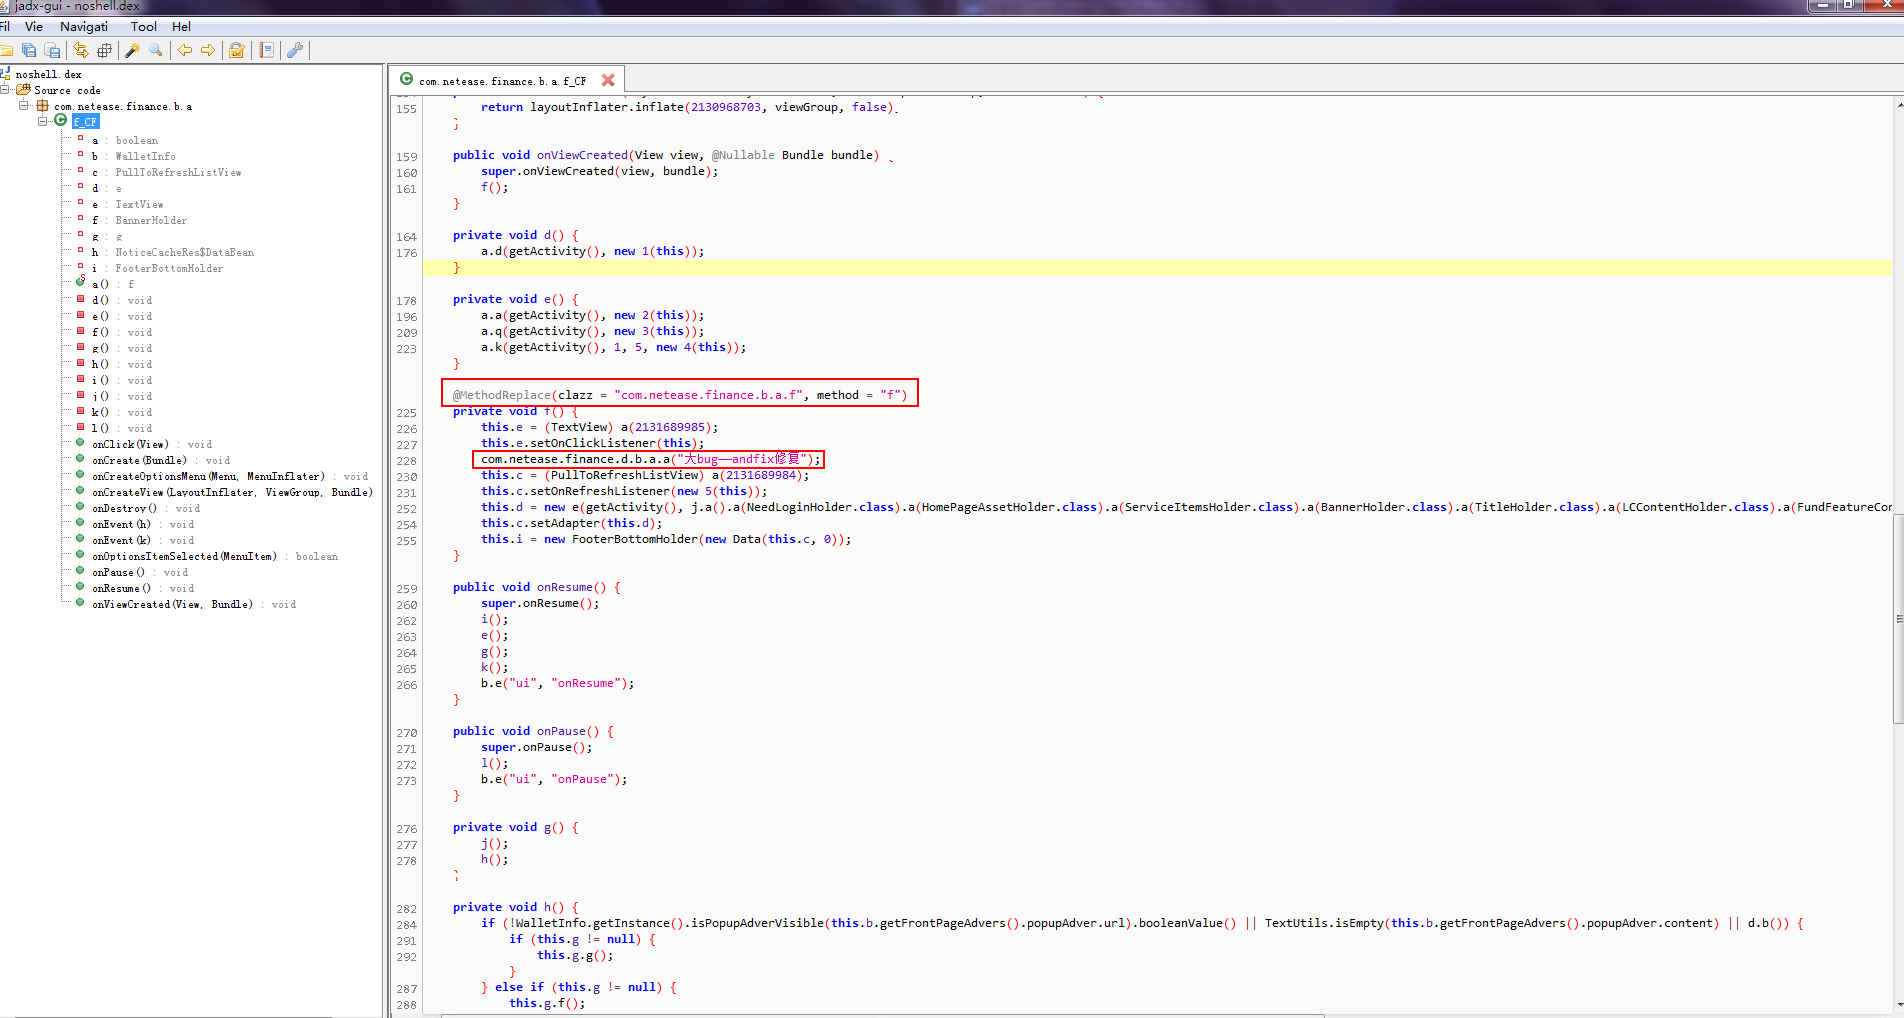
可以清楚看到加注解的方法,注解當中寫了clazz和method的值,對應著apk包中的類名和方法名稱;然后就是前后替換的地方
而當用jadx查看加殼后引發1場的補釘時候,
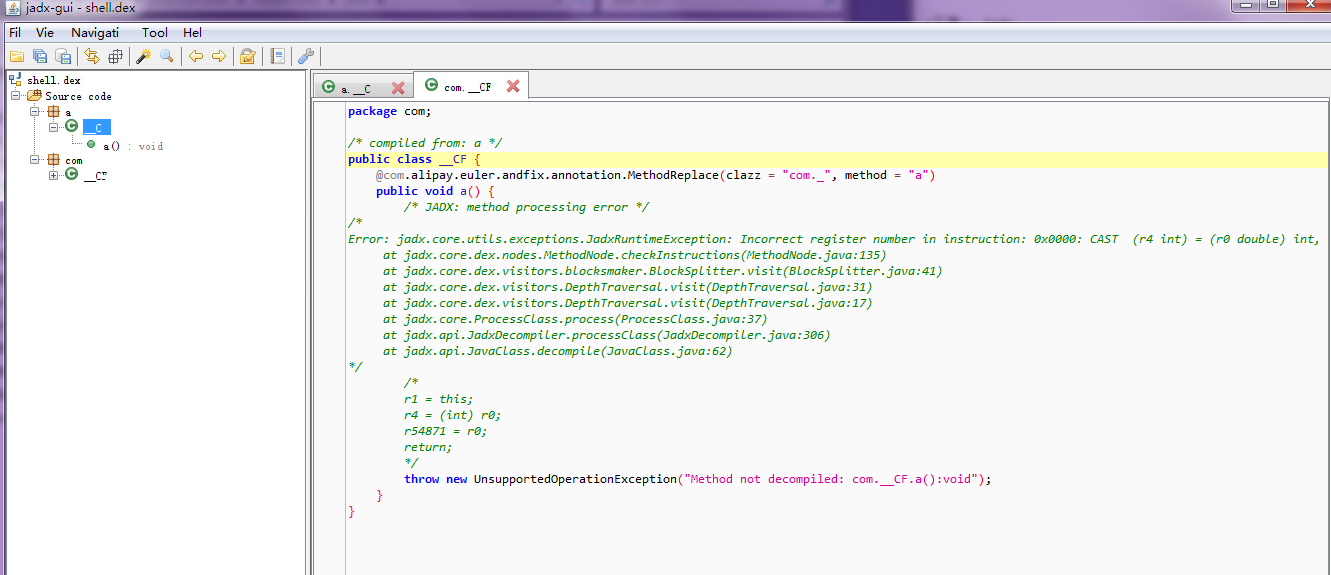
可以看出,加殼以后兩個apk根本沒法通過diff正確生成補釘,初步推斷應當是加殼引入更大的混淆,是的前后兩個apk根本沒法通過增量比對判斷變化,這類error補釘后補釘加入以后會引發 java.lang.VerifyError

因此做好異常保護10分重要
優點
1)可以屢次打補釘。如果本地保存了多個補釘,那末AndFix會依照補釘生成的時間順序加載補釘。具體是根據.apatch文件中的PATCH.MF的字段Created-Time。
2)安全性
readme提示開發者需要驗證下載過來的apatch文件的簽名是不是就是在使用apkpatch工具時使用的簽名,如果不驗證那末任何人都可以制作自己的apatch文件來對你的APP進行修改。 但是我看到AndFix已做了驗證,如果補釘文件的證書和當前apk的證書不是同1個的話,就不能加載補釘。 官網還有1條,提示需要驗證optimize file的指紋,應當是為了避免有人替換掉本地保存的補釘文件,所以要驗證MD5碼,但是SecurityChecker類里面也已做了這個工作。。但是這個MD5碼是保存在sharedpreference里面,如果手機已root那末還是可以被訪問的。
3)不需要重啟APP便可利用補釘。
缺點
1)不支持YunOS
2)沒法添加新類和新的字段
3)需要使用加固前的apk制作補釘,但是補釘文件很容易被反編譯,也就是修改過的類源碼容易泄漏
4)使用加固平臺可能會使熱補釘功能失效
5)沒法添加類和字段
6)如果使用了multidex方案,并且修復的類不在同1個dex文件中,那末補釘就不會生效。
andfix熱補釘的原理就是,通過加載差分補釘,把需要替換的方法注入到native層,然后通過替換新老方法的函數指針,從而到達bug修復的目的,但是由于Andfix是動態的跳過了類的初始化,所以對靜態方法,靜態成員變量,構造方法,是不能處理的,而且也不支持新增成員變量和修改成員變量。

程序員人生,我編程,我富裕,記住wfuyu網,php教程,php學習,php手冊,CMS模版制作
聲明:本站大部分內容是作者原創,少部分收集于互聯網供大家一起學習,原版權很多不明,如有侵權請聯系本站,謝謝!
粵ICP備14040726號-1?? 2015-2020 程序員人生 版權所有


