

布局很簡單,只羅列 關鍵部位的代碼
_renderAddImageView(index){
    if (this.state.avatarSource!=null&&index<this.state.avatarSource.length) {
       return(
         <Image
           source={require('../../img/service/虛線框.png')}
           style ={addImageViewStyles.image}>
           <Image source={this.state.avatarSource[index]} style={addImageViewStyles.imageL} />
           <TouchableOpacity
             onPress ={this.deleteLoadedImage.bind(this,index)}
             style={addImageViewStyles.rightDelButton}>
             <Image source={require('../../img/service/刪除.png')}/>
           </TouchableOpacity>
         </Image>
       );
    }
    if ((this.state.avatarSource==null||this.state.avatarSource.length<1)&&index==1){
        return null;
    }
    return (
      <Image
      source={require('../../img/service/虛線框.png')}
      style ={styles.image}>
      <TouchableOpacity onPress = {this.addOnClicked.bind(this)}>
        <Image source={require('../../img/service/添加.png')}></Image>
      </TouchableOpacity>
      <Text style ={styles.normalTitle}>上傳圖片</Text>
      <Text style ={styles.normalText}>(最多能上傳2張)</Text>
      </Image>
    );
}根據不同端訪問相冊的不同可分別處理 ,由于觸及到原生和react native 的混合開發,相對復雜建議使用1個兼容iOS 和Android的第3方庫來實現該功能。下面的示例使用的是react-native-image-picker 。
ImagePicker.launchImageLibrary(options, (response)  => {
      if (response.didCancel) {
        console.log('用戶點擊了取消');
      }
      else if (response.error) {
        console.log('ImagePicker 出錯: ', response.error);
      }
      else {
        let source = {uri: 'data:image/jpeg;base64,' + response.data, isStatic: true};
        if (Platform.OS === 'ios') {
           source = {uri: response.uri.replace('file://', ''), isStatic: true};
        } else {
           source = {uri: response.uri, isStatic: true};
        }
        let imageArray = this.state.avatarSource;
        imageArray.push(source);
        let imgFileNameArray = this.state.imgFileName;
        if (response.fileName!=null) {
            imgFileNameArray.push(response.fileName);
        }
        this.setState({
          avatarSource:imageArray,
          imgFileName:imgFileNameArray
        });
      }
});封裝上傳文件的接口
function fetchUploadAction(...props) {
  this.url = props.shift(1);
  this.options = props.shift(1);
  return fetch(this.url, Object.assign({}, this.options))
  .then((response) => {
    const bodyBlob = response["_bodyBlob"];
    if (bodyBlob != null && bodyBlob.size == 0) {
       return null;
    }
    const headers = response["headers"]
    if (headers != null) {
      const mapHeader = headers["map"];
      if (mapHeader != null) {
        contentLength = mapHeader["content-length"];
        if (contentLength != null && contentLength == 0) {
          return null;
        }
      }
    }
    return response.json()
  });
調用上面的接口,專門用來上傳圖片
//imagesObject是存儲調用相冊返回的選中的圖片的多個對象,可取得圖片uri
//fileName 這幾個對象對應的文件名,也可不要這個參數 從上面的uri中截取
function postUpLoadImage_Attachment(imagesObject,fileName) {
    var apiPort = "v1/cases/attachments/";
    let retObject = null;
    for(let i=0;imagesObject!=null&&i<imagesObject.length;i++){
      let formData = new FormData();
      let tmpUri =imagesObject[i];
      //DateFormatTool.GetDateTimeStrValue() 是獲得當前時間的時間戳字符串
      let tmpfileName=DateFormatTool.GetDateTimeStrValue()+"_"+i+"_"+fileName[i];
      let file = {uri:tmpUri.uri,type:'multipart/form-data',name:tmpfileName};
      formData.append("attachment",file);
      retObject=fetchUploadAction(`${kParCRMAPIBaseURL}/${apiPort}`, {
        method: 'post',
        headers: {
            'Content-Type':'multipart/form-data',
         },
         body: formData,
      });
    }
    return retObject;
},try {
CRMServiceApiNet.postUpLoadImage_Attachment(this.state.avatarSource,this.state.imgFileName)
.then((response) => {
this.updateLoadingState(false);
if(response!=null&&response.code) {
HandleErrorManager.handleObj(response);
} else {
console.log("上傳成功"+response);
this.sendTheQuestionSuccess();
}
})
} catch(e) {
this.updateLoadingState(false);
StandardAlertCom.show('提示','網絡毛病',[
{
text: '肯定',
onPress: () => console.log('肯定 Pressed!')
}
]);
}安裝Apache ,配置服務器環境 , 設置最大的上傳文件的大小和上傳文件的并發個數 ,和要上傳到的目錄的屬性必須為可寫。。。下面是以mac 電腦為例,配置服務器相干屬性。
這1步跳過 ,由于mac 上自帶 Apache 環境 。
使用命令行工具 cd 到 /etc目錄 如圖

運行命令 ls *php* ,找到php.init 文件,如果沒有 則找到 php.ini.default copy 1份,
注意將原文件copy 1份 ,以防修改出錯
file_uploads = on ;是不是允許通過HTTP上傳文件的開關。默許為ON即是開
upload_max_filesize = 8m ; 即允許上傳文件大小的最大值。默許為2M
post_max_size = 8m ;指通過表單POST給PHP的所能接收的最大值,包括表單里的所有值。默許為8M
1般地,設置好上述4個參數后,上傳<=100M的文件是不成問題,在網絡正常的情況下。
但如果要上傳>8M的大體積文件,只設置上述4項還1定能行的通。還得設置以下參數:
max_execution_time = 600 ;每一個PHP頁面運行的最大時間值(秒),默許30秒
max_input_time = 600 ;每一個PHP頁面接收數據所需的最大時間,默許60秒
memory_limit = 8m ;每一個PHP頁面所吃掉的最大內存,默許8M
如果上面配置后還不成功,你可以把php.ini.default 再配置1下。
函數原型: pathinfo(path,options)
定義和用法
pathinfo() 函數以數組或字符串的情勢返回關于文件路徑的信息。
返回的數組元素以下:
[dirname]: 返回文件路徑中的目錄部份
[basename]: 返回文件路徑中文件名的部份
[extension]: 返回文件路徑中文件的類型的部份
定義和用法
file_exists() 函數檢查文件或目錄是不是存在。
如果指定的文件或目錄存在則返回 true,否則返回 false。
語法
file_exists(path)
參數 描寫
path 必須。規定要檢查的路徑。
getimagesize() 函數用于獲得圖象尺寸,類型等信息。
本函數可用來獲得 GIF、JPEG 及 PNG 格式的圖片的高與寬,(不需要安裝 GD library 就能夠使用本函數)
返回的數據解析(成功返回1個數組,失敗則返回 FALSE )
返回的數組有4個元素。
返回數組的第1個元素 (索引值 0) 是圖片的高度,單位是像素 (pixel)。
第2個元素 (索引值 1) 是圖片的寬度。
第3個元素 (索引值 2) 是圖片的文件格式,其值 1 為 GIF 格式、 2 為 JPEG/JPG 格式、3 為 PNG 格式。
第4個元素 (索引值 3) 為圖片的高與寬字符串,height=xxx width=yyy。可省略的參數 imageinfo 用來獲得1些圖片的相干信息.
函數原型 : move_uploaded_file(file ,newloc)
參數描寫
file 必須。規定要移動的文件。
newloc 必須。規定文件的新位置。
說明
該函數檢查并確保由 file 指定的文件是合法的上傳文件(即通過 PHP 的 HTTP POST 上傳機制所上傳的)。如果文件合法,則將其移動為由 newloc 指定的文件。
如果 file 不是合法的上傳文件,不會出現任何操作,move_uploaded_file() 將返回 false。
如果 file 是合法的上傳文件,但出于某些緣由沒法移動,不會出現任何操作,move_uploaded_file() 將返回 false,另外還會發出1條正告。
這類檢查顯得格外重要,如果上傳的文件有可能會造成對用戶或本系統的其他用戶顯示其內容的話。
本代碼設計1個文件上傳管理類 ,定義1系列的操作。$this->retErrorDetail 為返回的毛病信息,如果沒有出錯該值則為 null 。如果上傳成功則返回1個json 數據,(哪些文件上傳成功,文件的參數,哪些失敗,失敗的緣由)。
下面是主要函數的示例代碼:
function handleUploadAndSave($formkey){
$FilekeyValue_FormData =$formkey;
$theFile = $_FILES[$FilekeyValue_FormData]["tmp_name"];
//Post multipart
if ($_FILES[$FilekeyValue_FormData]["error"] > 0){
$this->retErrorDetail="Error: " . $_FILES[$FilekeyValue_FormData]["error"];
$this->formatDetailError($this->retErrorDetail);
return false;
}else{
//打印上傳2進制文件信息
foreach($_FILES[$FilekeyValue_FormData] as $key=>$value){
$this->formatDetailSuccess($key."=>".$value. "\n");
}
//定義上傳的文件 保存的路徑
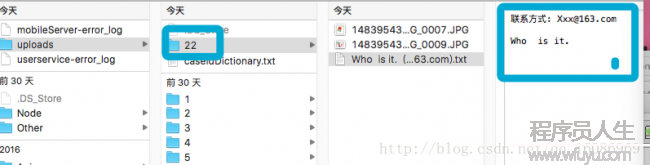
$target_dir = "/Users/XXXX/myWebServer/uploads/".$this->caseId."/";
$target_file = $target_dir.basename($_FILES[$FilekeyValue_FormData]["name"]);
$uploadOK = 1;
$imageFileType = pathinfo($target_file,PATHINFO_EXTENSION);
// 檢查 上傳的文件是不是為圖片
$check = getimagesize($theFile);
if($check !== false) {
$this->formatDetailSuccess("文件是1個 圖片- " . $check["mime"] . ".");
$uploadOk = 1;
} else {
$this->retErrorDetail="文件不是圖片.";
$this->formatDetailError($this->retErrorDetail);
$uploadOk = 0;
}
// 檢測要上傳的文件是不是 已被上傳(在該目錄下是不是已存在該文件)
if (file_exists($target_file)) {
$this->retErrorDetail="抱歉, 該文件已存在.";
$this->formatDetailError($this->retErrorDetail);
$uploadOk = 0;
}
//檢測要上傳文件的大小 >1mb
if ($_FILES[$FilekeyValue_FormData]["size"] > 1024*1024) {
$this->retErrorDetail="抱歉, 您上傳的文件太大了";
$this->formatDetailError($this->retErrorDetail);
$uploadOk = 0;
}
//檢測后綴名稱
$imageFileType = strtolower($imageFileType);
if($imageFileType != "jpg" && $imageFileType != "png" && $imageFileType != "jpeg"
&& $imageFileType != "gif" ) {
$this->retErrorDetail= "抱歉, 僅支持 JPG, JPEG, PNG & GIF files";
$this->formatDetailError($this->retErrorDetail);
$uploadOk = 0;
}
//檢測是不是上傳成功
if ($uploadOk == 0) {
$this->retErrorDetail="抱歉, 您的文件沒有被上傳成功.";
$this->formatDetailError($this->retErrorDetail);
} else {
if (!mkdir("uploads")){
$this->formatDetailSuccess("創建目錄失敗");
return false;
}
if (move_uploaded_file($theFile,$target_file))
{
$this->formatDetailSuccess("文件已被上傳成功.");
} else {
$this->retErrorDetail="抱歉, 保存文件時出現未知毛病.";
$this->formatDetailError($this->retErrorDetail);
}
}
}
if($uploadOk==0){
return false;
}
return true;
}
在 uploads 目錄下 ,找到創建的case 。(聯系方式和具體的描寫寫在 文檔里)

程序員人生,我編程,我富裕,記住wfuyu網,php教程,php學習,php手冊,CMS模版制作
聲明:本站大部分內容是作者原創,少部分收集于互聯網供大家一起學習,原版權很多不明,如有侵權請聯系本站,謝謝!
粵ICP備14040726號-1?? 2015-2020 程序員人生 版權所有


