
最開始使用AndroidStudio的時候,各種不適應,各種懷戀Eclipse,寫了幾千行代碼委曲熟習了AndroidStudio后,感覺AndroidStudio不要太棒了。
學習Retrofit也是這樣,遇到麻煩就想去用之前用過的框架,熟習了過后我現在連吃個湯圓都喜歡串著吃,囧….
固然實際的項目開發中,不可能給我們時間漸漸去適應、去學習,要斟酌技術風險和學習本錢、團隊共用。所以我才覺得Retrofit這1點好貼心,基于OkHttp實現,也就是說我當我遇到我不知道該怎樣實現的功能的時候,可以無縫切換到OkHttp上面實現需求。
看看下面的代碼,一樣申明1個要求call,一樣的異步call.enqueue,一樣的回調Callback,乃至連mDatas = new Gson().fromJson(res, new TypeToken<List<SearchImage>>Gson解析都是從前的味道。但是我們已開始在使用Retrofit了,不知不覺,潛移默化中已前進了1小步。
    private void initBtnBasic() {
        mBtnBasic.setOnClickListener(new View.OnClickListener() {
            @Override
            public void onClick(View v) {
                Retrofit build = new Retrofit.Builder().baseUrl("http://zhuangbi.info/").build();
                Call<ResponseBody> call = build.create(SearchApi.class).basicSearch("牛逼");
                call.enqueue(new Callback<ResponseBody>() {
                    @Override
                    public void onResponse(Call<ResponseBody> call, Response<ResponseBody> response) {
                        try {
                            String res = response.body().string();
                            mDatas = new Gson().fromJson(res, new TypeToken<List<SearchImage>>() {
                            }.getType());
                            for (SearchImage searchImage : mDatas) {
                                Log.d(TAG, "onResponse: " + searchImage.toString());
                            }
                        } catch (IOException e) {
                            e.printStackTrace();
                        }
                    }

                    @Override
                    public void onFailure(Call<ResponseBody> call, Throwable t) {
                        Log.e(TAG, "onFailure: ", t);
                    }
                });
            }
        });
    }
public interface SearchApi {
@GET("search")
Call<ResponseBody> basicSearch(@Query("q") String qTitle);
}固然,100%的雷同也不好嘛,來了1趟總得學點東西,1下接觸陌生知識太多,跨步前進容易扯到蛋不可取,原地踏步也不爽,小步慢行。
這里我們構建要求URL的事后使用了1個接口SearchApi,
Retrofit
Retrofit.Builder().baseUrl("http://zhuangbi.info/").build().create(SearchApi.class).basicSearch("牛逼");OkHttp
new Request.Builder()
                .url("http://zhuangbi.info/search?q=" + getString("牛逼"))
                .build();
聰明的我們1看就知道
 @GET("search")
Call<ResponseBody> basicSearch(@Query("q") String qTitle);這里的@GET("search")表示使用get要求,同時search是get命令路徑的1部份
固然,你也能夠把他寫到參數里面,Like This
   @GET("{path}")
    Call<ResponseBody> basicSearch(@Path("path") String path, @Query("q") String qTitle);
這樣用就好了:
Retrofit.Builder().baseUrl("http://zhuangbi.info/").build().create(SearchApi.class).basicSearch("search","牛逼");@Query("q") String qTitleQuery是查詢參數,就相當于http://zhuangbi.info/search?q=牛逼的
?q=牛逼 部份
或許你會想如果要查詢很多參數,豈不是也要配置很多函數參數里面,然后讓函數變得巨長
固然不用@QueryMap為你排難解紛
    @GET("search")
    Call<ResponseBody> basicSearch(@QueryMap Map<String, String> map);
就這么簡單,輕松進入到Retrofit的地盤
    private void initTrans() {
        final Retrofit build = new Retrofit.Builder()
                .baseUrl("http://zhuangbi.info/")
                .addConverterFactory(GsonConverterFactory.create())//添加轉換器
                .build();

        mBtnTrans.setOnClickListener(new View.OnClickListener() {
            @Override
            public void onClick(View v) {
                Call<List<SearchImage>> call = build.create(SearchApi.class).transSearch("牛逼");
                call.enqueue(new Callback<List<SearchImage>>() {
                    @Override
                    public void onResponse(Call<List<SearchImage>> call, Response<List<SearchImage>> response) {
                        mDatas.clear();
                        //使用轉換器,內部已幫我們實現轉換,省去了new Gson().form(jsonStr,new TypeToken<>())的進程
                        mDatas = response.body();
                        for (SearchImage searchImage : mDatas) {
                            Log.d(TAG, "onResponse: " + searchImage.toString());
                        }
                    }

                    @Override
                    public void onFailure(Call<List<SearchImage>> call, Throwable t) {
                        Log.e(TAG, "onFailure: ", t);
                    }
                });
            }
        });
}所謂轉換器,其實再剛才的代碼基礎上也沒多大改動嘛,不過是再構造的時候加了1句.addConverterFactory(GsonConverterFactory.create())//添加轉換器
Callback里面的json轉換不用再使用
                Gson gson = new Gson();
                mDatas = gson.fromJson(resStr, new TypeToken<List<SearchImage>>() {
}.getType());直接使用mDatas = response.body();就能夠獲得,固然要求的函數泛型也要改寫
    @GET("search")
    Call<List<SearchImage>> transSearch(@Query("q") String qTitle);
省去了在回調函數new Gson的干擾,代碼變得跟簡潔。
固然,這里使用的是Gson,如果你需要JackSon,FastJson選擇適合的解析器傳遞進去就好了。
如果,你需要自定義解析規則,也是沒問題的,這需要自己去實現,但是這不是我們今天要說的重點,放到后面再寫1個這類例子。
總之—使用了解析器,讓我們的代碼可讀性變得更好,代碼也更簡潔。
 private void initAdapt() {

        final Retrofit build = new Retrofit.Builder()
                .baseUrl("http://zhuangbi.info/")
                .addConverterFactory(GsonConverterFactory.create())//添加轉換器
                .addCallAdapterFactory(RxJavaCallAdapterFactory.create())//添加適配器 連接RxJava
                .build();
        //使用RxBinding處理點擊事件 RxBinding基于RxJava實現
        RxView.clicks(mBtnAdapter)
                .debounce(500, TimeUnit.MILLISECONDS) //排除500ms內重復點擊事件
                .observeOn(AndroidSchedulers.mainThread())//切換到主線程履行響應內容,相當于在回調方法中履行runOnUiThread方法
                .subscribe(new Action1<Void>() {
                    @Override
                    public void call(Void aVoid) {
                        //不需要Call了,直接使用Observable,順滑的切換到RxJava領域
                        Observable<List<SearchImage>> observable = build.create(SearchApi.class)
                                .search("牛逼")
                                .subscribeOn(Schedulers.io())
                                .observeOn(AndroidSchedulers.mainThread());
                        //這里主要是為了演示,代碼簡潔,實際中不要這樣,
                        // 還要斟酌取消1個要求,返回毛病值處理,業務需求等等
                        observable.subscribe(new Action1<List<SearchImage>>() {
                            @Override
                            public void call(List<SearchImage> searchImages) {
                                for (SearchImage searchImage : searchImages) {
                                    Log.d(TAG, "call: " + searchImage.toString());
                                }
                            }
                        });
                    }
                });
}和解析器1樣,適配器也就是加了1句.addCallAdapterFactory(RxJavaCallAdapterFactory.create())//添加適配器 連接
代碼雖然簡潔,作用巨大,注意現在我們已不用Call來做要求了,我們使用Observable,這直接就能夠利用RxJava操作。
 .subscribeOn(Schedulers.io())
.observeOn(AndroidSchedulers.mainThread());2.之前的回調Callback變成了監聽者處理事件observable.subscribe,有更多
Action1
Subscription
方式讓我們選擇
3.鏈式調用,全部邏輯清晰明了
但是注意1點:
對API調用了 observeOn(MainThread) 以后,線程會跑在主線程上,包括 onComplete 也是, unsubscribe 也在主線程,然后如果這時候候調用 call.cancel 會致使 NetworkOnMainThreadException ,所以1定要在 retrofit 的API調用.subscribeOn(io).observeOn(MainThread) 以后加1句 unsubscribeOn(io)
完全的就是
Api
.subscribeOn(io)
.observeOn(MainThread)
.unsubscribeOn(io)哦,這里取消1個命令和call的方式不同,用的是unsubscribeOn(io),Call對應的方法是cancel()
這里還加入了1點小元素,注意我們使用的是
 RxView.clicks(mBtnAdapter)
                .debounce(500, TimeUnit.MILLISECONDS) //排除500ms內重復點擊事件
                .observeOn(AndroidSchedulers.mainThread())//切換到主線程履行響應內容,相當于在回調方法中履行runOnUiThread方法
                .subscribe(new Action1<Void>() {
                    @Override
                    public void call(Void aVoid) {
取代
  mBtnTrans.setOnClickListener(new View.OnClickListener() {
            @Override
            public void onClick(View v) {}
這是使用了RxBinding這個庫,基于RxJava實現,看看用著這類方式實現方式對照傳統方式在上述代碼表達出來的,線程切換、避免重復點擊的實現優勢
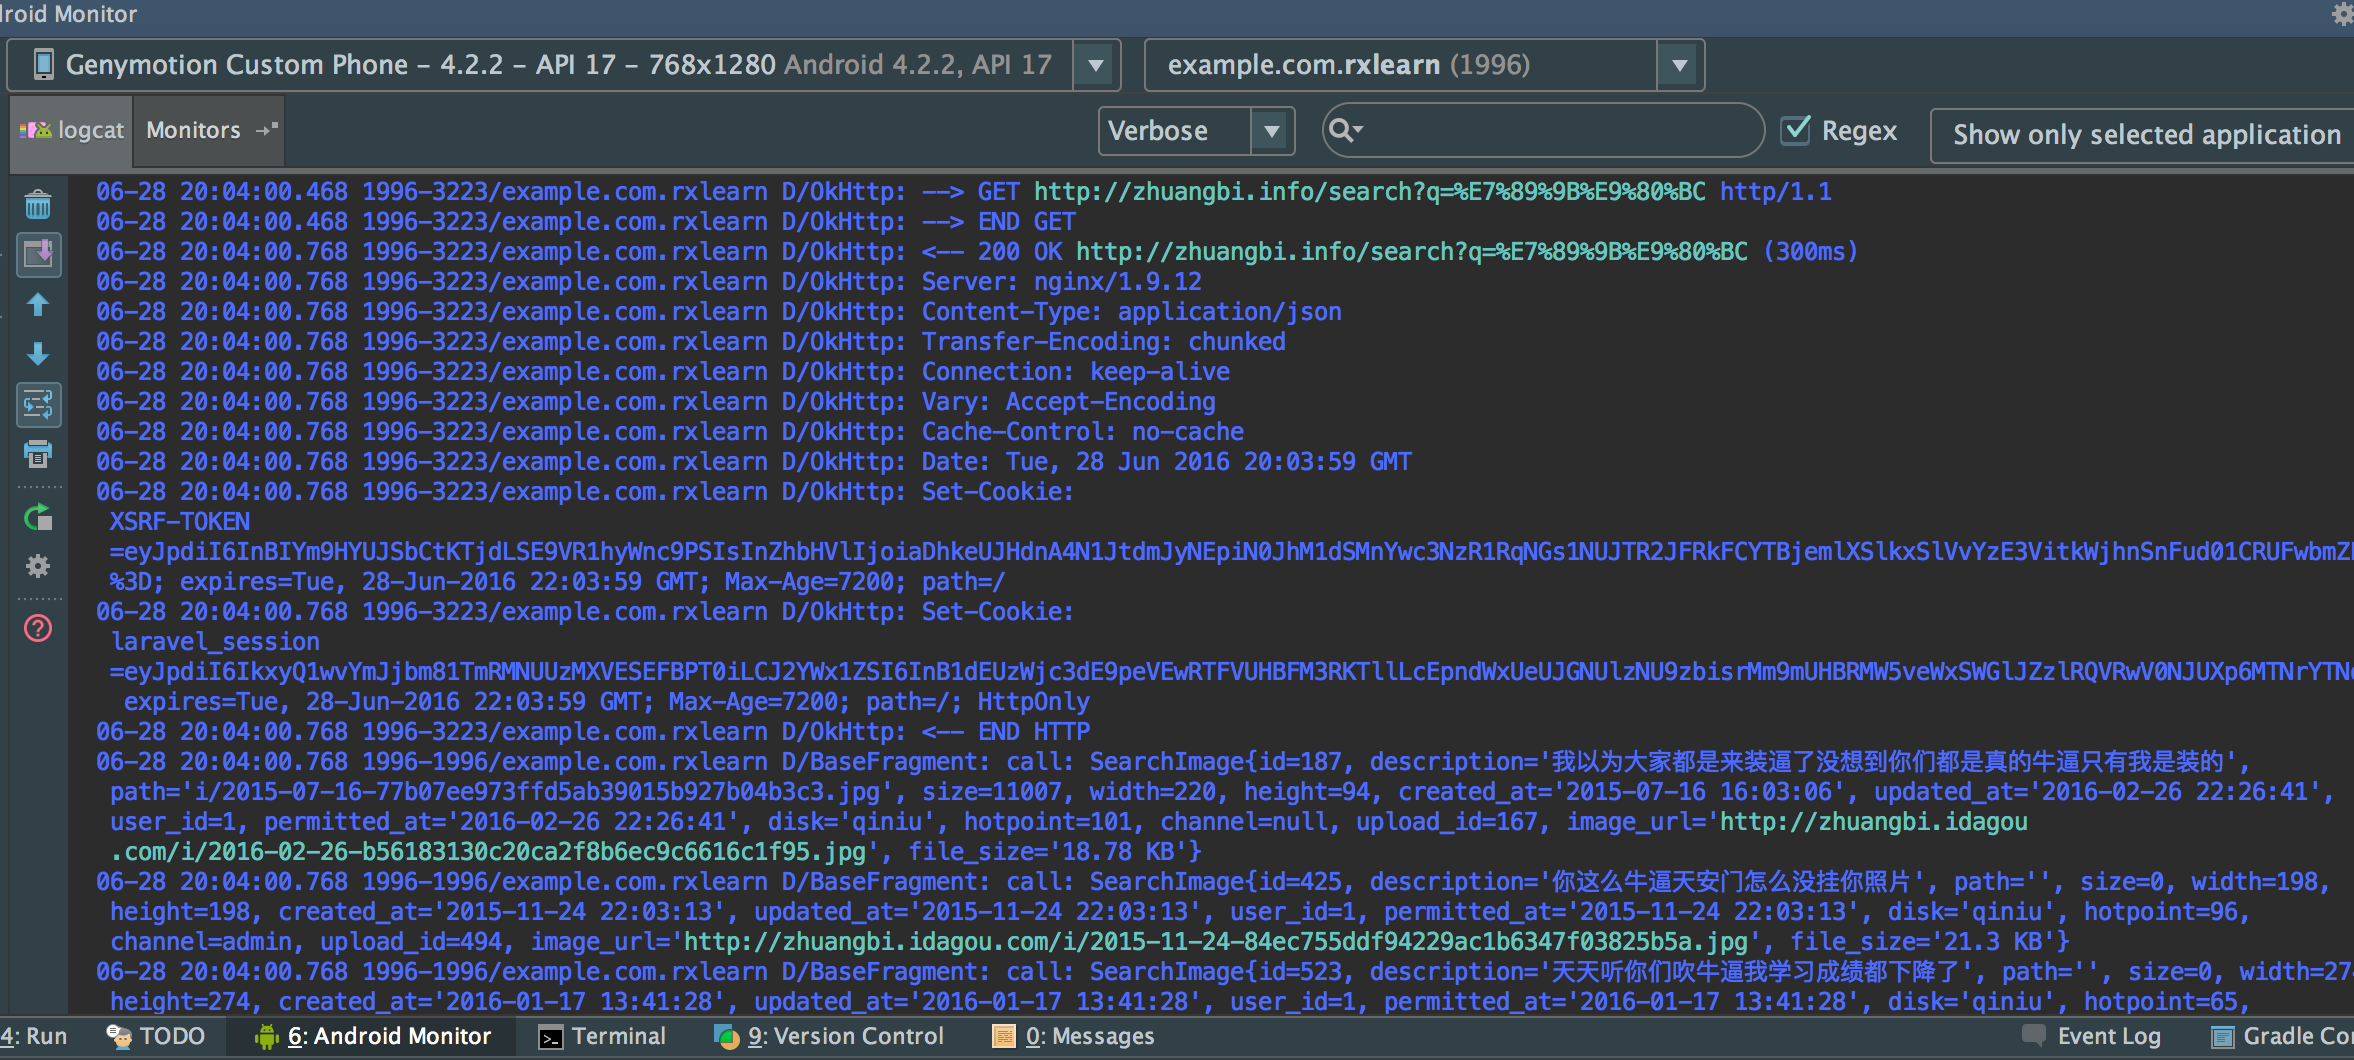
我寫了,快1周也沒有找到他的,要求方式,要求頭在哪兒打印,1直好慌。知道再OkHttp的Github上看到HttpLoggingInterceptor這個庫。
使用方式:導入
compile 'com.squareup.okhttp3:logging-interceptor:3.3.1' private void initLog() {
HttpLoggingInterceptor logging = new HttpLoggingInterceptor().setLevel(HttpLoggingInterceptor.Level.HEADERS);
//自定義攔截方式
HttpLoggingInterceptor logger = new HttpLoggingInterceptor(new HttpLoggingInterceptor.Logger() {
@Override
public void log(String message) {
Log.v("Retrofit", message);
}
}).setLevel(HttpLoggingInterceptor.Level.BASIC);
OkHttpClient httpClient = new OkHttpClient.Builder().addInterceptor(logger).build();
final Retrofit build = new Retrofit.Builder()
.baseUrl("http://zhuangbi.info/")
.addConverterFactory(GsonConverterFactory.create())//添加轉換器
.addCallAdapterFactory(RxJavaCallAdapterFactory.create())//添加適配器 連接RxJava
.client(httpClient)
.build();
RxView.clicks(mBtnLog)
.debounce(300, TimeUnit.MILLISECONDS)
.subscribe(new Action1<Void>() {
@Override
public void call(Void aVoid) {
//不需要Call了,直接使用Observable,順滑的切換到RxJava領域
Observable<List<SearchImage>> observable = build.create(SearchApi.class)
.search("牛逼")
.subscribeOn(Schedulers.io())
.observeOn(AndroidSchedulers.mainThread());
//這里主要是為了演示,代碼簡潔,實際中不要這樣,
// 還要斟酌取消1個要求,返回毛病值處理,業務需求等等
observable.subscribe(new Action1<List<SearchImage>>() {
@Override
public void call(List<SearchImage> searchImages) {
for (SearchImage searchImage : searchImages) {
Log.d(TAG, "call: " + searchImage.toString());
}
}
});
}
}
);
}有4個要求層次,1般BASIC和HEADER用得比較多
  public enum Level {
    /** No logs. */
    NONE,
    /**
     * Logs request and response lines.
     *
     * <p>Example:
     * <pre>{@code
     * --> POST /greeting http/1.1 (3-byte body)
     *
     * <-- 200 OK (22ms, 6-byte body)
     * }</pre>
     */
    BASIC,
    /**
     * Logs request and response lines and their respective headers.
     *
     * <p>Example:
     * <pre>{@code
     * --> POST /greeting http/1.1
     * Host: example.com
     * Content-Type: plain/text
     * Content-Length: 3
     * --> END POST
     *
     * <-- 200 OK (22ms)
     * Content-Type: plain/text
     * Content-Length: 6
     * <-- END HTTP
     * }</pre>
     */
    HEADERS,
    /**
     * Logs request and response lines and their respective headers and bodies (if present).
     *
     * <p>Example:
     * <pre>{@code
     * --> POST /greeting http/1.1
     * Host: example.com
     * Content-Type: plain/text
     * Content-Length: 3
     *
     * Hi?
     * --> END GET
     *
     * <-- 200 OK (22ms)
     * Content-Type: plain/text
     * Content-Length: 6
     *
     * Hello!
     * <-- END HTTP
     * }</pre>
     */
    BODY
}還可以通過自定義HttpLoggingInterceptor logger = new HttpLoggingInterceptor(new HttpLoggingInterceptor.Logger()個性化打造自己的網絡數據要求打印。
把攔截器,進1步升華,比以下載數據的時候,攔截下Response,讀取里面的信息,然后再傳輸給下1層,不就能夠實現監聽下行數據么。
先實現1個監聽器
public interface ProcessListener {
    /**
     * @param current     已完成字節數
     * @param total       總字節數
     * @param isCompleted 是不是已完成
     */
    void onProcess(long current, long total, boolean isCompleted);
}
實現1個具有攔截能力的Response類
public class ProcessResponseBody extends ResponseBody {
    private ProcessListener mProcessListener;
    private ResponseBody mResponseBody;
    private BufferedSource mBufferedSource;

    public ProcessResponseBody(ResponseBody responseBody, ProcessListener processListener) {
        mProcessListener = processListener;
        mResponseBody = responseBody;
    }

    @Override
    public MediaType contentType() {
        return mResponseBody.contentType();
    }

    @Override
    public long contentLength() {
        return mResponseBody.contentLength();
    }

    @Override
    public BufferedSource source() {
        if (mBufferedSource == null) {
            mBufferedSource = Okio.buffer(source(mResponseBody.source()));
        }
        return mBufferedSource;
    }

    private Source source(Source source) {
        return new ForwardingSource(source) {
            long nowSize = 0L;

            @Override
            public long read(Buffer sink, long byteCount) throws IOException {
                long readSize = super.read(sink, byteCount);
                nowSize += (readSize != -1 ? readSize : 0);
                mProcessListener.onProcess(nowSize, mResponseBody.contentLength(), readSize == -1);
                return readSize;
            }
        };
    }
}
調用
final OkHttpClient httpClient = new OkHttpClient.Builder()
.addInterceptor(new Interceptor() {
@Override
public okhttp3.Response intercept(Chain chain) throws IOException {
okhttp3.Response oldResponse = chain.proceed(chain.request());
return oldResponse.newBuilder()
.body(new ProcessResponseBody(oldResponse.body(), new ProcessListener() {
@Override
public void onProcess(long current, long total, boolean isCompleted) {
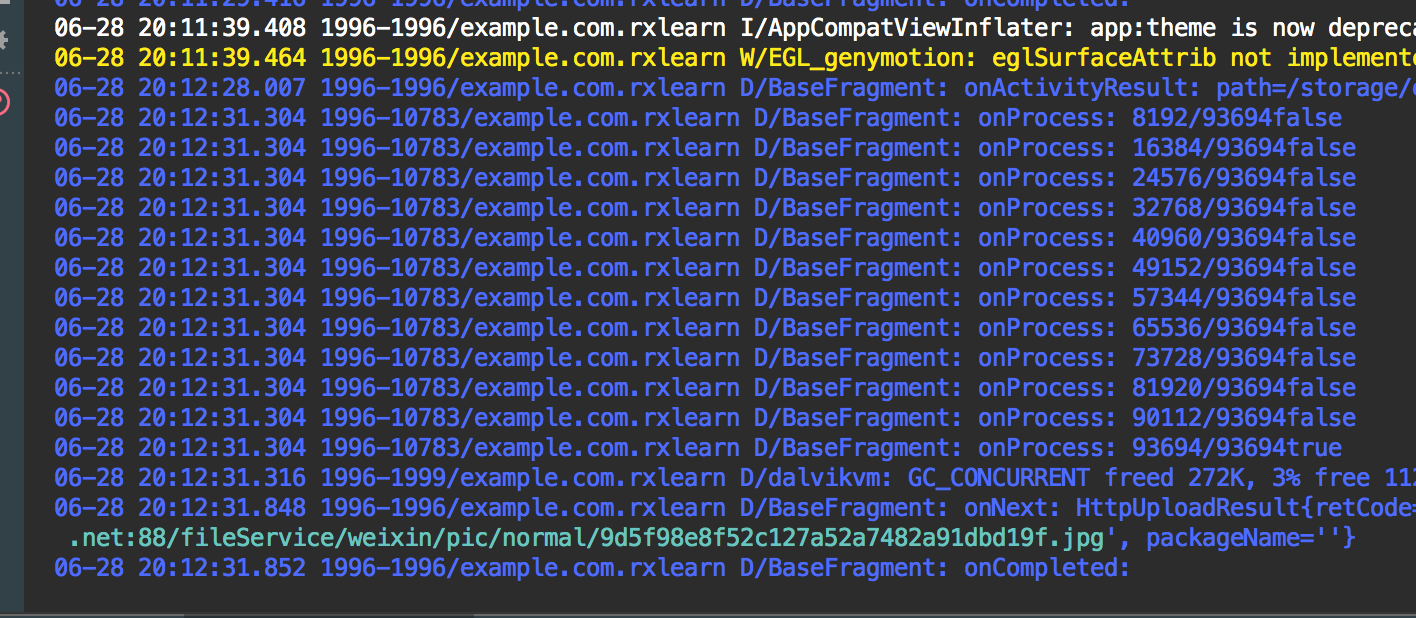
Log.d(TAG, "onProcess: " + current + "/" + total + "---" + isCompleted);
}
}))
.build();
}
}).build();查看Log
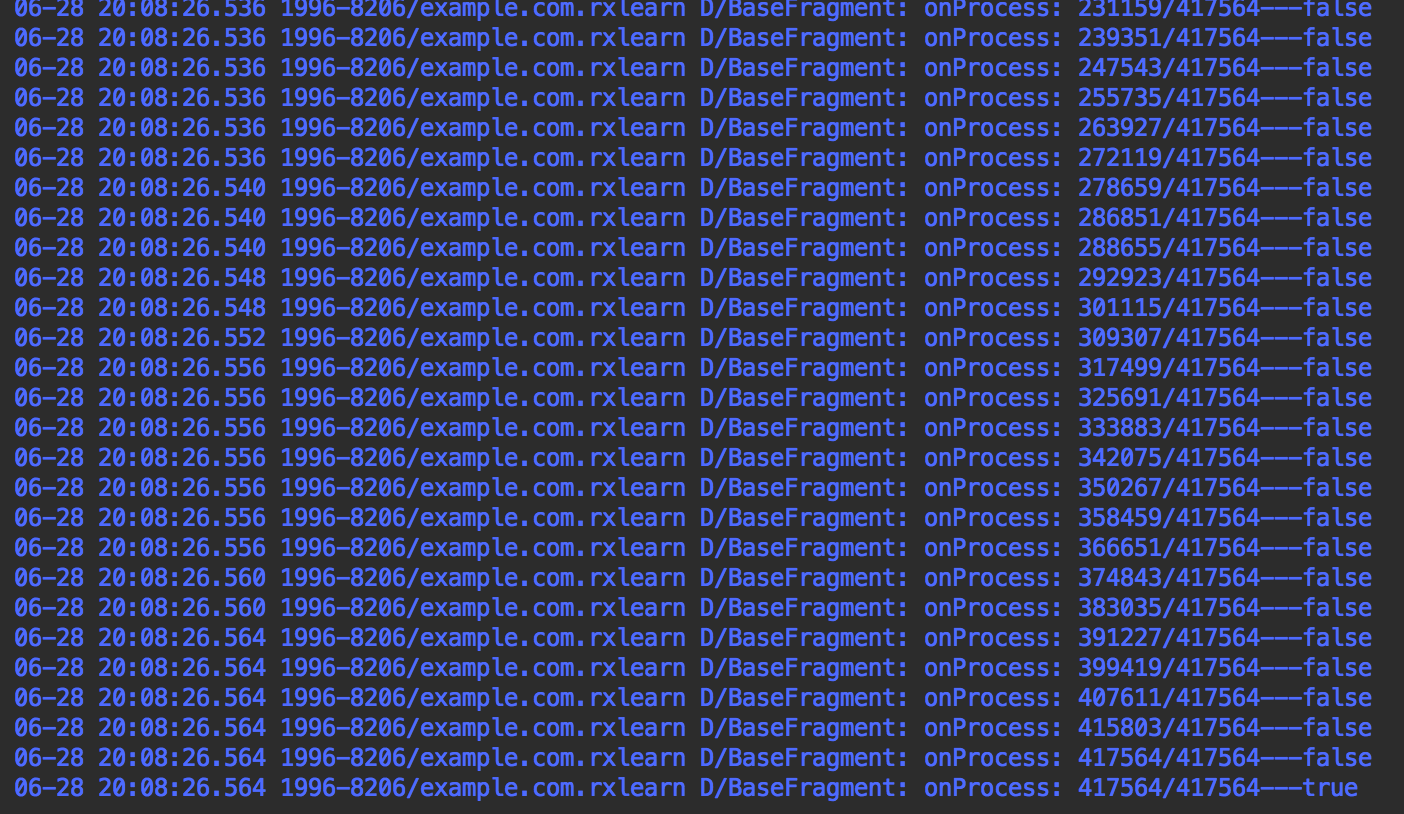
上傳和下行,同理,實現1個具有攔截能力的Request便可
太快了,摹擬器里面沒有大1點的圖片,本來是有進度條顯示,看下日志吧
實現代碼:
public class ProcessRequestBody extends RequestBody {
    private ProcessListener mProcessListener;
    private RequestBody mRequestBody;

    private BufferedSink mBufferedSink;

    public ProcessRequestBody(RequestBody requestBody, ProcessListener processListener) {
        mProcessListener = processListener;
        mRequestBody = requestBody;
    }

    @Override
    public long contentLength() throws IOException {
        return mRequestBody.contentLength();
    }

    @Override
    public MediaType contentType() {
        return mRequestBody.contentType();
    }

    @Override
    public void writeTo(BufferedSink sink) throws IOException {
        if (mBufferedSink == null) {
            mBufferedSink = Okio.buffer(sink(sink));
        }
        mRequestBody.writeTo(mBufferedSink);
        mBufferedSink.flush();
    }

    private Sink sink(Sink sink) {
        return new ForwardingSink(sink) {
            long writenBytes = 0L;

            @Override
            public void write(Buffer source, long byteCount) throws IOException {
                super.write(source, byteCount);
                writenBytes += byteCount;
                mProcessListener.onProcess(writenBytes, mRequestBody.contentLength(), writenBytes == mRequestBody.contentLength());
            }
        };
    }
}
調用
 final OkHttpClient client = new OkHttpClient.Builder()
                .addInterceptor(new Interceptor() {
                    @Override
                    public okhttp3.Response intercept(Chain chain) throws IOException {

                        RequestBody requestBody = new ProcessRequestBody(chain.request().body(), new ProcessListener() {
                            @Override
                            public void onProcess(final long current, final long total, final boolean isCompleted) {

                                getActivity().runOnUiThread(new Runnable() {
                                    @Override
                                    public void run() {
                                        mDialog.show();
                                        mDialog.setProgress((int) (current * 100 / total));
                                        if (isCompleted) {
                                            mDialog.dismiss();
                                        }

                                    }
                                });
                                Log.d(TAG, "onProcess: " + current + "/" + total + isCompleted);
                            }
                        });

                        Request newRequest = chain.request().newBuilder().post(requestBody).build();
                        return chain.proceed(newRequest);

                    }
                })
                .build();
沒有進度條終究是不爽的,用真機選個大圖再來1發

源碼下載地址:https://github.com/zhouruikevin/RxJavaSamples-master

程序員人生,我編程,我富裕,記住wfuyu網,php教程,php學習,php手冊,CMS模版制作
聲明:本站大部分內容是作者原創,少部分收集于互聯網供大家一起學習,原版權很多不明,如有侵權請聯系本站,謝謝!
粵ICP備14040726號-1?? 2015-2020 程序員人生 版權所有


