
翻譯 Interacting with Other Apps相干課程,并通過溫習該文檔的知識,完成以下功能:
我們開發的Android 利用1般具有若干個Activity。每一個Activity顯示1個用戶界面,用戶可通過該界面履行特定任務(比如,查看地圖或拍照)。要將用戶從1個Activity轉至另外一Activity,必須使用 Intent 定義當前利用做某事的“意向”。 當使用諸如 startActivity() 的方法將 Intent 傳遞至系統時,系統會使用 Intent 辨認和啟動相應的利用組件。使意圖向乃至可讓當前利用啟動另外一個利用中包括的Activity。
Intent 可以為 顯式 以便啟動特定組件(特定的 Activity 實例)或隱式 以便啟動處理意向操作(比如“拍攝照片”)的任何組件。
本文將展現如何使用 Intent 履行與其他利用的1些基本交互操作,比如啟動另外一個利用、接收來自該利用的結果和使我們的利用能夠響應來自其他利用的意向。
必須使意圖向(Intent)在自己利用中的Activity之間進行導航。通常使用明確意向履行此操作,該意向定義開發者希望啟動的組件的確切類名稱。
但是,當我們希望另外一利用履行操作時,比如“查看地圖”,就必須使用隱含義向。
隱含義向就是不指定名稱,而指定動作行動,比如拍照,查看地圖,發送郵件等
例如,此處顯示如何使用指定電話號碼的 Uri 數據創建發起電話呼喚的意向:
Uri number = Uri.parse("tel:5551234");
Intent callIntent = new Intent(Intent.ACTION_DIAL, number);
查看地圖:
// Map point based on address
Uri location = Uri.parse("geo:0,0?q=1600+Amphitheatre+Parkway,+Mountain+View,+California");
// Or map point based on latitude/longitude
// Uri location = Uri.parse("geo:37.422219,⑴22.08364?z=14"); // z param is zoom level
Intent mapIntent = new Intent(Intent.ACTION_VIEW, location);
查看網頁
Uri webpage = Uri.parse("http://www.android.com");
Intent webIntent = new Intent(Intent.ACTION_VIEW, webpage);
其他類型的隱含義向需要提供不同數據類型(比如,字符串)的“額外”數據。 我們可使用各種 putExtra() 方法添加1條或多條額外數據。
默許情況下,系統基于所包括的 Uri 數據肯定意向需要的相應 MIME 類型。如果未在乎向中包括 Uri,通常應使用 setType() 指定與意向關聯的數據的類型。 設置 MIME 類型可進1步指定哪些類型的Activity應接收意向。
比如發送郵件:
Intent emailIntent = new Intent(Intent.ACTION_SEND);
// The intent does not have a URI, so declare the "text/plain" MIME type
emailIntent.setType(HTTP.PLAIN_TEXT_TYPE);
emailIntent.putExtra(Intent.EXTRA_EMAIL, new String[] {"jon@example.com"}); // recipients
emailIntent.putExtra(Intent.EXTRA_SUBJECT, "Email subject");
emailIntent.putExtra(Intent.EXTRA_TEXT, "Email message text");
emailIntent.putExtra(Intent.EXTRA_STREAM, Uri.parse("content://path/to/email/attachment"));
// You can also attach multiple items by passing an ArrayList of Uris
日歷事件
Intent calendarIntent = new Intent(Intent.ACTION_INSERT, Events.CONTENT_URI);
Calendar beginTime = Calendar.getInstance().set(2012, 0, 19, 7, 30);
Calendar endTime = Calendar.getInstance().set(2012, 0, 19, 10, 30);
calendarIntent.putExtra(CalendarContract.EXTRA_EVENT_BEGIN_TIME, beginTime.getTimeInMillis());
calendarIntent.putExtra(CalendarContract.EXTRA_EVENT_END_TIME, endTime.getTimeInMillis());
calendarIntent.putExtra(Events.TITLE, "Ninja class");
calendarIntent.putExtra(Events.EVENT_LOCATION, "Secret dojo");
做點事情,總希望得到1個反饋對吧?那末構建終了意向,現在我們需要肯定是不是有利用接收;
注意:如果調用了意向,但裝備上沒有可用于處理意向的利用,利用將崩潰
要確認是不是存在可響應意向的可用Activity,請調用 queryIntentActivities() 來獲得能夠處理Intent 的Activity列表。 如果返回的 List 不為空,可以安全地使用該意向。例如
PackageManager packageManager = getPackageManager();
List activities = packageManager.queryIntentActivities(intent,
        PackageManager.MATCH_DEFAULT_ONLY);
boolean isIntentSafe = activities.size() > 0;
如果 isIntentSafe 是 true,則最少有1個利用將響應當意向。 如果它是 false,則沒有任何利用處理該意向。
1旦已創建 Intent 并設置附加信息,調用 startActivity() 將其發送給系統 。如果系統辨認可處理意向的多個Activity,它會為用戶顯示對話框供其選擇要使用的利用,如圖 1 所示。 如果只有1個Activity處理意向,系統會立即開始這個Activity。
 圖1
圖1
此處顯示完全的示例:如何創建查看地圖的意向,確認是不是存在處理意向的利用,然后啟動它:
// Build the intent
Uri location = Uri.parse("geo:0,0?q=1600+Amphitheatre+Parkway,+Mountain+View,+California");
Intent mapIntent = new Intent(Intent.ACTION_VIEW, location);

// Verify it resolves
PackageManager packageManager = getPackageManager();
List<ResolveInfo> activities = packageManager.queryIntentActivities(mapIntent, 0);
boolean isIntentSafe = activities.size() > 0;

// Start an activity if it's safe
if (isIntentSafe) {
    startActivity(mapIntent);
}注意,當通過將 Intent 傳遞至 startActivity() 而開始Activity時,有多個利用響應意向,用戶可以選擇默許使用哪一個利用(通過選中對話框底部的復選框;見圖 1。 當履行用戶通常希望每次使用相同利用進行的操作時,比如當打開網頁(用戶可能只使用1個網頁閱讀器)或拍照(用戶可能習慣使用1個照相機)時,這非常有用。
但是,如果要履行的操作可由多個利用處理并且用戶可能習慣于每次選擇不同的利用,—比如“同享”操作,用戶有多個利用分享項目—,應明確顯示選擇器對話框如圖 2 所示。 選擇器對話框強迫用戶選擇用于每次操作的利用(用戶不能對此操作選擇默許的利用)。
 圖2
圖2
要顯示選擇器,使用 createChooser() 創建Intent 并將其傳遞至 startActivity()。例如:
Intent intent = new Intent(Intent.ACTION_SEND);
...

// Always use string resources for UI text.
// This says something like "Share this photo with"
String title = getResources().getString(R.string.chooser_title);
// Create intent to show chooser
Intent chooser = Intent.createChooser(intent, title);

// Verify the intent will resolve to at least one activity
if (intent.resolveActivity(getPackageManager()) != null) {
    startActivity(chooser);
}
這將顯示1個對話框,其中有響應傳遞給 createChooser() 方法的意向的利用列表,并且將提供的文本用作 對話框標題。
要接收結果,請調用 startActivityForResult()(而不是 startActivity())。并在原Acitivity的 onActivityResult() 回調中接收它。
啟動針對結果的Activity時,所使用的 Intent 對象并沒有甚么特別的地方,但需要向 startActivityForResult() 方法傳遞額外的整數參數。
該整數參數是辨認當前要求的“要求代碼”。當、原Acitivity收到結果Intent 時,回調提供相同的要求代碼,以便當前利用可以正確辨認結果并肯定如何處理它。
例如,此處顯示如何開始允許用戶選擇聯系人的Activity:
static final int PICK_CONTACT_REQUEST = 1;  // The request code
...
private void pickContact() {
    Intent pickContactIntent = new Intent(Intent.ACTION_PICK, Uri.parse("content://contacts"));
    pickContactIntent.setType(Phone.CONTENT_TYPE); // Show user only contacts w/ phone numbers
    startActivityForResult(pickContactIntent, PICK_CONTACT_REQUEST);
}當用戶完成后續Activity并且返回時,系統會調用本來Activity onActivityResult() 的方法。此方法包括3個參數:
本例說明您可以如何處理“選擇聯系人”意向的結果。
代碼注釋很簡潔,就不翻譯了,具體關于 如何通過URL獲得到聯系人信息的,需要溫習內容提供者的知識
@Override
protected void onActivityResult(int requestCode, int resultCode, Intent data) {
    // Check which request it is that we're responding to
    if (requestCode == PICK_CONTACT_REQUEST) {
        // Make sure the request was successful
        if (resultCode == RESULT_OK) {
            // Get the URI that points to the selected contact
            Uri contactUri = data.getData();
            // We only need the NUMBER column, because there will be only one row in the result
            String[] projection = {Phone.NUMBER};

            // Perform the query on the contact to get the NUMBER column
            // We don't need a selection or sort order (there's only one result for the given URI)
            // CAUTION: The query() method should be called from a separate thread to avoid blocking
            // your app's UI thread. (For simplicity of the sample, this code doesn't do that.)
            // Consider using CursorLoader to perform the query.
            Cursor cursor = getContentResolver()
                    .query(contactUri, projection, null, null, null);
            cursor.moveToFirst();

            // Retrieve the phone number from the NUMBER column
            int column = cursor.getColumnIndex(Phone.NUMBER);
            String number = cursor.getString(column);

            // Do something with the phone number...
        }
    }
}前兩節重點講述1方面:從當前利用開始另外一個利用的Activity。但如果當前利用可以履行對另外一個利用可能有用的操作,但錢利用應準備好響應來自其他利用的操作要求。 例如,如果我們構建1款可與用戶的好友分享消息或照片的社交利用,那末我們最關注的是支持 ACTION_SEND 意向以便用戶可以從另外一利用發起 “同享”操作并且啟動您的利用履行該操作。
要允許其他利用啟動我們的Activity,我們需要 在相應元素的宣示說明文件中添加1個 元素。
當利用安裝在裝備上時,系統會辨認您的意向過濾器并添加信息至所有已安裝利用支持的意向內部目錄。當利用通過隱含義向調用 startActivity() 或 startActivityForResult() 時,系統會找到可以響應當意向的Activity
為了正肯定義Activity可處理的意向,添加的每一個意向過濾器在操作類型和Activity接受的數據方面應盡量具體。
如果Activity具有滿足以下 Intent 對象條件的意向過濾器,系統可能向Activity發送給定的 Intent:
操作
對要履行的操作命名的字符串。通常是平臺定義的值之1,比如 ACTION_SEND 或 ACTION_VIEW。
使用 元素在乎向過濾器(Intent filter)中指定此值。在此元素中指定的值必須是操作的完全字符串名稱,而不是 API 常數(可以參閱以下示例)。
數據
與意向關聯的數據描寫。
用 元素在您的意向過濾器中指定此內容。使用此元素中的1個或多個屬性,可以只指定 MIME 類型、URI 前綴、URI 架構或這些的組合和其他唆使所接受數據類型的項。
注意:如果無需聲明關于數據的具體信息 Uri(比如,當前Activity處理其他類型的“額外”數據而不是 URI 的時),我們應只指定 android:mimeType 屬性聲明您的Activity處理的數據類型,比如 text/plain 或 image/jpeg。
種別
提供另外1種表征處理意向的Activity的方法,通常與用戶手勢或Activity開始的位置有關。 系統支持多種不同的種別,但大多數都很少使用。 ?但是,所有隱含義向默許使用 CATEGORY_DEFAULT 進行定義。
用 元素在乎向過濾器中指定此內容。
在乎向過濾器中,可以通過聲明嵌套在 元素中的具有相應 XML 元素的各項,來聲明當前Activity接受的條件。
例如,此處有1個在數據類型為文本或圖象時處理 ACTION_SEND 意向的意向過濾器:
<activity android:name="ShareActivity">
    <intent-filter>
        <action android:name="android.intent.action.SEND"/>
        <category android:name="android.intent.category.DEFAULT"/>
        <data android:mimeType="text/plain"/>
        <data android:mimeType="image/*"/>
    </intent-filter>
</activity>
別的利用來啟動了,接下來我們固然要響應操作咯!
當Activity開始時,調用 getIntent() 檢索開始Activity的 Intent。可以在Activity生命周期的任什么時候間履行此操作,通常應在初期回調時(比如, onCreate() 或 onStart())履行。
@Override
protected void onCreate(Bundle savedInstanceState) {
    super.onCreate(savedInstanceState);

    setContentView(R.layout.main);

    // Get the intent that started this activity
    Intent intent = getIntent();
    Uri data = intent.getData();

    // Figure out what to do based on the intent type
    if (intent.getType().indexOf("image/") != -1) {
        // Handle intents with image data ...
    } else if (intent.getType().equals("text/plain")) {
        // Handle intents with text ...
    }
}想獲得返回結果,只需調用 setResult() 指定結果代碼和結果 Intent。當操作完成且用戶應返回原始Activity時,調用 finish() 關閉(和燒毀)的Activity。 例如:
// Create intent to deliver some kind of result data
Intent result = new Intent("com.example.RESULT_ACTION", Uri.parse("content://result_uri");
setResult(Activity.RESULT_OK, result);
finish();
我們必須始終為結果指定結果代碼。通常,它為 RESULT_OK 或 RESULT_CANCELED。在這以后可以根據需要為 Intent 提供額外的數據。
結果默許設置為 RESULT_CANCELED。因此,如果用戶在完成操作動作或設置結果之前按了返回按鈕,原始Activity會收到“已取消”的結果。
如果我們的需求是返回唆使若干結果選項之1的整數,那末可以將結果代碼設置為大于 0 的任何值。 如果我們使用結果代碼傳遞整數,并且無需包括 Intent,可以調用 setResult() 并且僅傳遞結果代碼。 例如:
setResult(1);
finish();
在這類情況下,只有幾個可能的結果,因此結果代碼是1個本地定義的整數(大于 0)。 當向自己利用中的Activity返回結果時,這將非常有效,由于接收結果的Activity可援用公共常數來肯定結果代碼的值。
無需檢查Activity是使用 startActivity() 還是 startActivityForResult() 開始的。如果開始您的Activity的意向可能需要結果,只需調用 setResult()。 如果原始Activity已調用 startActivityForResult(),則系統將向其傳遞您提供給 setResult() 的結果;否則,會疏忽結果。
從主Activity跳轉到相機或相冊,選中1張圖片,或拍攝1張圖片返回,放在主Activity中展現
UML圖:
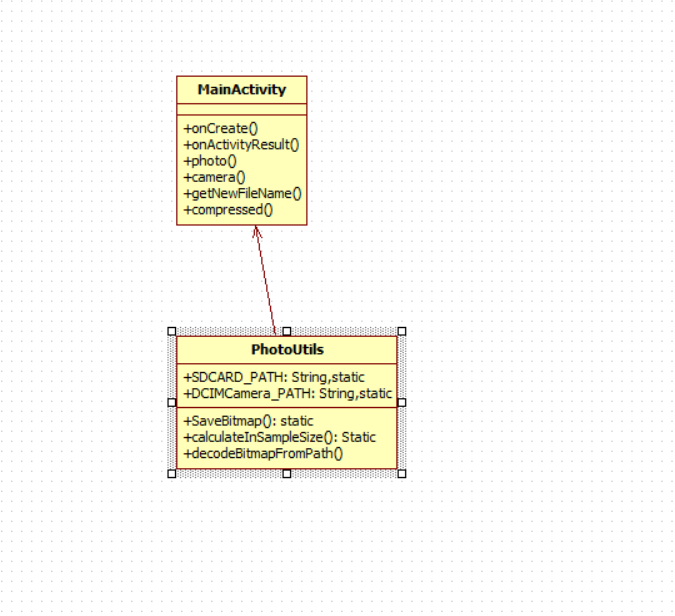
MainActivity中有兩個點擊事件:photo()和camera(),分別代表:從相冊獲得圖片,從相機獲得圖片
斟酌有的圖片太占內存,所以引入compressed()是來優化內存,通過調用PhotoUtils里的靜態方法完成圖片緊縮
從MainActivity 發送1個信息(去相冊的信息或去相機的信息)
啟動新的利用:相機app 或相冊app
有兩個分支:
用戶click,選擇1張圖片->
MainActivity展現
用戶取消,沒有選擇圖片->
MainActivity不做任何改變
先介紹MainActivity.java的布局文件
很多朋友可能會喊f**k,第1個布局元素ConstraintLayout就不認識,莫急莫慌,詳情請看我的另外一篇博客 2016谷歌新技術
<?xml version="1.0" encoding="utf⑻"?>
<android.support.constraint.ConstraintLayout xmlns:android="http://schemas.android.com/apk/res/android"
    xmlns:app="http://schemas.android.com/apk/res-auto"
    xmlns:tools="http://schemas.android.com/tools"
    android:id="@+id/activity_main"
    android:layout_width="match_parent"
    android:layout_height="match_parent"
    tools:context="com.learn.chaofun.interactingwithotherapp.MainActivity">

    <Button
        android:id="@+id/photo"
        android:layout_width="150dp"
        android:layout_height="48dp"
        android:text="相冊"
        android:onClick="photo"
        app:layout_constraintTop_toTopOf="@+id/activity_main"
        android:layout_marginTop="72dp"
        app:layout_constraintRight_toRightOf="@+id/activity_main"
        android:layout_marginRight="24dp"
        android:layout_marginEnd="24dp" />

    <Button
        android:id="@+id/camer"
        android:layout_width="150dp"
        android:layout_height="48dp"
        android:text="camera"
        android:onClick="camera"
        app:layout_constraintLeft_toLeftOf="@+id/activity_main"
        android:layout_marginLeft="40dp"
        android:layout_marginStart="40dp"
        app:layout_constraintTop_toTopOf="@+id/activity_main"
        android:layout_marginTop="72dp" />

    <ImageView
        android:id="@+id/main_show_pic"
        android:layout_width="300dp"
        android:layout_height="300dp"
        android:background="#ff313131"
        app:layout_constraintLeft_toLeftOf="@+id/activity_main"
        android:layout_marginLeft="40dp"
        android:layout_marginStart="40dp"
        app:layout_constraintTop_toTopOf="@+id/activity_main"
        android:layout_marginTop="160dp"
        app:layout_constraintRight_toRightOf="@+id/activity_main"
        android:layout_marginRight="16dp"
        android:layout_marginEnd="16dp"
        app:layout_constraintHorizontal_bias="0.38" />


</android.support.constraint.ConstraintLayout>
重點在于默許ImageView:大小為矩形,默許背景色彩為灰色,目的是為了看出圖片裁剪的效果,到達內存優化的目的
下面我們來看MainActivity中是如何書寫的吧:
public class MainActivity extends AppCompatActivity {
    /* 用來標識要求照相功能的activity */
    private static final int CAMERA_WITH_DATA = 3023;

    /* 用來標識要求相冊的activity */
    private static final int PHOTO_PICKED_WITH_DATA = 3021;

    /* 照相機拍照得到的圖片 */
    private File mCurrentPhotoFile;
    private String photoPath = null, tempPhotoPath, camera_path;


    //首先使用butterkniff  拿到view對象
    @InjectView(R.id.photo)
    Button photo;
    @InjectView(R.id.camer)
    Button camer;
    @InjectView(R.id.main_show_pic)
    ImageView mImageView;
    @InjectView(R.id.activity_main)
    ConstraintLayout activityMain;

    @Override
    protected void onCreate(Bundle savedInstanceState) {
        super.onCreate(savedInstanceState);
        setContentView(R.layout.activity_main);
        ButterKnife.inject(this);


    }

    //定時器來完成任務
    Timer timer = new Timer();
    TimerTask task = new TimerTask() {
        public void run() {
            Message message = new Message();
            message.what = 1;
            myHandler.sendMessage(message);
        }
    };

    //重點演示Activity之間跳轉,接收返回的數據
    @Override
    protected void onActivityResult(int requestCode, int resultCode, Intent data) {
        Log.i("result", "result");

        //判斷用戶是不是操作了,沒有選擇的話,圖片為空,為了避免空指針異常,這里判斷結果碼來避免異常
        if (resultCode == RESULT_OK) {


            switch (requestCode) {
                case CAMERA_WITH_DATA:

                    photoPath = tempPhotoPath;
                    if (mImageView.getWidth() == 0) {
                        timer.schedule(task, 10, 1000);
                    } else {
                        compressed();
                    }

                    break;

                case PHOTO_PICKED_WITH_DATA:

                    Uri originalUri = data.getData();


                    String[] filePathColumn = {MediaStore.MediaColumns.DATA};
                    Cursor cursor = MainActivity.this.getContentResolver().query(
                            originalUri, filePathColumn, null, null, null);
                    cursor.moveToFirst();
                    int columnIndex = cursor.getColumnIndex(filePathColumn[0]);
                    photoPath = cursor.getString(columnIndex);
                    // 延遲每次延遲10 毫秒 隔1秒履行1次
                    if (mImageView.getWidth() == 0) {
                        timer.schedule(task, 10, 1000);
                    } else {
                        compressed();
                    }

                    break;

                default:
                    break;
            }
        }
    }

    /* 從相機中獲得照片 */
    public void camera(View view) throws IOException {

        Intent intent = new Intent("android.media.action.IMAGE_CAPTURE");

        tempPhotoPath = PhotoUtils.DCIMCamera_PATH + getNewFileName()
                + ".jpg";
        mCurrentPhotoFile = new File(tempPhotoPath);
        if (!mCurrentPhotoFile.exists()) {
            try {
                mCurrentPhotoFile.createNewFile();
            } catch (IOException e) {
                // TODO Auto-generated catch block
                e.printStackTrace();
            }
        }
        intent.putExtra(MediaStore.EXTRA_OUTPUT,
                Uri.fromFile(mCurrentPhotoFile));
        startActivityForResult(intent, CAMERA_WITH_DATA);
    }

    /* 從相冊中獲得照片 */
    public void photo(View view) {
        Intent openphotoIntent = new Intent(Intent.ACTION_PICK);
        openphotoIntent.setType("image/*");
        startActivityForResult(openphotoIntent, PHOTO_PICKED_WITH_DATA);
    }

    public static String getNewFileName() {
        SimpleDateFormat formatter = new SimpleDateFormat("yyyyMMddHHmmss");
        Date curDate = new Date(System.currentTimeMillis());
        return formatter.format(curDate);
    }

    //重點是調用了PhotoUtils的接口
    private void compressed() {
        Bitmap resizeBmp = PhotoUtils.decodeBitmapFromPath(photoPath, 540, 540);
        mImageView.setImageBitmap(resizeBmp);
        camera_path = PhotoUtils.SaveBitmap(resizeBmp, "saveTemp");
    }

    //handler 負責刷新UI
    final Handler myHandler = new Handler() {
        @Override
        public void handleMessage(Message msg) {
            if (msg.what == 1) {
                if (mImageView.getWidth() != 0) {
                    // 取消定時器
                    timer.cancel();
                    compressed();
                }
            }
        }
    };

}Activity中的點擊事件 是在XML中以屬性的方式配置的 比如 相機Button的 android:onClick=”camera”,以后在Activity中以(自己加1個camera函數)同名函數被系統回調的方式,避免setOnclickListener的繁瑣,或onClick中switch判斷每個View的id致使性能太低的情況。
引入定時器的技術,這里是我刻意加上去的,為的的是介紹Timer和TimerTask的概念,它們用處很廣泛,比如閃屏頁定時展現幾秒后跳轉到主頁,或定時完成1些任務,跟Handler的sendMessageDelay,postDelay類似,還可以實現AdapterViewFliper的定時更換頁面類似效果,不過定時器的方式更加簡潔。
Sending the User to Another App的做法:
比如
    /* 從相冊中獲得照片 */
    public void photo(View view) {
        Intent openphotoIntent = new Intent(Intent.ACTION_PICK);
        openphotoIntent.setType("image/*");
        startActivityForResult(openphotoIntent, PHOTO_PICKED_WITH_DATA);
    }
不言而喻:
onActivityResult中的處理,用RESULT_OK 來判斷用戶是進行了“在相機利用中或圖庫利用當選中圖片,系統默許返回跳轉原MainActivity”操作或是進行了“用戶點擊Back按鈕返回原MainActivity”操作
緊縮圖片的尺寸,調用了PhotoUtils的接口
下面是工具類PhotoUtils:
public class PhotoUtils {

    public static String SDCARD_PAHT = Environment
            .getExternalStorageDirectory().getPath();

    public static String DCIMCamera_PATH = Environment
            .getExternalStorageDirectory() + "/DCIM/Camera/";

    // 將生成的圖片保存到內存中
    public static String SaveBitmap(Bitmap bitmap, String name) {
        if (Environment.getExternalStorageState().equals(
                Environment.MEDIA_MOUNTED)) {
            File dir = new File(SDCARD_PAHT);
            if (!dir.exists())
                dir.mkdir();
            File file = new File(SDCARD_PAHT + "/" + name + ".jpg");
            FileOutputStream out;
            try {
                out = new FileOutputStream(file);
                if (bitmap.compress(Bitmap.CompressFormat.JPEG, 90, out)) {
                    out.flush();
                    out.close();
                }
                return file.getAbsolutePath();
            } catch (IOException e) {
                e.printStackTrace();
            }
        }

        return null;
    }

    public static int calculateInSampleSize(
            BitmapFactory.Options options, int reqWidth, int reqHeight) {
        // 取得內存中圖片的寬高
        final int height = options.outHeight;
        final int width = options.outWidth;
        int inSampleSize = 1;

        if (height > reqHeight || width > reqWidth) {

            final int halfHeight = height / 2;
            final int halfWidth = width / 2;

            // 計算出1個數值,必須符合為2的冪(1,2,4,8,tec),賦值給inSampleSize
            // 圖片寬高應大于期望的寬高的時候,才進行計算
            while ((halfHeight / inSampleSize) > reqHeight
                    && (halfWidth / inSampleSize) > reqWidth) {
                inSampleSize *= 2;
            }
        }

        return inSampleSize;
    }
    public static Bitmap decodeBitmapFromPath(String path ,
                                                         int reqWidth, int reqHeight) {

        // 第1次解析 inJustDecodeBounds=true 只是用來獲得bitmap在內存中的尺寸和類型,系統其實不會為其分配內存,
        final BitmapFactory.Options options = new BitmapFactory.Options();
        options.inJustDecodeBounds = true;
        BitmapFactory.decodeFile(path, options);

        // 計算出1個數值
        options.inSampleSize = calculateInSampleSize(options, reqWidth, reqHeight);

        // 根據inSampleSize 數值來解析bitmap
        options.inJustDecodeBounds = false;
        return BitmapFactory.decodeFile(path, options);
    }
}
關于圖片緊縮,可以通過我之前兩篇博文Google 優化內存史詩巨著 和 圖片緊縮看我的博客就夠了! 來溫習為何要緊縮圖片
Interacting with Other Apps by chaofan

程序員人生,我編程,我富裕,記住wfuyu網,php教程,php學習,php手冊,CMS模版制作
聲明:本站大部分內容是作者原創,少部分收集于互聯網供大家一起學習,原版權很多不明,如有侵權請聯系本站,謝謝!
粵ICP備14040726號-1?? 2015-2020 程序員人生 版權所有


