
自定義View系列教程01–經(jīng)常使用工具介紹
自定義View系列教程02–onMeasure源碼詳實(shí)分析
自定義View系列教程03–onLayout源碼詳實(shí)分析
自定義View系列教程04–Draw源碼分析及其實(shí)踐
自定義View系列教程05–示例分析
PS:如果覺(jué)得文章太長(zhǎng),那就直接看視頻吧
之前結(jié)合源碼分析完了自定義View的3個(gè)階段:measure,layout,draw。
那末,自定義有哪幾種常見(jiàn)的方式呢?
直接繼承自View
在使用該方式實(shí)現(xiàn)自定義View時(shí)通常的核心操作都在onDraw( )當(dāng)中進(jìn)行。但是,請(qǐng)注意,在分析measure部份源碼的時(shí)候,我們提到如果直接繼承自View在onMeasure( )中要處理view大小為wrap_content的情況,否則這類(lèi)情況下的大小和match_parent1樣。除此以為,還需要注意對(duì)padding的處理。
繼承自系統(tǒng)已有的View
比如常見(jiàn)的TextView,Button等等。如果采取該方式,我們只需要在系統(tǒng)控件的基礎(chǔ)上做出1些調(diào)劑和擴(kuò)大便可,而且也不需要去自己支持wrap_content和padding。
直接繼承自ViewGroup
如果使用該方式實(shí)現(xiàn)自定義View,請(qǐng)注意兩個(gè)問(wèn)題
第1點(diǎn):
在onMeasure( )實(shí)現(xiàn)wrap_content的支持。這點(diǎn)和直接繼承自View是1樣的。
第2點(diǎn):
在onMeasure( )和onLayout中需要處理本身的padding和子View的margin
繼承自系統(tǒng)已有的ViewGroup
比如LinearLayout,RelativeLayout等等。如果采取該方式,那末在3中提到的兩個(gè)問(wèn)題就不用再過(guò)量斟酌了,簡(jiǎn)便了許多。
在此,舉兩個(gè)例子。
瞅瞅第1個(gè)例子,效果以下圖:
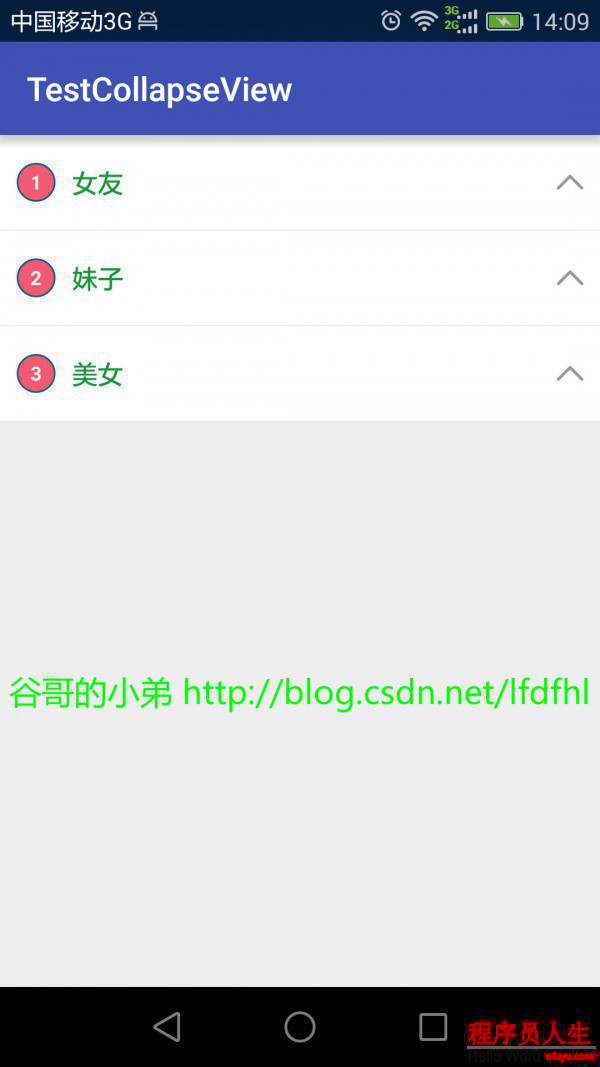
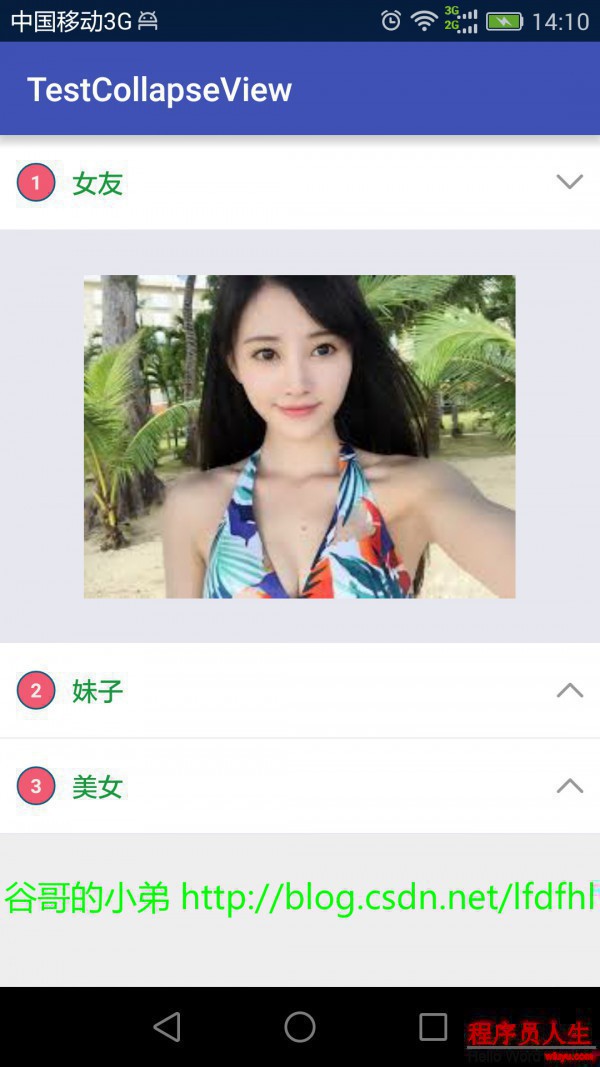
對(duì)該效果的主要描寫(xiě)以下:
好了,效果已看到了,我們來(lái)明確和拆解1下這個(gè)小功能
弄清楚這些就該動(dòng)手寫(xiě)代碼了。
先來(lái)看這個(gè)控件的布局文件
<?xml version="1.0" encoding="utf⑻"?>
<LinearLayout xmlns:android="http://schemas.android.com/apk/res/android"
    android:layout_width="match_parent"
    android:layout_height="wrap_content"
    android:background="#ffffff"
    android:orientation="vertical">


    <RelativeLayout
        android:id="@+id/titleRelativeLayout"
        android:padding="30px"
        android:layout_width="match_parent"
        android:layout_height="170px"
        android:clickable="true">

        <TextView
            android:id="@+id/numberTextView"
            android:layout_width="70px"
            android:layout_height="70px"
            android:gravity="center"
            android:layout_centerVertical="true"
            android:background="@drawable/circle_textview"
            android:clickable="false"
            android:text="1"
            android:textStyle="bold"
            android:textColor="#EBEFEC"
            android:textSize="35px" />

        <TextView
            android:id="@+id/titleTextView"
            android:layout_width="match_parent"
            android:layout_height="wrap_content"
            android:layout_centerVertical="true"
            android:layout_toRightOf="@id/numberTextView"
            android:layout_marginLeft="30px"
            android:clickable="false"
            android:textColor="#1d953f"
            android:textSize="46px" />


        <ImageView
            android:id="@+id/arrowImageView"
            android:layout_width="48px"
            android:layout_height="27px"
            android:layout_alignParentRight="true"
            android:layout_centerVertical="true"
            android:background="@drawable/btn_an_xxh"
            android:clickable="false"
            android:scaleType="fitCenter" />
    </RelativeLayout>

    <View
        android:layout_width="match_parent"
        android:layout_height="2px"
        android:layout_below="@id/titleRelativeLayout"
        android:background="#E7E7EF"
        android:clickable="false"
        />

    <RelativeLayout
        android:id="@+id/contentRelativeLayout"
        android:visibility="gone"
        android:layout_width="wrap_content"
        android:layout_height="wrap_content">
    </RelativeLayout>

</LinearLayout>
請(qǐng)注意,在此將顯示圖片的容器即contentRelativeLayout設(shè)置為gone。
為何要這么做呢?由于進(jìn)入利用后是看不到圖片部份的,只有點(diǎn)擊后才可見(jiàn)。嗯哼,你大概已猜到了:圖片的隱藏和顯示是通過(guò)改變?nèi)萜鞯膙isibility實(shí)現(xiàn)的。是的!那圖片的逐步顯示和隱藏還有箭頭的旋轉(zhuǎn)又是怎樣做的呢?請(qǐng)看該控件的具體實(shí)現(xiàn)。
package com.stay4it.testcollapseview;

import android.content.Context;
import android.text.TextUtils;
import android.util.AttributeSet;
import android.util.DisplayMetrics;
import android.view.LayoutInflater;
import android.view.View;
import android.view.WindowManager;
import android.view.animation.Animation;
import android.view.animation.Transformation;
import android.widget.ImageView;
import android.widget.LinearLayout;
import android.widget.RelativeLayout;
import android.widget.TextView;
/**
 * 原創(chuàng)作者:
 * 谷哥的小弟
 *
 * 博客地址:
 * http://blog.csdn.net/lfdfhl
 */
public class CollapseView extends LinearLayout {
    private long duration = 350;
    private Context mContext;
    private TextView mNumberTextView;
    private TextView mTitleTextView;
    private RelativeLayout mContentRelativeLayout;
    private RelativeLayout mTitleRelativeLayout;
    private ImageView mArrowImageView;
    int parentWidthMeasureSpec;
    int parentHeightMeasureSpec;
    public CollapseView(Context context) {
        this(context, null);
    }

    public CollapseView(Context context, AttributeSet attrs) {
        super(context, attrs);
        mContext=context;
        LayoutInflater.from(mContext).inflate(R.layout.collapse_layout, this);
        initView();
    }


    private void initView() {
        mNumberTextView=(TextView)findViewById(R.id.numberTextView);
        mTitleTextView =(TextView)findViewById(R.id.titleTextView);
        mTitleRelativeLayout= (RelativeLayout) findViewById(R.id.titleRelativeLayout);
        mContentRelativeLayout=(RelativeLayout)findViewById(R.id.contentRelativeLayout);
        mArrowImageView =(ImageView)findViewById(R.id.arrowImageView);
        mTitleRelativeLayout.setOnClickListener(new OnClickListener() {
            @Override
            public void onClick(View v) {
                rotateArrow();
            }
        });

        collapse(mContentRelativeLayout);
    }


    public void setNumber(String number){
        if(!TextUtils.isEmpty(number)){
            mNumberTextView.setText(number);
        }
    }

    public void setTitle(String title){
        if(!TextUtils.isEmpty(title)){
            mTitleTextView.setText(title);
        }
    }

    public void setContent(int resID){
        View view=LayoutInflater.from(mContext).inflate(resID,null);
        RelativeLayout.LayoutParams layoutParams=
                new RelativeLayout.LayoutParams(LayoutParams.MATCH_PARENT, LinearLayout.LayoutParams.WRAP_CONTENT);
        view.setLayoutParams(layoutParams);
        mContentRelativeLayout.addView(view);
    }


    public void rotateArrow() {
        int degree = 0;
        if (mArrowImageView.getTag() == null || mArrowImageView.getTag().equals(true)) {
            mArrowImageView.setTag(false);
            degree = -180;
            expand(mContentRelativeLayout);
        } else {
            degree = 0;
            mArrowImageView.setTag(true);
            collapse(mContentRelativeLayout);
        }
        mArrowImageView.animate().setDuration(duration).rotation(degree);
    }

    @Override
    protected void onMeasure(int widthMeasureSpec, int heightMeasureSpec) {
        super.onMeasure(widthMeasureSpec, heightMeasureSpec);
        parentWidthMeasureSpec=widthMeasureSpec;
        parentHeightMeasureSpec=heightMeasureSpec;
    }

    @Override
    protected void onLayout(boolean changed, int l, int t, int r, int b) {
        super.onLayout(changed, l, t, r, b);
    }

    // 展開(kāi)
    private void expand(final View view) {
        WindowManager wm = (WindowManager) mContext.getSystemService(Context.WINDOW_SERVICE);
        DisplayMetrics outMetrics = new DisplayMetrics();
        wm.getDefaultDisplay().getMetrics(outMetrics);
        view.measure(parentWidthMeasureSpec, parentHeightMeasureSpec);
        final int measuredWidth = view.getMeasuredWidth();
        final int measuredHeight = view.getMeasuredHeight();
        view.setVisibility(View.VISIBLE);

        Animation animation = new Animation() {
            @Override
            protected void applyTransformation(float interpolatedTime, Transformation t) {
                if(interpolatedTime == 1){
                    view.getLayoutParams().height =measuredHeight;
                }else{
                    view.getLayoutParams().height =(int) (measuredHeight * interpolatedTime);
                }
                view.requestLayout();
            }


            @Override
            public boolean willChangeBounds() {
                return true;
            }
        };
        animation.setDuration(duration);
        view.startAnimation(animation);
    }

    // 折疊
    private void collapse(final View view) {
        final int measuredHeight = view.getMeasuredHeight();
        Animation animation = new Animation() {
            @Override
            protected void applyTransformation(float interpolatedTime, Transformation t) {
                if (interpolatedTime == 1) {
                    view.setVisibility(View.GONE);
                } else {
                    view.getLayoutParams().height = measuredHeight - (int) (measuredHeight * interpolatedTime);
                    view.requestLayout();
                }
            }

            @Override
            public boolean willChangeBounds() {
                return true;
            }
        };
        animation.setDuration(duration);
        view.startAnimation(animation);
    }
}
現(xiàn)就該代碼中的主要操作做1些分析和介紹。
實(shí)現(xiàn)content部份的顯示,請(qǐng)參見(jiàn)代碼第110⑴38行
在這遇到1個(gè)困難:
這個(gè)content會(huì)占多大的空間呢?
我猛地這么1問(wèn),大家可能有點(diǎn)懵圈。
如果沒(méi)有聽(tīng)懂或回答不上來(lái),我就先舉個(gè)例子:
小狗1秒鐘跑1米(即小狗的速度為1m/s),請(qǐng)問(wèn)小狗跑完這段路要多少時(shí)間?
看到這個(gè)問(wèn)題,是否是覺(jué)得挺腦殘的,是否是有1種想抽我耳光的沖動(dòng)?
你他妹的,路程的長(zhǎng)短都沒(méi)有告知我,我怎樣知道小狗要跑多久?!真是日了狗了!
嗯哼,是的。我們?cè)谶@里根本不知道這個(gè)View(比如此處的content)有多高多寬,我們固然也不知道它要占多大的空間!!那怎樣辦呢?在這就依照最直接粗魯?shù)姆绞絹?lái)——遇到問(wèn)題,解決問(wèn)題!找出該View的寬和高!
前面在分析View的measure階段時(shí)我們知道這些控件的寬和高是由系統(tǒng)丈量的,在此以后我們只需要利用getMeasuredWidth()和getMeasuredHeight()就好了。但是這個(gè)控件的visibility本來(lái)是GONE的,系統(tǒng)在measure階段根本不會(huì)去丈量它的寬和高,所以現(xiàn)在需要我們自己去手動(dòng)丈量。代碼以下:
view.measure(parentWidthMeasureSpec, parentHeightMeasureSpec);
獲得到view的寬高后借助于動(dòng)畫(huà)實(shí)現(xiàn)content的漸次展開(kāi),請(qǐng)參見(jiàn)代碼第119⑴37行。
動(dòng)畫(huà)的interpolatedTime在1定時(shí)間內(nèi)(duration)從0變化到1,所以
measuredHeight * interpolatedTime
表示了content的高從0到measuredHeight的逐次變化,在這個(gè)變化的進(jìn)程中不斷調(diào)用
view.requestLayout();
刷新界面,這樣就到達(dá)了料想的效果。
實(shí)現(xiàn)content部份的隱藏,請(qǐng)參見(jiàn)代碼第141⑴61行
隱藏的進(jìn)程和之前的逐次顯示進(jìn)程原理是1樣的,不再贅述。
實(shí)現(xiàn)箭頭的轉(zhuǎn)向,請(qǐng)參見(jiàn)代碼第83⑼5行
這個(gè)比較簡(jiǎn)單,在此直接用屬性動(dòng)畫(huà)(ViewPropertyAnimator)讓箭頭旋轉(zhuǎn)
示例小結(jié):
在該demo中主要采取了手動(dòng)丈量View的方式獲得View的大小。
瞅瞅第2個(gè)例子,效果以下圖:

嗯哼,這個(gè)流式布局(FlowLayout)大家可能見(jiàn)過(guò),它經(jīng)常使用來(lái)做1些標(biāo)簽的顯示。比如,我要給我女朋友的照片加上描寫(xiě),我就能夠設(shè)置tag為:”賢良淑德”, “女神”, “年輕美貌”, “清純”, “溫順賢慧”等等。而且在標(biāo)簽的顯示進(jìn)程中,如果這1行沒(méi)有足夠的空間顯示下1個(gè)標(biāo)簽,那末會(huì)先自動(dòng)換行然后再添加新的標(biāo)簽。
好了,效果已看到了,我們來(lái)瞅瞅它是怎樣做的。
package com.stay4it.testflowlayout;

import android.content.Context;
import android.util.AttributeSet;
import android.view.View;
import android.view.ViewGroup;

/**
 * 原創(chuàng)作者:
 * 谷哥的小弟
 *
 * 博客地址:
 * http://blog.csdn.net/lfdfhl
 */
public class MyFlowLayout extends ViewGroup{
    private int  verticalSpacing = 20;
    public MyFlowLayout(Context context, AttributeSet attrs) {
        super(context, attrs);
    }

    @Override
    protected void onMeasure(int widthMeasureSpec, int heightMeasureSpec) {
        int widthSpecMode = MeasureSpec.getMode(widthMeasureSpec);
        int widthSpecSize = MeasureSpec.getSize(widthMeasureSpec);
        int heightSpecMode = MeasureSpec.getMode(heightMeasureSpec);
        int heightSpecSize = MeasureSpec.getSize(heightMeasureSpec);

        int paddingLeft = getPaddingLeft();
        int paddingRight = getPaddingRight();
        int paddingTop = getPaddingTop();
        int paddingBottom = getPaddingBottom();

        int widthUsed = paddingLeft + paddingRight;
        int heightUsed = paddingTop + paddingBottom;

        int childMaxHeightOfThisLine = 0;
        int childCount = getChildCount();
        for (int i = 0; i < childCount; i++) {
            View child = getChildAt(i);
            if (child.getVisibility() != GONE) {
                int childUsedWidth = 0;
                int childUsedHeight = 0;
                measureChild(child,widthMeasureSpec,heightMeasureSpec);
                childUsedWidth += child.getMeasuredWidth();
                childUsedHeight += child.getMeasuredHeight();

                LayoutParams childLayoutParams = child.getLayoutParams();

                MarginLayoutParams marginLayoutParams = (MarginLayoutParams) childLayoutParams;

                childUsedWidth += marginLayoutParams.leftMargin + marginLayoutParams.rightMargin;
                childUsedHeight += marginLayoutParams.topMargin + marginLayoutParams.bottomMargin;

                if (widthUsed + childUsedWidth < widthSpecSize) {
                    widthUsed += childUsedWidth;
                    if (childUsedHeight > childMaxHeightOfThisLine) {
                        childMaxHeightOfThisLine = childUsedHeight;
                    }
                } else {
                    heightUsed += childMaxHeightOfThisLine + verticalSpacing;
                    widthUsed = paddingLeft + paddingRight + childUsedWidth;
                    childMaxHeightOfThisLine = childUsedHeight;
                }

            }

        }

        heightUsed += childMaxHeightOfThisLine;
        setMeasuredDimension(widthSpecSize, heightUsed);
    }


    @Override
    protected void onLayout(boolean changed, int l, int t, int r, int b) {
        int paddingLeft = getPaddingLeft();
        int paddingRight = getPaddingRight();
        int paddingTop = getPaddingTop();
        int paddingBottom = getPaddingBottom();

        int childStartLayoutX = paddingLeft;
        int childStartLayoutY = paddingTop;

        int widthUsed = paddingLeft + paddingRight;

        int childMaxHeight = 0;

        int childCount = getChildCount();

        for (int i = 0; i < childCount; i++) {
            View child = getChildAt(i);
            if (child.getVisibility() != GONE) {
                int childNeededWidth, childNeedHeight;
                int left, top, right, bottom;

                int childMeasuredWidth = child.getMeasuredWidth();
                int childMeasuredHeight = child.getMeasuredHeight();

                LayoutParams childLayoutParams = child.getLayoutParams();
                MarginLayoutParams marginLayoutParams = (MarginLayoutParams) childLayoutParams;
                int childLeftMargin = marginLayoutParams.leftMargin;
                int childTopMargin = marginLayoutParams.topMargin;
                int childRightMargin = marginLayoutParams.rightMargin;
                int childBottomMargin = marginLayoutParams.bottomMargin;
                childNeededWidth = childLeftMargin + childRightMargin + childMeasuredWidth;
                childNeedHeight = childTopMargin + childBottomMargin + childMeasuredHeight;

                if (widthUsed + childNeededWidth <= r - l) {
                    if (childNeedHeight > childMaxHeight) {
                        childMaxHeight = childNeedHeight;
                    }
                    left = childStartLayoutX + childLeftMargin;
                    top = childStartLayoutY + childTopMargin;
                    right = left + childMeasuredWidth;
                    bottom = top + childMeasuredHeight;
                    widthUsed += childNeededWidth;
                    childStartLayoutX += childNeededWidth;
                } else {
                    childStartLayoutY += childMaxHeight + verticalSpacing;
                    childStartLayoutX = paddingLeft;
                    widthUsed = paddingLeft + paddingRight;
                    left = childStartLayoutX + childLeftMargin;
                    top = childStartLayoutY + childTopMargin;
                    right = left + childMeasuredWidth;
                    bottom = top + childMeasuredHeight;
                    widthUsed += childNeededWidth;
                    childStartLayoutX += childNeededWidth;
                    childMaxHeight = childNeedHeight;
                }
                child.layout(left, top, right, bottom);
            }
        }
    }

}
現(xiàn)就該代碼中的主要操作做1些分析和介紹。
重寫(xiě)onMeasure( ),請(qǐng)參見(jiàn)代碼第22⑺1行。
2.1 獲得View寬和高的mode和size,請(qǐng)參見(jiàn)代碼第23⑵6行。
此處widthSpecSize表示了View的寬,該值在判斷是不是需要換行時(shí)會(huì)用到。
2.2 計(jì)算View在水平方向和垂直方向已占用的大小,請(qǐng)參見(jiàn)代碼第33⑶4行。
在源碼階段也分析過(guò)這些已占用的大小主要指的是View的padding值。
2.3 丈量每一個(gè)子View的寬和高,請(qǐng)參見(jiàn)代碼第38⑹7行。
這1步操作是關(guān)鍵。在這1步中需要丈量出來(lái)每一個(gè)子View的大小從而計(jì)算出該控件的高度。
在對(duì)代碼做具體分析之前,我們先明白幾個(gè)問(wèn)題。
第1點(diǎn):
我們常說(shuō)丈量每一個(gè)子View的寬和高是為了將每一個(gè)子View的寬累加起來(lái)得到父View的寬,將每一個(gè)子View的高累加起來(lái)得到父View的高。
在此處,控件的寬就是屏幕的寬,所以我們不用去累加每一個(gè)子View的寬,但是要利用子View的寬判斷換行的時(shí)機(jī)。
至于控件的高,還是需要將每一個(gè)子View的高相累加。
第2點(diǎn):
怎樣判斷需要換行顯示新的tag呢?如果:
這1行已占用的寬度+行將顯示的子View的寬度>該行總寬度
那末就要斟酌換行顯示該tag
第3點(diǎn):
如果10個(gè)人站成1排,那末這個(gè)隊(duì)伍的高度是由誰(shuí)決定的呢?固然是這排人里個(gè)子最高的人決定的。一樣的道理,幾個(gè)tag擺放在同1行,這1行的高度就是由最高的tag的值決定的;然后將每行的高度相加就是View的總高了。
嗯哼,明白了這些,我們?cè)倏创a就容易很多了。
第1步:
利用measureChild( )丈量子View,請(qǐng)參見(jiàn)代碼第43行。
第2步:
計(jì)算子View需要占用的寬和高(childUsedWidth和childUsedHeight),請(qǐng)參見(jiàn)代碼第51⑸2行。
第3步:
判斷和處理是不是需要換行,請(qǐng)參見(jiàn)代碼第54⑹3行。
第4步:
利用setMeasuredDimension()設(shè)置View的寬和高,請(qǐng)參見(jiàn)代碼第70行
重寫(xiě)onLayout( ),請(qǐng)參見(jiàn)代碼第75⑴33行。
在onMeasure中已對(duì)每一個(gè)子View進(jìn)行了丈量,在該階段需要把每一個(gè)子View擺放在適合的位置。
所以核心是肯定每一個(gè)子View的left, top, right, bottom。
在該進(jìn)程中,一樣需要斟酌換行的問(wèn)題,思路也和measure階段類(lèi)似,故不再贅述。
嗯哼,完成了該自定義控件的代碼,該怎樣樣使用呢?
mFlowLayout.addView(textView, marginLayoutParams);
通過(guò)該方式就能夠?qū)?個(gè)tag添加到FlowLayout控件中顯示。
示例小結(jié):
通過(guò)直接繼承ViewGroup在其onMeasure( )和onLayout()中分別丈量和擺放各子View
PS:如果覺(jué)得文章太長(zhǎng),那就直接看視頻吧
好了,這就是和大家1起分享的兩個(gè)自定義View控件。
who is the next one? ——> TouchEvent

程序員人生,我編程,我富裕,記住wfuyu網(wǎng),php教程,php學(xué)習(xí),php手冊(cè),CMS模版制作
聲明:本站大部分內(nèi)容是作者原創(chuàng),少部分收集于互聯(lián)網(wǎng)供大家一起學(xué)習(xí),原版權(quán)很多不明,如有侵權(quán)請(qǐng)聯(lián)系本站,謝謝!
粵ICP備14040726號(hào)-1?? 2015-2020 程序員人生 版權(quán)所有


