
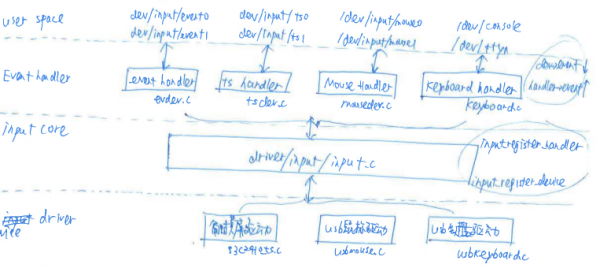
input子系統由驅動層drivers,輸入子系統核心層input core,事件處理層event handler組成。
1個輸入事件,通過輸入裝備發給系統如鼠標移動,鍵盤按鍵按下等通過device driver->input core(handler->event函數)->event handler->user space的順序到達用戶空間傳給利用程序。
1個輸失事件,通過系統發給輸入裝備,通過user space->event handler->input core(dev->event函數)->device driver
1、驅動功能層:負責和底層的硬件裝備打交道,將底層硬件裝備對用戶輸入的響應轉換為標準的輸入事件以后再向上發送給輸入系統核心層
2、Input系統核心層:由driver/input/input.c及相干頭文件實現,他對下提供了裝備驅動層的接口,對上提供了事件處理層的變成接口。
3、事件處理層將硬件裝備上報的事件分發到用戶空間和內核。
結構圖以下:
1)包括頭文件<linux/input.h>,他是input子系統的接口,提供了必要的定義消息
2)Input_allocate_device()
分配了1個Input device的結構,設置他的bit field來告知input子系統他能產生或接收甚么事件。
3)input_register_device(struct input_dev *dev)
將dev結構體添加到input_dev_list全局鏈表中去
通過input_attach_handler(struct input_dev *dev, struct input_handler *handler)來查找對應的handler,
input_attach_handler里面實際調用了input_match_device(const struct input_device_id *id,struct input_dev *dev)
1旦input_attach_handler找到了對應的handler,就履行handler->connect
4)input_report_key(struct input_dev *dev, unsigned int code, int value)
5)input_sync(struct input_dev *dev)
告知事件的接收者,到此為止為1次完全的消息。比如我們在touch screen上取得了x、y的值,要使作為1次事件,那末將input_sync加在report x、y值得后面。
6)其他的事件type,輸失事件處理
其他的事件有:
EV_LED:用作鍵盤的LED燈
EV_SND:用作鍵盤的蜂鳴器
他和鍵盤事件很相似,只不過鍵盤事件是INPUT_PASS_TO_DEVICE,而輸失事件是INPUT_PASS_TO_HANDLERS,從系統到輸入裝備的驅動程序,如果你的驅動程序要處理這些事件,必須設置evbit中相應位,而且要實現1個回調函數。
struct input_dev *button_dev;
button_dev->event = button_event;這個便是處理輸失事件的回調函數
Makefile以下:
Include/linux/bitops.h中定義了
#define BIT(nr) (1UL << (nr))
#define BIT_MASK(nr) (1UL << ((nr) % BITS_PER_LONG))
#define BIT_WORD(nr) ((nr) / BITS_PER_LONG)
#define BTN_0 0x100
button_dev->evbit[0] = BIT_MASK(EV_KEY);
button_dev->keybit[BIT_WORD(BTN_0)] = BIT_MASK(BTN_0);
說明:
1)上面的0x100表示BTN_0這個bit在所有的bit中是0x100(bit 256)位,那末
BIT_WORD(BTN_0)代表bit 256在keybit這個數組的第幾個數組(第8個)
BIT_MASK(BTN_0)代表bit 256在keybit這個數組的第幾個數組里面的值(第8個數組的bit0)
2)事件類型type――編碼code――值value
evbit是事件數組,evbit這個事件數組里面可以放很多事件類型,比如key、abs等
事件key里面又有很多具體編碼BTN_0、BTN_TOUCH等
事件abs里面也有很多具體編碼ABS_X、ABS_Y等
不同編碼有不同的值
另外http://blog.csdn.net/ylyuanlu/article/details/6704744 這篇博客對以下說的挺詳細的
1)input子系統的struct input_dev、struct handler的注冊
2)struct input_dev與struct input_handler怎樣相互匹配(類似于device和driver匹配)
3)事件處理進程
以上只是1個簡單的利用程序測試。當你按下K1的時候,串口終端會有顯示的input dev上報的按鍵的消息。
編寫利用程序的時候如何肯定是哪一個eventX呢,cat /proc/bus/input/devices,輸出打印消息以下:
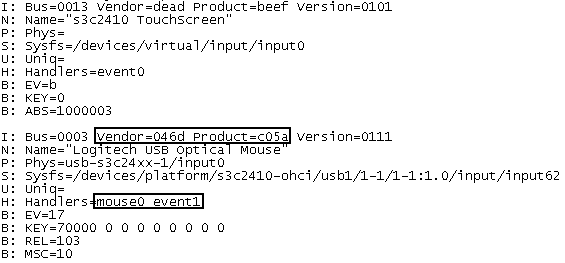
這里插入了鼠標,通過比較VID、PID來找到對應的usb mouse裝備,然后找到對應的mouse0、event1
另外還有很多里面ioctl調用的內容沒有實驗,具體可以參考這篇博客http://www.cnblogs.com/leaven/archive/2011/02/12/1952793.html,對ioctl的每一個case和read調用都試1遍,找到自己的體會。

下一篇 圖論:拓撲排序
程序員人生,我編程,我富裕,記住wfuyu網,php教程,php學習,php手冊,CMS模版制作
聲明:本站大部分內容是作者原創,少部分收集于互聯網供大家一起學習,原版權很多不明,如有侵權請聯系本站,謝謝!
粵ICP備14040726號-1?? 2015-2020 程序員人生 版權所有


