【Unity Shaders】Unity里的霧效模擬
來源:程序員人生 發布時間:2014-12-16 08:45:01 閱讀次數:7653次
寫在前面
熟習Unity的都知道,Unity可以進行基本的霧效摹擬。所謂霧效,就是在闊別我們視角的方向上,物體看起來像被蒙上了某種色彩(通常是灰色)。這類技術的實現實際上非常簡單,就是根據物體距離攝像機的遠近,來混合霧的色彩和物體本身的色彩便可。
Unity里設置霧效有兩種方式,1種最簡單的就是直接開啟全局霧效,也就是在Edit->Render Settings里配置,以下圖所示:
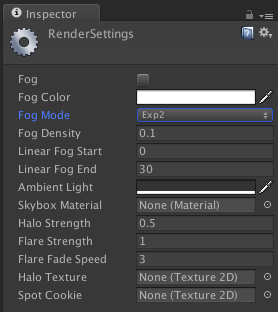
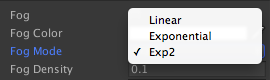
而我們只需要把“Fog”選項后面的勾選框打開便可。上圖包括了1些設置:霧的色彩,摹擬霧采取的方法,霧的濃度(只在采取指數方法時有用),受霧影響的距離出發點和終點(只在采取線性方法時有效)。其中,比較重要的是摹擬霧采取的方法,即“Fog Mode”這1選項。它可以選擇3種方法:
還有1種方法就是在shader中用Fog指令設置。這里有官網的說明。
3種模式
Linear、Exponential和Exp2這3種模式實際上是使用了不同的公式計算霧的影響因子。這個影響因子會作為混合霧的色彩和物體原始色彩的參數,來計算終究的混合色彩。例如,我們使用下面的語句來計算:
float3 afterFog = mix(_FogColor.rgb, col.rgb, fogFactor);
如果影響因子為1,則表明完全沒有霧效;如果為0,則表示完全被霧覆蓋。而3種模式使用的公式分別以下所示:
- Linear:
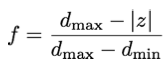 ,其中Dmax和Dmin分別表示受霧影響的距離出發點和終點。
- Exponential:
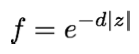 ,其中d表示霧的濃度。
- Exp2:
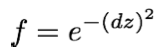 ,其中d表示霧的濃度。
3個等式中的z,表示距離攝像機的遠近。
為了充分理解霧效的實現原理和這3種方法的不同的地方,我們這篇會自己在Fragment Shader中摹擬霧效。
Unity摹擬的霧效
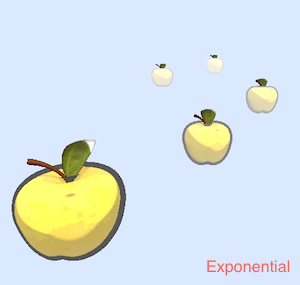
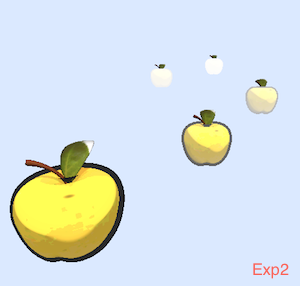
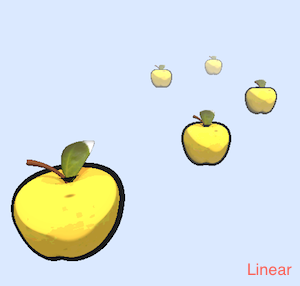
我們采取以下簡單的卡通蘋果場景(小蘋果真是我的最愛。。。)來檢驗霧效。原始的場景如圖所示:
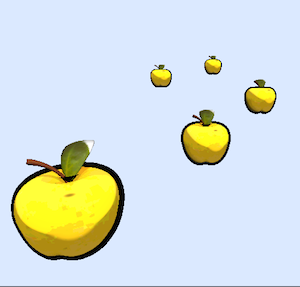
其中距離相機最遠的小蘋果的距離大約是25單位。
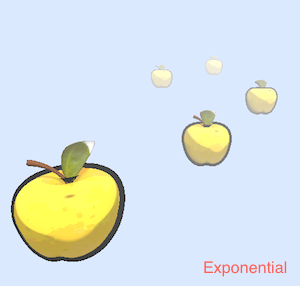
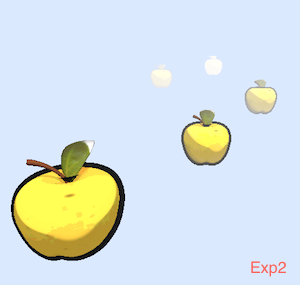
我們開啟Unity的全局霧效后,分別采取3種方法摹擬,結果以下:
它們的霧效配置以下所示:
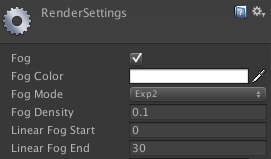
我們在后面會解釋這些參數的含義,現在我們只需要知道“Fog Density”僅在“Fog Mode”為“Exponential”或“Exp2”時有用,而“Linear Fog Start”和“Linear Fog End”僅在“Fog Mode”為“Linear”時有用便可。注意,上面的“Linear Fog Start”和“Linear Fog End”參數是基于“距離相機最遠的小蘋果的距離大約是25單位”這1條件設置的,只是為了讓霧效更加明顯而已。
現在,我們可以從視覺上了解3種方法的異同。
Fog實現的內部原理
為了充分了解霧效算法,我們現在在小蘋果現有的shader里添加霧效算法的實現。
- 首先,我們需要在Properties塊中添加霧效的幾個設置參數:
Properties {
_MainTex ("Base (RGB)", 2D) = "white" {}
_Ramp ("Ramp Texture", 2D) = "white" {}
_Tooniness ("Tooniness", Range(0.1,20)) = 4
_Outline ("Outline", Range(0,1)) = 0.1
_FogColor("Fog Color", Color) = (1, 0, 0, 0)
_FogIntensity("Fog Intensity", float) = 0.1
_FogStart("Fog Start", float) = 0
_FogEnd("Fog End", float) = 300
}
- 下面是添加摹擬霧效的函數:
float4 SimulateFog(float4 pos, float4 col)
{
pos.w = 0.0;
float dist = length(pos);
// float dist = pos.z;
// Linear
// float fogFactor = (_FogEnd - abs(dist)) / (_FogEnd - _FogStart);
// fogFactor = clamp(fogFactor, 0.0, 1.0);
// Exponential
// float fogFactor = exp(-abs(_FogIntensity * dist));
// fogFactor = clamp(fogFactor, 0.0, 1.0);
// Exp2
float fogFactor = exp(-(_FogIntensity * dist) * (_FogIntensity * dist));
fogFactor = clamp(fogFactor, 0.0, 1.0);
float3 afterFog = mix(_FogColor.rgb, col.rgb, fogFactor);
return float4(afterFog, col.a);
}
解釋:有了上面的公式,這個函數很好理解。值得說明的是,函數參數pos是指在view space中頂點的位置,由于只有在這個坐標系中,攝像機的位置總是位于原點。在計算距離攝像機遠近時,我們有兩種可選方式:1種直接使用pos.z得到近似值,1種是使用真正距離攝像機的距離,即計算xyz平方和后開根號的結果。第2種方法由于使用了計算根號這類操作,因此在性能上稍微比第1種查1點,但效果也更真實。
使用上述代碼的3種模式效果以下:
上圖中使用蘋果主體部份使用了fog shader,葉子和梗沒有使用哦~可以看出,和Unity摹擬的效果基本相同。
最后,完全的代碼以下:
Shader "Custom/FogSimulation" {
Properties {
_MainTex ("Base (RGB)", 2D) = "white" {}
_Ramp ("Ramp Texture", 2D) = "white" {}
_Tooniness ("Tooniness", Range(0.1,20)) = 4
_Outline ("Outline", Range(0,1)) = 0.1
_FogColor("Fog Color", Color) = (1, 0, 0, 0)
_FogIntensity("Fog Intensity", float) = 0.1
_FogStart("Fog Start", float) = 0
_FogEnd("Fog End", float) = 300
}
SubShader {
Tags { "RenderType"="Opaque" }
LOD 200
CGINCLUDE
#include "UnityCG.cginc"
sampler2D _MainTex;
sampler2D _Ramp;
float4 _MainTex_ST;
float _Tooniness;
float _Outline;
float4 _FogColor;
float _FogIntensity;
float _FogStart;
float _FogEnd;
float4 SimulateFog(float4 pos, float4 col)
{
pos.w = 0.0;
float dist = length(pos);
// float dist = pos.z;
// Linear
// float fogFactor = (_FogEnd - abs(dist)) / (_FogEnd - _FogStart);
// fogFactor = clamp(fogFactor, 0.0, 1.0);
// Exponential
// float fogFactor = exp(-abs(_FogIntensity * dist));
// fogFactor = clamp(fogFactor, 0.0, 1.0);
// Exp2
float fogFactor = exp(-(_FogIntensity * dist) * (_FogIntensity * dist));
fogFactor = clamp(fogFactor, 0.0, 1.0);
float3 afterFog = mix(_FogColor.rgb, col.rgb, fogFactor);
return float4(afterFog, col.a);
}
ENDCG
Pass {
Tags { "LightMode"="ForwardBase" }
Cull Front
Lighting Off
ZWrite On
CGPROGRAM
#pragma vertex vert
#pragma fragment frag
#pragma multi_compile_fwdbase
#include "UnityCG.cginc"
struct a2v
{
float4 vertex : POSITION;
float3 normal : NORMAL;
};
struct v2f
{
float4 pos : POSITION;
float4 viewSpacePos : TEXCOORD0;
};
v2f vert (a2v v)
{
v2f o;
float4 pos = mul( UNITY_MATRIX_MV, v.vertex);
float3 normal = mul( (float3x3)UNITY_MATRIX_IT_MV, v.normal);
normal.z = -0.5;
pos = pos + float4(normalize(normal),0) * _Outline;
o.pos = mul(UNITY_MATRIX_P, pos);
o.viewSpacePos = mul( UNITY_MATRIX_MV, v.vertex);
return o;
}
float4 frag(v2f i) : COLOR
{
return SimulateFog(i.viewSpacePos, float4(0, 0, 0, 1));
}
ENDCG
}
Pass {
Tags { "LightMode"="ForwardBase" }
Cull Back
Lighting On
CGPROGRAM
#pragma vertex vert
#pragma fragment frag
#pragma multi_compile_fwdbase
#include "UnityCG.cginc"
#include "Lighting.cginc"
#include "AutoLight.cginc"
#include "UnityShaderVariables.cginc"
struct a2v
{
float4 vertex : POSITION;
float3 normal : NORMAL;
float4 texcoord : TEXCOORD0;
float4 tangent : TANGENT;
};
struct v2f
{
float4 pos : POSITION;
float2 uv : TEXCOORD0;
float3 normal : TEXCOORD1;
float4 viewSpacePos : TEXCOORD2;
LIGHTING_COORDS(3,4)
};
v2f vert (a2v v)
{
v2f o;
//Transform the vertex to projection space
o.pos = mul( UNITY_MATRIX_MVP, v.vertex);
o.normal = mul((float3x3)_Object2World, SCALED_NORMAL);
//Get the UV coordinates
o.uv = TRANSFORM_TEX (v.texcoord, _MainTex);
o.viewSpacePos = mul( UNITY_MATRIX_MV, v.vertex);
// pass lighting information to pixel shader
TRANSFER_VERTEX_TO_FRAGMENT(o);
return o;
}
float4 frag(v2f i) : COLOR
{
//Get the color of the pixel from the texture
float4 c = tex2D (_MainTex, i.uv);
//Merge the colours
c.rgb = (floor(c.rgb*_Tooniness)/_Tooniness);
//Based on the ambient light
float3 lightColor = UNITY_LIGHTMODEL_AMBIENT.xyz;
//Work out this distance of the light
float atten = LIGHT_ATTENUATION(i);
//Angle to the light
float diff = dot (normalize(i.normal), normalize(_WorldSpaceLightPos0.xyz));
diff = diff * 0.5 + 0.5;
//Perform our toon light mapping
diff = tex2D(_Ramp, float2(diff, 0.5));
//Update the colour
lightColor += _LightColor0.rgb * (diff * atten);
//Product the final color
c.rgb = lightColor * c.rgb * 2;
return SimulateFog(i.viewSpacePos, c);
}
ENDCG
}
}
FallBack "Diffuse"
}
寫在最后
Unity文檔中寫道:
Note that if you use fragment programs, Fog settings of the shader will still be applied. On platforms where there is no fixed function Fog functionality, Unity will patch shaders at runtime to support the requested Fog mode.
也就是說,即使我們是使用自己編寫的Fragment Shader,但還是會遭到Unity Render Settings的影響。即使是Unity里自定義的Vertex & Fragment Shader,應當也是不知道被Unity封裝了多少層以后的上層函數。如果開啟了全局霧效,那末Unity會在背后大概使用了固定渲染流水線中的fog指令,來摹擬霧效。因此,如果對不支持固定管線的霧效函數的平臺,它就會使用自己編寫shader(類似我們上面那樣),來摹擬霧效。
參考:《OpenGL 4 Sharding Language Cookbook》
生活不易,碼農辛苦
如果您覺得本網站對您的學習有所幫助,可以手機掃描二維碼進行捐贈