
注,大家可以看到,由于我們網站是發展早期,nginx只代理了后端1臺服務器,但由于我們網站名望大漲訪問的人愈來愈多1臺服務器實在是頂不住,因而我們加了多臺服務器,那末多臺服務器又怎樣配置代理呢,我們這里以兩臺服務器為案例,為大家做演示。
1.upstream 負載均衡模塊說明
案例:
下面設定負載均衡的服務器列表。
|
1
2
3
4
5
6
7
8
9
10
11
12
|
upstream test.net{ip_hash;server 192.168.10.13:80;server 192.168.10.14:80 down;server 192.168.10.15:8009 max_fails=3 fail_timeout=20s;server 192.168.10.16:8080;}server { location / { proxy_pass http://test.net; }} |
upstream是Nginx的HTTP Upstream模塊,這個模塊通過1個簡單的調度算法來實現客戶端IP到后端服務器的負載均衡。在上面的設定中,通過upstream指令指定了1個負載均衡器的名稱test.net。這個名稱可以任意指定,在后面需要用到的地方直接調用便可。
2.upstream 支持的負載均衡算法
Nginx的負載均衡模塊目前支持4種調度算法,下面進行分別介紹,其中后兩項屬于第3方調度算法。
輪詢(默許)。每一個要求按時間順序逐1分配到不同的后端服務器,如果后端某臺服務器宕機,故障系統被自動剔除,使用戶訪問不受影響。Weight 指定輪詢權值,Weight值越大,分配到的訪問機率越高,主要用于后端每一個服務器性能不均的情況下。
ip_hash。每一個要求按訪問IP的hash結果分配,這樣來自同1個IP的訪客固定訪問1個后端服務器,有效解決了動態網頁存在的session同享問題。
fair。這是比上面兩個更加智能的負載均衡算法。此種算法可以根據頁面大小和加載時間長短智能地進行負載均衡,也就是根據后端服務器的響應時間來分配要求,響應時間短的優先分配。Nginx本身是不支持fair的,如果需要使用這類調度算法,必須下載Nginx的upstream_fair模塊。
url_hash。此方法按訪問url的hash結果來分配要求,使每一個url定向到同1個后端服務器,可以進1步提高后端緩存服務器的效力。Nginx本身是不支持url_hash的,如果需要使用這類調度算法,必須安裝Nginx 的hash軟件包。
3.upstream 支持的狀態參數
在HTTP Upstream模塊中,可以通過server指令指定后端服務器的IP地址和端口,同時還可以設定每一個后端服務器在負載均衡調度中的狀態。經常使用的狀態有:
down,表示當前的server暫時不參與負載均衡。
backup,預留的備份機器。當其他所有的非backup機器出現故障或忙的時候,才會要求backup機器,因此這臺機器的壓力最輕。
max_fails,允許要求失敗的次數,默許為1。當超過最大次數時,返回proxy_next_upstream 模塊定義的毛病。
fail_timeout,在經歷了max_fails次失敗后,暫停服務的時間。max_fails可以和fail_timeout1起使用。
注,當負載調度算法為ip_hash時,后端服務器在負載均衡調度中的狀態不能是weight和backup。
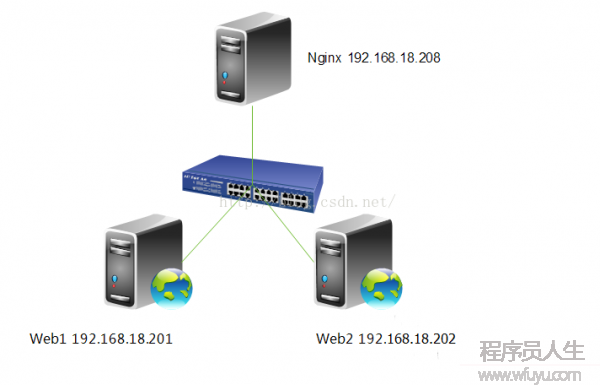
4.實驗拓撲
5.配置nginx負載均衡
|
1
2
3
4
5
6
7
8
9
10
11
12
13
14
15
|
[root@nginx ~]# vim /etc/nginx/nginx.confupstream webservers { server 192.168.18.201 weight=1; server 192.168.18.202 weight=1; } server { listen 80; server_name localhost; #charset koi8-r; location / { proxy_pass http://webservers; proxy_set_header X-Real-IP $remote_addr; }} |
注,upstream是定義在server{ }以外的,不能定義在server{ }內部。定義好upstream以后,用proxy_pass援用1下便可。
6.重新加載1下配置文件
|
1
2
3
4
|
[root@nginx ~]# service nginx reloadnginx: the configuration file /etc/nginx/nginx.conf
syntax is oknginx: configuration file /etc/nginx/nginx.conf test is
successful重新載入 nginx: [肯定] |
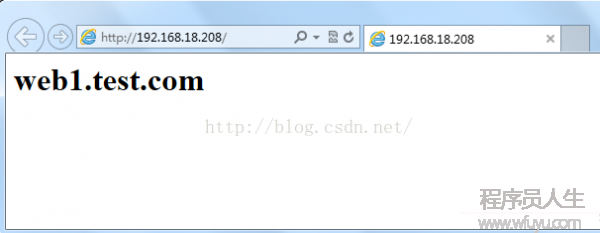
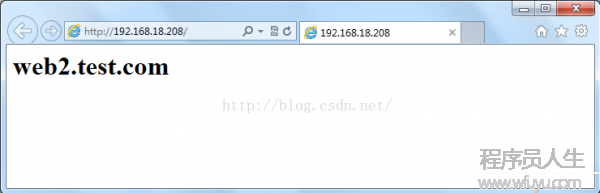
7.測試1下
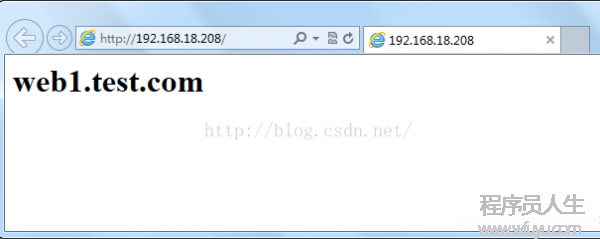
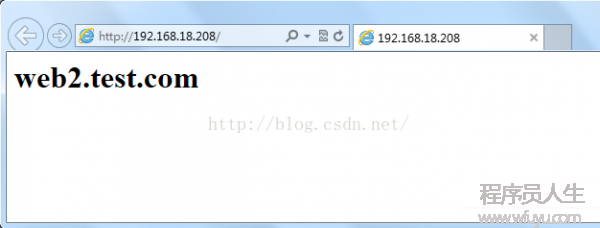
注,大家可以不斷的刷新閱讀的內容,可以發現web1與web2是交替出現的,到達了負載均衡的效果。
8.查看1下Web訪問服務器日志
Web1:
|
1
2
3
4
5
6
7
8
9
10
11
|
[root@web1 ~]# tail /var/log/httpd/access_log192.168.18.138 - - [04/Sep/2013:09:41:58
+0800] "GET / HTTP/1.0" 200 23 "-" "Mozilla/5.0
(compatible; MSIE 10.0; Windows NT 6.1; WOW64; Trident/6.0)"192.168.18.138 - - [04/Sep/2013:09:41:58
+0800] "GET / HTTP/1.0" 200 23 "-" "Mozilla/5.0
(compatible; MSIE 10.0; Windows NT 6.1; WOW64; Trident/6.0)"192.168.18.138 - - [04/Sep/2013:09:41:59
+0800] "GET / HTTP/1.0" 200 23 "-" "Mozilla/5.0
(compatible; MSIE 10.0; Windows NT 6.1; WOW64; Trident/6.0)"192.168.18.138 - - [04/Sep/2013:09:41:59
+0800] "GET / HTTP/1.0" 200 23 "-" "Mozilla/5.0
(compatible; MSIE 10.0; Windows NT 6.1; WOW64; Trident/6.0)"192.168.18.138 - - [04/Sep/2013:09:42:00
+0800] "GET / HTTP/1.0" 200 23 "-" "Mozilla/5.0
(compatible; MSIE 10.0; Windows NT 6.1; WOW64; Trident/6.0)"192.168.18.138 - - [04/Sep/2013:09:42:00
+0800] "GET / HTTP/1.0" 200 23 "-" "Mozilla/5.0
(compatible; MSIE 10.0; Windows NT 6.1; WOW64; Trident/6.0)"192.168.18.138 - - [04/Sep/2013:09:42:00
+0800] "GET / HTTP/1.0" 200 23 "-" "Mozilla/5.0
(compatible; MSIE 10.0; Windows NT 6.1; WOW64; Trident/6.0)"192.168.18.138 - - [04/Sep/2013:09:44:21
+0800] "GET / HTTP/1.0" 200 23 "-" "Mozilla/5.0
(compatible; MSIE 10.0; Windows NT 6.1; WOW64; Trident/6.0)"192.168.18.138 - - [04/Sep/2013:09:44:22
+0800] "GET / HTTP/1.0" 200 23 "-" "Mozilla/5.0
(compatible; MSIE 10.0; Windows NT 6.1; WOW64; Trident/6.0)"192.168.18.138 - - [04/Sep/2013:09:44:22
+0800] "GET / HTTP/1.0" 200 23 "-" "Mozilla/5.0
(compatible; MSIE 10.0; Windows NT 6.1; WOW64; Trident/6.0)" |
Web2:
先修改1下,Web服務器記錄日志的格式。
|
1
2
3
4
5
|
[root@web2 ~]# vim /etc/httpd/conf/httpd.confLogFormat "%{X-Real-IP}i %l %u %t \"%r\" %>s %b \"%{Referer}i\"
\"%{User-Agent}i\"" combined[root@web2 ~]# service httpd restart停止 httpd: [肯定]正在啟動 httpd: [肯定] |
接著,再訪問屢次,繼續查看日志。
|
1
2
3
4
5
6
7
8
9
10
11
|
[root@web2 ~]# tail /var/log/httpd/access_log192.168.18.138 - - [04/Sep/2013:09:50:28
+0800] "GET / HTTP/1.0" 200 23 "-" "Mozilla/5.0
(compatible; MSIE 10.0; Windows NT 6.1; WOW64; Trident/6.0)"192.168.18.138 - - [04/Sep/2013:09:50:28
+0800] "GET / HTTP/1.0" 200 23 "-" "Mozilla/5.0
(compatible; MSIE 10.0; Windows NT 6.1; WOW64; Trident/6.0)"192.168.18.138 - - [04/Sep/2013:09:50:28
+0800] "GET / HTTP/1.0" 200 23 "-" "Mozilla/5.0
(compatible; MSIE 10.0; Windows NT 6.1; WOW64; Trident/6.0)"192.168.18.138 - - [04/Sep/2013:09:50:28
+0800] "GET / HTTP/1.0" 200 23 "-" "Mozilla/5.0
(compatible; MSIE 10.0; Windows NT 6.1; WOW64; Trident/6.0)"192.168.18.138 - - [04/Sep/2013:09:50:28
+0800] "GET / HTTP/1.0" 200 23 "-" "Mozilla/5.0
(compatible; MSIE 10.0; Windows NT 6.1; WOW64; Trident/6.0)"192.168.18.138 - - [04/Sep/2013:09:50:28
+0800] "GET / HTTP/1.0" 200 23 "-" "Mozilla/5.0
(compatible; MSIE 10.0; Windows NT 6.1; WOW64; Trident/6.0)"192.168.18.138 - - [04/Sep/2013:09:50:28
+0800] "GET / HTTP/1.0" 200 23 "-" "Mozilla/5.0
(compatible; MSIE 10.0; Windows NT 6.1; WOW64; Trident/6.0)"192.168.18.138 - - [04/Sep/2013:09:50:28
+0800] "GET / HTTP/1.0" 200 23 "-" "Mozilla/5.0
(compatible; MSIE 10.0; Windows NT 6.1; WOW64; Trident/6.0)"192.168.18.138 - - [04/Sep/2013:09:50:29
+0800] "GET / HTTP/1.0" 200 23 "-" "Mozilla/5.0
(compatible; MSIE 10.0; Windows NT 6.1; WOW64; Trident/6.0)"192.168.18.138 - - [04/Sep/2013:09:50:29
+0800] "GET / HTTP/1.0" 200 23 "-" "Mozilla/5.0
(compatible; MSIE 10.0; Windows NT 6.1; WOW64; Trident/6.0)" |
注,大家可以看到,兩臺服務器日志都記錄是192.168.18.138訪問的日志,也說明了負載均衡配置成功。
9.配置nginx進行健康狀態檢查
max_fails,允許要求失敗的次數,默許為1。當超過最大次數時,返回proxy_next_upstream 模塊定義的毛病。
fail_timeout,在經歷了max_fails次失敗后,暫停服務的時間。max_fails可以和fail_timeout1起使用,進行健康狀態檢查。
|
1
2
3
4
5
|
[root@nginx ~]# vim /etc/nginx/nginx.confupstream webservers { server 192.168.18.201 weight=1 max_fails=2 fail_timeout=2; server 192.168.18.202 weight=1 max_fails=2 fail_timeout=2; } |
10.重新加載1下配置文件
|
1
2
3
4
|
[root@nginx ~]# service nginx reloadnginx: the configuration file /etc/nginx/nginx.conf
syntax is oknginx: configuration file /etc/nginx/nginx.conf test is
successful重新載入 nginx: [肯定] |
11.停止服務器并測試
|
1
2
3
|
先停止Web1,進行測試。[root@web1 ~]# service httpd stop停止 httpd: [肯定] |
注,大家可以看到,現在只能訪問Web2,再重新啟動Web1,再次訪問1下。
|
1
2
|
[root@web1 ~]# service httpd start正在啟動 httpd: [肯定] |
注,大家可以看到,現在又可以重新訪問,說明nginx的健康狀態查檢配置成功。但大家想1下,如果不幸的是所有服務器都不能提供服務了怎樣辦,用戶打開頁面就會出現出錯頁面,那末會帶來用戶體驗的下降,所以我們能不能像配置LVS是配置sorry_server呢,答案是可以的,但這里不是配置sorry_server而是配置backup。
12.配置backup服務器
|
1
2
3
4
5
6
7
8
9
10
11
12
13
14
15
|
[root@nginx ~]# vim /etc/nginx/nginx.confserver { listen 8080; server_name localhost; root /data/www/errorpage; index index.html; }upstream webservers { server 192.168.18.201 weight=1 max_fails=2 fail_timeout=2; server 192.168.18.202 weight=1 max_fails=2 fail_timeout=2; server 127.0.0.1:8080 backup; }[root@nginx ~]# mkdir -pv /data/www/errorpage[root@nginx errorpage]# cat index.html<h1>Sorry......</h1> |
13.重新加載配置文件
|
1
2
3
4
|
[root@nginx errorpage]# service nginx reloadnginx: the configuration file /etc/nginx/nginx.conf
syntax is oknginx: configuration file /etc/nginx/nginx.conf test is
successful重新載入 nginx: [肯定] |
14.關閉Web服務器并進行測試

程序員人生,我編程,我富裕,記住wfuyu網,php教程,php學習,php手冊,CMS模版制作
聲明:本站大部分內容是作者原創,少部分收集于互聯網供大家一起學習,原版權很多不明,如有侵權請聯系本站,謝謝!
粵ICP備14040726號-1?? 2015-2020 程序員人生 版權所有


