
新blog地址:http://hengyunabc.github.io/deploy-system-build-with-jenkins-ansible-supervisor/
1步1步用jenkins,ansible,supervisor打造1個web構建發布系統。
本來應當還有gitlab這1環節的,但是感覺加上,內容會增加很多。所以直接用github上的spring-mvc-showcase項目來做演示。
https://github.com/spring-projects/spring-mvc-showcase
本文的環境用docker來構建。固然也能夠任意linux環境下搭建。
如果沒有安裝docker,可以參考官方的文檔:
https://docs.docker.com/installation/ubuntulinux/#ubuntu-trusty⑴404-lts⑹4-bit
下面將要介紹的完全流程是:
在文章的最后,會給出1個完全的docker鏡像,大家可以自己運行查看實際效果。
sudo docker run -i -t -p 8080:8080 -p 8101:8101 -p 9001:9001 --name='jenkins' ubuntu /bin/bash8080是jenkins的端口,8101是spring-mvc-showcase的端口,9001是supervisor的web界面端口
履行完以后,會得到1個container的shell。接著在這個shell里安裝其它組件。
sudo apt-get update
sudo apt-get install openjdk-7-jdk gitapt-get install wget
mkdir /opt/jenkins
cd /opt/jenkins
wget http://apache.fayea.com/tomcat/tomcat-8/v8.0.18/bin/apache-tomcat-8.0.18.tar.gz
tar xzf apache-tomcat-8.0.18.tar.gz
cd /opt/jenkins/apache-tomcat-8.0.18/webapps
wget http://mirrors.jenkins-ci.org/war/latest/jenkins.war
rm -rf ROOT*
mv jenkins.war ROOT.war/opt/jenkins/apache-tomcat-8.0.18/bin/startup.sh然后在本機用閱讀器訪問:http://localhost:8080/ ,可以看到jenkins的界面了。
安裝git插件:
https://wiki.jenkins-ci.org/display/JENKINS/Git+Plugin
在“系統管理”,“插件管理”,“可選插件”列表里,搜索“Git Plugin”,這樣比較快可以找到。
由于jenkins用google來檢查網絡的連通性,所以可能在開始安裝插件時會卡住1段時間。
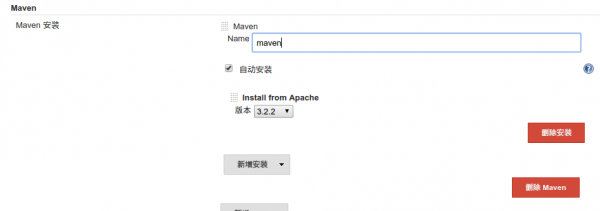
打開 http://localhost:8080/configure,
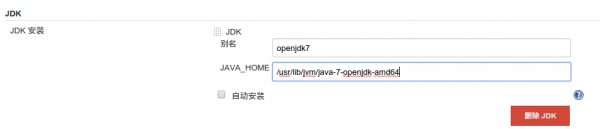
在jenkins的系統配置里,可以找到maven,git,java相干的配置,只要勾選了,在開時履行job時,會自動下載。
JDK可以選擇剛才安裝好的openjdk,也能夠選擇自動安裝oracle jdk。
Git會自動配置好。
安裝sshd服務:
sudo apt-get install openssh-server sshpass編輯
vi /etc/ssh/sshd_config
把
PermitRootLogin without-password改成:
PermitRootLogin yes重啟ssh服務:
sudo /etc/init.d/ssh restart為root用戶配置密碼,設置為12345:
passwd最后嘗試登陸下:
ssh root@127.0.0.1在jenkins這個container里,繼續安裝ansible,用來做遠程發布用。
先安裝pip,再用pip安裝ansible:
sudo apt-get install python-pip python-dev build-essential git
sudo pip install ansible把自動發布的ansible playbook clone到本地:
https://github.com/hengyunabc/jenkins-ansible-supervisor-deploy
mkdir -p /opt/ansible
cd /opt/ansible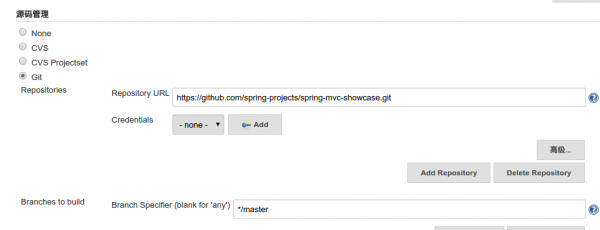
git clone https://github.com/hengyunabc/jenkins-ansible-supervisor-deploy新建1個maven的項目/job,名為spring-mvc-showcase
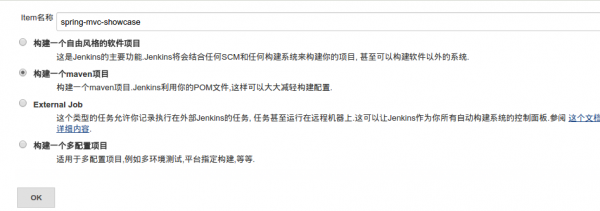
在配置頁面里,勾選“參數化構建進程”,再順次增加“String”類型的參數
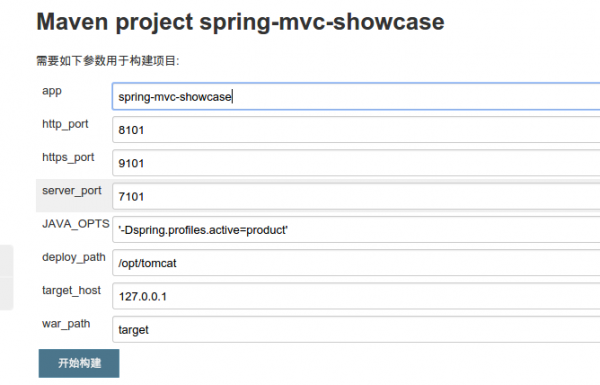
共有這些參數:
    app    要發布的app的名字
    http_port     tomcat的http端口
    https_port  tomcat的https端口
    server_port tomcat的server port
    JAVA_OPTS    tomcat啟動的Java參數
    deploy_path   tomcat的目錄
    target_host  要發布到哪臺機器
war_path jenkins生成的war包的目錄https://github.com/spring-projects/spring-mvc-showcase.git
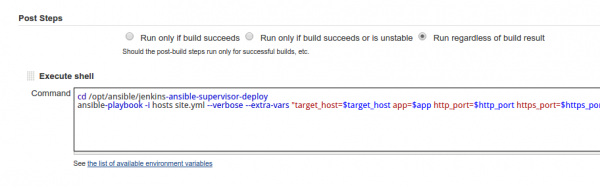
cd /opt/ansible/jenkins-ansible-supervisor-deploy
ansible-playbook -i hosts site.yml --verbose --extra-vars "target_host=$target_host app=$app http_port=$http_port https_port=$https_port server_port=$server_port deploy_path=$deploy_path JAVA_HOME=/usr JAVA_OPTS=$JAVA_OPTS deploy_war_path=$WORKSPACE/$war_path"
最后,保存。
1切都配置好以后,可以在jenkins界面上,在左側,選擇“Build with Parameters”,“開始”來構建項目了。
如果構建成功的話,就能夠打開 http://localhost:8101 ,就能夠看到spring-mvc-showcase的界面了。

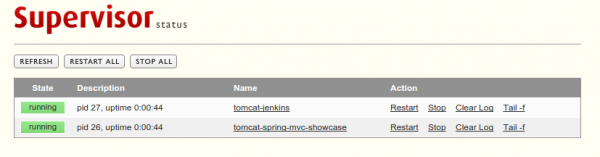
打開 http://localhost:9001 可以看到superviosr的控制網頁,可以查看tomcat進程的狀態,重啟,查看日志等。
如果想要發布到其它機器上的話,只要在
/opt/ansible/jenkins-ansible-supervisor-deploy/hosts
文件里增加相應的host配置就能夠了。
如果提示
to use the 'ssh' connection type with passwords, you must install the sshpass program則安裝:
sudo apt-get install sshpass如果只是想查看實際運行效果,可以直接把 hengyunabc/jenkins-ansible-supervisor 這個image拉下來,運行便可。
docker run -it -p 8080:8080 -p 8101:8101 -p 9001:9001 --name='jenkins' hengyunabc/jenkins-ansible-supervisor
上一篇 【JavaScript】body內的任意節點的自定義屬性
下一篇 Codeforces Round #295 (Div. 1) C. Pluses everywhere (組合數學+乘法逆元)
程序員人生,我編程,我富裕,記住wfuyu網,php教程,php學習,php手冊,CMS模版制作
聲明:本站大部分內容是作者原創,少部分收集于互聯網供大家一起學習,原版權很多不明,如有侵權請聯系本站,謝謝!
粵ICP備14040726號-1?? 2015-2020 程序員人生 版權所有


