
在閱讀相冊的時候,可能需要生成相應的縮略圖。
直接上代碼:
public class ImageUtil {

    private Logger log = LoggerFactory.getLogger(getClass());

    private static String DEFAULT_PREVFIX = "thumb_";
    private static Boolean DEFAULT_FORCE = false;//建議該值為false

    /**
     * <p>Title: thumbnailImage</p>
     * <p>Description: 根據圖片路徑生成縮略圖 </p>
     * @param imagePath    原圖片路徑
     * @param w            縮略圖寬
     * @param h            縮略圖高
     * @param prevfix    生成縮略圖的前綴
     * @param force        是不是強迫依照寬高生成縮略圖(如果為false,則生成最好比例縮略圖)
     */
    public void thumbnailImage(String imagePath, int w, int h, String prevfix, boolean force){
        File imgFile = new File(imagePath);
        if(imgFile.exists()){
            try {
                // ImageIO 支持的圖片類型 : [BMP, bmp, jpg, JPG, wbmp, jpeg, png, PNG, JPEG, WBMP, GIF, gif]
                String types = Arrays.toString(ImageIO.getReaderFormatNames());
                String suffix = null;
                // 獲得圖片后綴
                if(imgFile.getName().indexOf(".") > -1) {
                    suffix = imgFile.getName().substring(imgFile.getName().lastIndexOf(".") + 1);
                }// 類型和圖片后綴全部小寫,然后判斷后綴是不是合法
                if(suffix == null || types.toLowerCase().indexOf(suffix.toLowerCase()) < 0){
                    log.error("Sorry, the image suffix is illegal. the standard image suffix is {}." + types);
                    return ;
                }
                log.debug("target image's size, width:{}, height:{}.",w,h);
                Image img = ImageIO.read(imgFile);
                if(!force){
                    // 根據原圖與要求的縮略圖比例,找到最適合的縮略圖比例
                    int width = img.getWidth(null);
                    int height = img.getHeight(null);
                    if((width*1.0)/w < (height*1.0)/h){
                        if(width > w){
                            h = Integer.parseInt(new java.text.DecimalFormat("0").format(height * w/(width*1.0)));
                            log.debug("change image's height, width:{}, height:{}.",w,h);
                        }
                    } else {
                        if(height > h){
                            w = Integer.parseInt(new java.text.DecimalFormat("0").format(width * h/(height*1.0)));
                            log.debug("change image's width, width:{}, height:{}.",w,h);
                        }
                    }
                }
                BufferedImage bi = new BufferedImage(w, h, BufferedImage.TYPE_INT_RGB);
                Graphics g = bi.getGraphics();
                g.drawImage(img, 0, 0, w, h, Color.LIGHT_GRAY, null);
                g.dispose();
                String p = imgFile.getPath();
                // 將圖片保存在原目錄并加上前綴
                ImageIO.write(bi, suffix, new File(p.substring(0,p.lastIndexOf(File.separator)) + File.separator + prevfix +imgFile.getName()));
                log.debug("縮略圖在原路徑下生成成功");
            } catch (IOException e) {
               log.error("generate thumbnail image failed.",e);
            }
        }else{
            log.warn("the image is not exist.");
        }
    }

    public static void main(String[] args) {
        new ImageUtil().thumbnailImage("C:/Users/cm/Desktop/我的頁面/images/girlNoImg.jpg", 100, 150,DEFAULT_PREVFIX,DEFAULT_FORCE);
    }
}
直接運行main方法,填入相對應的參數便可。
在我們修改個人微博、qq資料的時候可以上傳個人頭像,并可以剪裁個人頭像然后上傳。剪裁圖片的大小樣式是通過javascript實現的,但是它其實不能生成1個新的圖片。但是js剪裁圖片提供圖片的x,y坐標和寬高,通過這4個參數我們可以根據原圖片生成新的剪裁圖片。
步驟:
1、首先通過頁面利用js實現圖片剪切閱讀功能,我參照慕課網提供的資料并略微更改了1下。另外我們也能夠使用插件,比如Jcrop是款很不錯的圖片裁剪插件。
下載地址:http://download.csdn.net/detail/u012385190/9733480
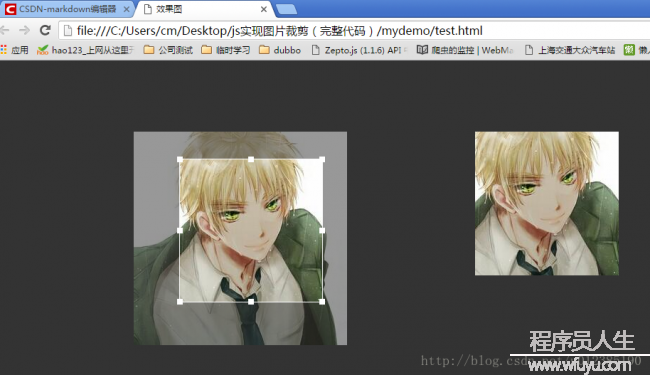
最后效果圖如上,左邊可以拖動拖拉,右邊是預覽圖。
2、java生成并保存剪切圖片
public class ImageUtil2 {

    private Logger log = LoggerFactory.getLogger(getClass());

    private static String DEFAULT_CUT_PREVFIX = "cut_";

    /**
     * Description: 根據原圖與裁切size截取局部圖片
     * @param srcImg 源圖片
     * @param output 圖片輸出流
     * @param rect 需要截取部份的坐標和大小
     */
    public void cutImage(File srcImg, OutputStream output,java.awt.Rectangle rect) {
        if (srcImg.exists()) {
            java.io.FileInputStream fis = null;
            ImageInputStream iis = null;
            try {
                fis = new FileInputStream(srcImg);
                // ImageIO 支持的圖片類型 : [BMP, bmp, jpg, JPG, wbmp, jpeg, png, PNG,
                // JPEG, WBMP, GIF, gif]
                String types = Arrays.toString(ImageIO.getReaderFormatNames())
                        .replace("]", ",");
                String suffix = null;
                // 獲得圖片后綴
                if (srcImg.getName().indexOf(".") > -1) {
                    suffix = srcImg.getName().substring(srcImg.getName().lastIndexOf(".") + 1);
                }// 類型和圖片后綴全部小寫,然后判斷后綴是不是合法
                if (suffix == null
                        || types.toLowerCase().indexOf(suffix.toLowerCase() + ",") < 0) {
                    log.error("Sorry, the image suffix is illegal. the standard image suffix is {}."+ types);
                    return;
                }
                // 將FileInputStream 轉換為ImageInputStream
                iis = ImageIO.createImageInputStream(fis);
                // 根據圖片類型獲得該種類型的ImageReader
                ImageReader reader = ImageIO.getImageReadersBySuffix(suffix).next();
                reader.setInput(iis, true);
                ImageReadParam param = reader.getDefaultReadParam();
                param.setSourceRegion(rect);
                BufferedImage bi = reader.read(0, param);
                ImageIO.write(bi, suffix, output);
                log.info("圖片生成成功,請到目錄下查看");
            } catch (FileNotFoundException e) {
                e.printStackTrace();
            } catch (IOException e) {
                e.printStackTrace();
            } finally {
                try {
                    if (fis != null)
                        fis.close();
                    if (iis != null)
                        iis.close();
                } catch (IOException e) {
                    e.printStackTrace();
                }
            }
        } else {
            log.warn("the src image is not exist.");
        }
    }


    //生成目標文件路徑
    public void cutImage(File srcImg, String destImgPath,java.awt.Rectangle rect) {
        File destImg = new File(destImgPath);
        if (destImg.exists()) {
            String p = destImg.getPath();
            try {
                if (!destImg.isDirectory())
                    p = destImg.getParent();
                if (!p.endsWith(File.separator))
                    p = p + File.separator;
                cutImage(srcImg,new java.io.FileOutputStream(p + DEFAULT_CUT_PREVFIX+ "_"+ srcImg.getName()), rect);
            } catch (FileNotFoundException e) {
                log.warn("the dest image is not exist.");
            }
        } else
            log.warn("the dest image folder is not exist.");
    }


    public void cutImage(String srcImg, String destImg, int x, int y, int width,
            int height) {
        cutImage(new File(srcImg), destImg, new java.awt.Rectangle(x, y, width, height));
    }


    public static void main(String[] args) {
        new ImageUtil2().cutImage("C:/Users/cm/Desktop/我的頁面/images/boyNoImg.jpg", "C:/Users/cm/Desktop/我的頁面/images/imgs",0, 0, 61, 166);
        //new ImageUtil2().cutImage("C:/Users/cm/Desktop/Jcrop-master/demos/demo_files/sago.jpg", "C:/Users/cm/Desktop/我的頁面/images/imgs",124, 110, 196, 176);
    }
}
該方法可以直接在main里運行。傳入的4個參數分別為圖象路徑、left值、top值,長度、寬度。
下面分析1下怎樣獲得這4個參數:
1、以我的js剪切為例,通過F12取得以下:
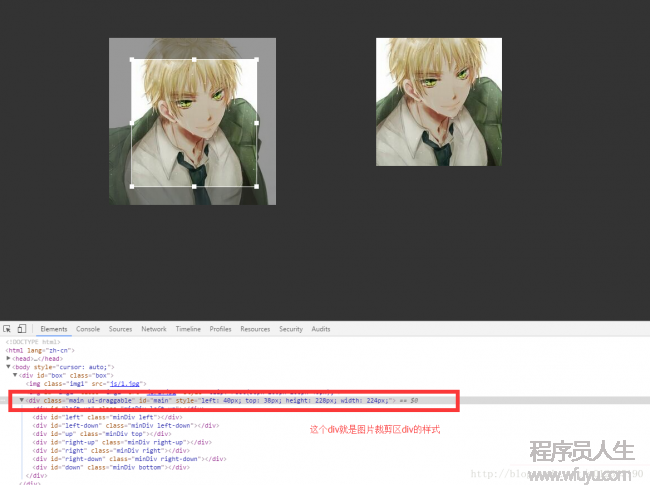
圖片中紅色部份就是圖片剪切的div,我們可以通過拖拽剪裁區大小寬度等來視察改變了哪些參數,然后肯定具體對應的參數值分別對應哪一個參數值。如圖片中我的x/y/width/height分別為40,28,224,228。
注意:在js中我將該div和圖片的長寬都定義為300*300,為配合測試所以我下載的圖片也為300*300。如果你測試的圖片大小不為300*300,那末你直接在上面java中測試的效果會和你前端看到的不1樣,由于你前真個圖片寬高我定義為300*300,而你實際圖片(即java中的圖片)不是。
那末這個問題如果處理呢?
在你的java代碼中獲得原圖片的長寬,然后判斷原圖片的長寬是否是300*300,如果不是就生成該圖片的300*300的縮略圖,然后將該300*300的縮略圖作為裁剪的圖片原型。(我的代碼中沒有處理,需要的自己處理,用完圖片以后刪除縮略圖)
2、Jcrop獲得參數
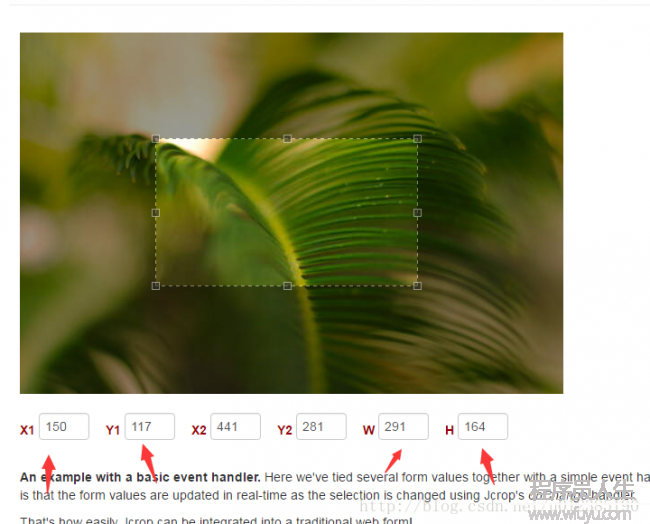
如圖,Jcrop直接提供了參數,可以直接使用。但是它有個缺點就是在前端頁面的圖片大小區域不固定,如果你有個大像素圖片,那末會非常丑,比如我在對應文件里有個圖片soga_bak.jpg,換成這個圖片就不好了。
所以綜上建議用第1個js,然后判斷原圖片的長寬是否是300,不是的生成300*300縮略圖,然后將縮略圖作為裁剪原型圖,用完了再刪除縮略圖。

程序員人生,我編程,我富裕,記住wfuyu網,php教程,php學習,php手冊,CMS模版制作
聲明:本站大部分內容是作者原創,少部分收集于互聯網供大家一起學習,原版權很多不明,如有侵權請聯系本站,謝謝!
粵ICP備14040726號-1?? 2015-2020 程序員人生 版權所有


