框架 day64 WebService(注解),CXF框架(jax-ws,Jax-rs,與spring整合)
來源:程序員人生 發布時間:2016-08-03 08:54:14 閱讀次數:2786次
WebService第2天
1 webservice的注解
1.1 案例:
摹擬查詢天氣信息,返回3天的天氣情況。
1.1.1 實現步驟
服務端:
第1步:創建1個天氣信息pojo,包括天氣的信息、最高、最低溫度、日期。
第2步:編寫SEI
第3步:編寫SEI實現類,返回天氣list
第4步:發布Webservice。
1.1.2 代碼實現
1.1.2.1 Pojo
public class WeatherModel {
private String info;
private int maxTemp;
private int minTemp;
private Date date;
1.1.2.2 SEI
天氣查詢SEI,返回3天的天氣情況
@WebService
public interface WeatherInterface {
List<WeatherModel> queryWeather(String cityName);
}
1.1.2.3 SEI實現類
實現類使用@WebService實現wsdl文檔元素名稱的修改
@WebService(
//endpointInterface="com.itheima.weather.service.WeatherInterface" //可以指定SEI接口
name="WeatherInterface", //不使用SEI接口時規范portType的名稱
serviceName="WeatherService", //服務視圖的名稱
portName="WeatherPort", //Service節點中port節點的name屬性
targetNamespace="http://weather.itheima.com/" //wsdl的命名空間
)
public class WeatherInterfaceImpl implements WeatherInterface {
@Override
@WebMethod/*(exclude=true)*/
@WebResult(name="WeatherInfo")
public List<WeatherModel> queryWeather(@WebParam(name="cityName")String cityName) {
System.out.println("客戶端發送的城市:" + cityName);
//查詢天氣信息
List<WeatherModel> info = getWeatherInfo(cityName);
//返回天氣信息
return info;
}
private List<WeatherModel> getWeatherInfo(String cityName) {
List<WeatherModel> weatherList = new ArrayList<>();
Calendar calendar = Calendar.getInstance();
//第1天
WeatherModel model1 = new WeatherModel();
model1.setInfo("雷陣雨");
model1.setMaxTemp(31);
model1.setMinTemp(22);
model1.setDate(calendar.getTime());
weatherList.add(model1);
//第2天
WeatherModel model2 = new WeatherModel();
model2.setInfo("多云");
model2.setMaxTemp(33);
model2.setMinTemp(25);
calendar.set(Calendar.DATE, calendar.get(Calendar.DATE) + 1);
model2.setDate(calendar.getTime());
weatherList.add(model2);
//第3天
WeatherModel model3 = new WeatherModel();
model3.setInfo("多云");
model3.setMaxTemp(35);
model3.setMinTemp(25);
calendar.set(Calendar.DATE, calendar.get(Calendar.DATE) + 1);
model3.setDate(calendar.getTime());
weatherList.add(model3);
return weatherList;
}
}
1.1.2.4 客戶端
public class WeatherClient {
public static void main(String[] args) throws Exception {
//創建服務視圖
Service service = Service.create(new URL("http://127.0.0.1:12345/weather"),
new QName("http://service.weather.itheima.com/", "WeatherInterfaceImplService"));
//從服務視圖取得protType對象
WeatherInterfaceImpl weatherInterfaceImpl = service.getPort(WeatherInterfaceImpl.class);
//調用服務端方法
List<WeatherModel> list = weatherInterfaceImpl.queryWeather("北京");
//顯示天氣信息
for (WeatherModel weatherModel : list) {
System.out.println(weatherModel.getDate().toGregorianCalendar().getTime().toLocaleString());
System.out.println(weatherModel.getInfo());
System.out.println(weatherModel.getMaxTemp());
System.out.println(weatherModel.getMinTemp());
}
}
}
1.2 要規范wsdl需要使用到webservice注解
1.2.1 @Webservice
@WebService(
//endpointInterface="com.itheima.weather.service.WeatherInterface"//可以指定SEI接口
name="WeatherInterface",//不使用SEI接口時規范portType的名稱
serviceName="WeatherService", //服務視圖的名稱
portName="WeatherPort", //Service節點中port節點的name屬性
targetNamespace="http://weather.itheima.com/" //wsdl的命名空間
)
1.2.2 @WebMethod
如果不指定@WebMethod注解默許是吧實現類中所有的public方法都發布成服務方法。
如果類中有的public方法不想發布成服務,就能夠使用@WebMethod(exclude=true)把此方法排除,也就是不發布為webservice方法。
注意:每一個Porttype中,必須有1個public方法并且不能標注為@WebMethod(exclude=true)
1.2.3 @WebParam、@WebResult
可以規范參數的名稱
@WebResult(name="xxxx")修改返回值的元素的父標簽名字
@WebParam(name="xxxxx")修改傳入參數的元素的父標簽名字
2 CXF框架
2.1 甚么是CXF
Apache CXF = Celtix + Xfire,開始叫 Apache CeltiXfire,后來更名為 Apache CXF 了,以下簡稱為 CXF。Apache CXF
是1個開源的 web Services 框架,CXF 幫助您構建和開發 web Services ,它支持多種協議,比如:SOAP1.1,1,2、XML/HTTP、RESTful 或 CORBA。
RESTful:1種風格而不是1個協議。它理念是網絡上的所有事物都被抽象為資源,每一個資源對應1個唯1的資源標識符。
CORBA(Common Object Request Broker Architecture公共對象要求代理體系結構,初期語言使用的WS。C,c++,C#)
Cxf是基于SOA總線結構,依托spring完成模塊的集成,實現SOA方式。
靈活的部署:可以運行在Tomcat,Jboss,Jetty(內置),weblogic上面。
2.2 CXF的安裝及配置
從官網下載:cxf.apache.org
學習使用的版本是:3.0.2
使用的方法,直接把cxf的jar包添加到工程中就能夠了。
環境配置
JAVA_HOME 需要jdk的支持
CXF_HOME 解壓目錄(bin的上層目錄) 需要使用bin目錄的可履行命令生成客戶端代碼
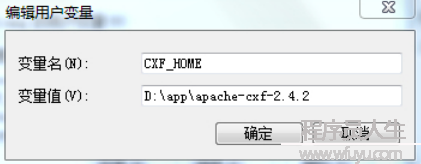
path = %JAVA_HOME%\bin;%CXF_HOME%\bin;
2.3 使用CXF實現java-ws規范的webservice
Soap1.1:
2.3.1 服務端:
實現步驟:
第1步:創建1java工程。
第2步:導入jar包導入cxf的jar包共138個。
第3步:編寫SEI,在SEI上添加@Webservice注解。
第3步:編寫SEI實現類。需要實現SEI接口,可以不加@Webservice注解
第4步:發布服務。
1、創建1個JaxWsServerFactoryBean對象。
2、設置服務的發布地址,是1個http url
3、設置SEI接口
4、設置SEI實現類對象
5、調用create方法發布服務。
2.3.2 代碼實現
2.3.2.1 SEI
@WebService
public interface WeatherInterface {
String queryWeather(String cityName);
}
2.3.2.2 實現類
public class WeatherInterfaceImpl implements WeatherInterface {
@Override
public String queryWeather(String cityName) {
System.out.println("城市名稱:" + cityName);
String result = "多云";
return result;
}
}
2.3.3 發布服務
服務發布類:后面整合spring依照此步驟配置便可
public class WeatherServer {
public static void main(String[] args) {
//創建1個JaxWsServerFactoryBean對象
JaxWsServerFactoryBean factoryBean = new JaxWsServerFactoryBean();
//設置服務發布的地址
factoryBean.setAddress("http://127.0.0.1:12345/weather");
//設置SEI
factoryBean.setServiceClass(WeatherInterface.class);
//設置實現類對象
factoryBean.setServiceBean(new WeatherInterfaceImpl());
//發布服務
factoryBean.create();
}
}
2.4 客戶端
2.4.1 Wsdl2java
可使用wsimport生成客戶端調用代碼,也能夠使用CXF自帶的工具生成。Wsdl2java。
可以實現wsimport一樣的功能,兩個工具生成的代碼都是1樣,wsdl2java工具的版本高。Wsimport對soap1.2支持的不好。
它包括以下參數:
a) -d參數,指定代碼生成的目錄。
b) -p參數,指定生成的新的包結構。
例:
在命令行履行
wsdl2java –d . -p cn.test.cxftext http://127.0.0.1:6666/helloworld?wsdl
2.4.2 客戶真個代碼實現
2.4.2.1 實現步驟
1、可以直接使用生成的代碼調用服務端方法。
2、使用CXF提供的工廠類調用。
第1步:創建JaxWsProxyFactoryBean對象
第2步:設置服務的url,服務端地址
第3步:設置SEI(portType)類型
第4步:調用Create方法取得portType對象。
第5步:調用服務端方法。
2.4.2.2 代碼實現
使用CXF工廠調用webservice,后面與spring整合配置可以用來參考
public class WeatherClient {
public static void main(String[] args) {
//創建1個JaxWsProxyFactoryBean對象
JaxWsProxyFactoryBean factoryBean = new JaxWsProxyFactoryBean();
//設置服務的url
factoryBean.setAddress("http://127.0.0.1:12345/weather?wsdl");
//設置SEI的類型
factoryBean.setServiceClass(WeatherInterface.class);
//取得porttype對象
WeatherInterface portType = (WeatherInterface) factoryBean.create();
//調用服務端方法
String result = portType.queryWeather("北京");
System.out.println(result);
}
}
2.5 Jax-rs規范的webservice
2.5.1 甚么是rest服務
1句話解釋:URL定位資源,用HTTP動詞(GET,POST,DELETE,DETC)描寫操作。
簡單來說,就是可以用httprequest 調用某個function. 比如在閱讀器里輸入www.chx.site/api/guesswhoisawesome,就會調用后臺的某個function得到1個response(可以是Json).
REST 是1種軟件架構風格,設計風格而不是標準,只是提供了1組設計原則和束縛條件。
它主要用于客戶端和服務器交互類的軟件。基于這個風格設計的軟件可以更簡潔,更有層次,更容易于實現緩存等機制。
rest服務采取HTTP 做傳輸協議,REST 對HTTP 的利用分為以下兩種:資源定位和資源操作。
關于JAX-WS與JAX-RS:
二者是不同風格的SOA(面向服務的體系結構)架構。
前者以動詞為中心,指定的是每次履行函數。
而后者以名詞為中心,每次履行的時候指的是資源。
資源定位:
Rest要求對資源定位更加準確,以下:
非rest方式:http://ip:port/queryUser.action?userType=student&id=001
Rest方式:http://ip:port/user/student/001
Rest方式表示互聯網上的資源更加準確,但是也有缺點,可能目錄的層級較多不容易理解。
資源操作
利用HTTP 的GET、POST、PUT、DELETE 4種操作來表示數據庫操作的SELECT、UPDATE、INSERT、DELETE 操作。
比如:
查詢學生方法:
設置Http的要求方法為GET,url以下:
http://ip:port/user/student/001
添加學生方法:
設置http的要求方法為PUT,url以下:
http://ip:port/user/student/001/張3/......
Rest經常使用于資源定位,資源操作方式較少使用。
REST 是1種軟件架構理念,現在被移植到Web 服務上,那末在開發Web 服務上,
偏于面向資源的服務適用于REST,REST 簡單易用,效力高,
SOAP 成熟度較高,安全性較好。
注意:REST 不是WebService,JAX-RS 只是將REST 設計風格利用到Web 服務開發上。
代碼實現
2.5.2 服務端
2.5.2.1 實現步驟
第1步:創建1個pojo,返回值的類型。需要在pojo上添加@XmlRootElement。
第2步:創建1個SEI。也就是1個接口。需要用到的注解
1、@Path:標注要求url
2、@GET、@POST、@PUT、@DELETE:標注操作的方法
3、@Produce:指定返回結果的數據類型,xml或json等。
第3步:創建SEI的實現類。可以不使用任何注解。
第4步:發布rest服務。
1、使用JAXRsServerFactoryBean對象發服務。
2、設置服務發布的地址。設置url
3、設置SEI實現類對象。
4、發布服務,create方法。
2.5.2.2 代碼實現
2.5.2.2.1 Pojo
返回值pojo類需要添加1個@XmlRootElement注解
@XmlRootElement
public class WeatherModel {
private String info;
private int maxTemp;
private int minTemp;
private Date date;
2.5.2.2.2 SEI
rest服務SEI
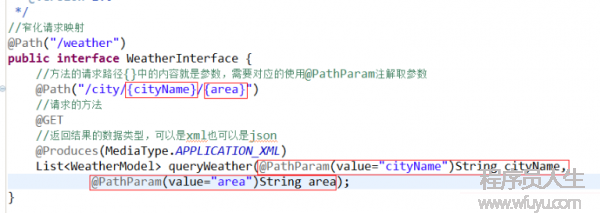
//窄化要求映照
@Path("/weather")
public interface WeatherInterface {
//方法的要求路徑{}中的內容就是參數,需要對應的使用@PathParam注解取參數
@Path("/city/{cityName}")
//要求的方法
@GET
//返回結果的數據類型,可以是xml也能夠是json
@Produces({MediaType.APPLICATION_JSON+";charset=utf⑻", MediaType.APPLICATION_XML})
List<WeatherModel> queryWeather(@PathParam(value="cityName")String cityName);
}
2.5.2.2.3 SEI實現類
public class WeatherInterfaceImpl implements WeatherInterface{
@Override
public List<WeatherModel> queryWeather(String cityName) {
List<WeatherModel> weatherInfo = getWeatherInfo(cityName);
return weatherInfo;
}
...
2.5.2.2.4 發布服務
使用履行命令生成相應的代碼后
public class WeatherServer {
public static void main(String[] args) {
//創建1個JAXRSServerFactoryBean對象
JAXRSServerFactoryBean factoryBean = new JAXRSServerFactoryBean();
//設置服務發布的地址
factoryBean.setAddress("http://127.0.0.1:12345/rest");
//設置實現類對象
factoryBean.setServiceBean(new WeatherInterfaceImpl());
//發布服務
factoryBean.create();
}
}
2.5.3 查看結果
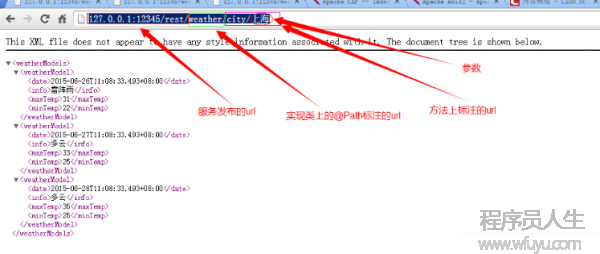
http://127.0.0.1:12345/rest/weather/city/上海
2.5.4 如果是多個參數可使用:
2.5.5 結果數據格式
2.5.5.1 Json
@Produces({MediaType.APPLICATION_JSON+";charset=utf⑻", MediaType.APPLICATION_XML})
其中charset=utf⑻ 為了避免出現亂碼
2.5.6 同1個方法返回兩種數據類型
支持xml或json數據格式
MediaType.APPLICATION_JSON
MediaType.APPLICATION_XML
默許返回xml格式的數據。
如果想訪問json格式的數據需要加參數:?_type=json
http://127.0.0.1:12345/rest/weather/city/%E4%B8%8A%E6%B5%B7?_type=json
2.5.7 客戶端
可使用ajax要求json數據。還可使用HttpClient訪問數據。需要自己轉換成java對象。
3 CXF整合spring
3.1 整合的思路
Spring就是1個容器,服務端讓spring容器實現服務的發布。客戶端使用spring容器完成取得porttype的進程,直接從spring容器中取得1個porttype對象。
3.2 案例需求
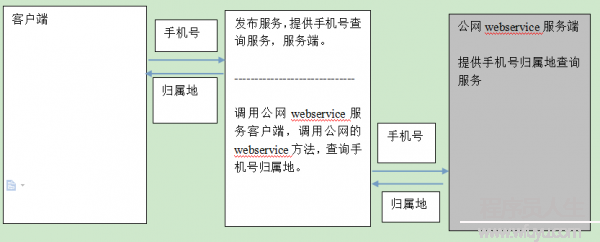
服務端發布手機號查詢服務供客戶端調用,服務端配置調用公網手機號查詢服務客戶端,調用公網WebService查詢手機號。
3.3 分析
3.4 實現步驟
服務端:有兩個身份,1個是調用公網webservice的客戶端。1個是對外提供手機號查詢服務的服務端。
第1步:實現調用公網webservice的客戶端
1、根據公網webservice的wsdl生成客戶端調用代碼
2、配置spring容器,完成創建服務視圖取得porttype的進程。直接從spring容器中取得prottype對象。
3、直接調用porttype對象的服務端方法,查詢手機號。
第2步:對外發布服務,實現手機號查詢。
1、編寫1個SEI接口。需要在SEI上添加@Webservice注解。
2、編寫1個SEI實現類,調用公網webservice的porttype實現手機號查詢。
3、發布服務,使用spring容器完成。
3.5 開發環境的搭建
第1步:創建1個Web工程
第2步:導入jar包。需要spring的jar包和cxf的jar包。
3.6 代碼實現
3.6.1 服務端
3.6.1.1 生成調用公網webservice的客戶端調用代碼
3.6.1.2 在spring容器中配置porttype
applicationContext.xml
<?xml version="1.0" encoding="UTF⑻"?>
<beans xmlns="http://www.springframework.org/schema/beans"
xmlns:xsi="http://www.w3.org/2001/XMLSchema-instance"
xmlns:jaxws="http://cxf.apache.org/jaxws"
xmlns:jaxrs="http://cxf.apache.org/jaxrs"
xmlns:cxf="http://cxf.apache.org/core"
xsi:schemaLocation="http://www.springframework.org/schema/beans
http://www.springframework.org/schema/beans/spring-beans.xsd
http://cxf.apache.org/jaxrs
http://cxf.apache.org/schemas/jaxrs.xsd
http://cxf.apache.org/jaxws
http://cxf.apache.org/schemas/jaxws.xsd
http://cxf.apache.org/core
http://cxf.apache.org/schemas/core.xsd">
<!-- 配置調用公網webservice的客戶端 -->
<!-- 相當于1個普通的bean,可以當作對象使用 -->
<jaxws:client id="mobileCodeWSSoap" address="http://webservice.webxml.com.cn/WebServices/MobileCodeWS.asmx"
serviceClass="cn.com.webxml.MobileCodeWSSoap"/>
<!-- 把SEI的實現類配置到spring容器 -->
<bean id="mobileInterfaceImpl" class="com.itheima.mobile.service.MobileInterfaceImpl">
<property name="mobileCodeWSSoap" ref="mobileCodeWSSoap"></property>
</bean>
</beans>
NoClassDefFoundError: org/apache/cxf/logging/FaultListener
解決方法:添加FaultListener。
<cxf:bus>
<cxf:properties>
<entry key="org.apache.cxf.logging.FaultListener">
<!-- 這個類可以換成自己的,如果不換就使用cxf中實現過上述接口的類 -->
<bean class="org.apache.cxf.logging.NoOpFaultListener"/>
</entry>
</cxf:properties>
</cxf:bus>
需要的xmlns和xsd
xmlns:cxf="http://cxf.apache.org/core
http://cxf.apache.org/core
http://cxf.apache.org/schemas/core.xsd
3.6.1.3 SEI
調用公網webservice查詢手機號的SEI
@WebService
public interface MobileInterface {
Mobile queryMobile(String code);
}
3.6.1.4 SEI實現類
手機號歸屬地查詢服務
public class MobileInterfaceImpl implements MobileInterface {
//公網webservice的porttype配置注入
private MobileCodeWSSoap mobileCodeWSSoap;
public void setMobileCodeWSSoap(MobileCodeWSSoap mobileCodeWSSoap) {
this.mobileCodeWSSoap = mobileCodeWSSoap;
}
@Override
public Mobile queryMobile(String code) {
//第1個參數:手機號
//第2個參數:免費用戶是空串
String info = mobileCodeWSSoap.getMobileCodeInfo(code, "");
Mobile mobile = new Mobile();
mobile.setAddress(info);
mobile.setCode(code);
return mobile;
}
}
3.6.1.5 發布服務
3.6.1.6 Web.xml
配置spring容器,配置cxf使用servlet。
web.xml
<?xml version="1.0" encoding="UTF⑻"?>
<web-app xmlns:xsi="http://www.w3.org/2001/XMLSchema-instance"
xmlns="http://java.sun.com/xml/ns/javaee" xmlns:web="http://java.sun.com/xml/ns/javaee/web-app_2_5.xsd"
xsi:schemaLocation="http://java.sun.com/xml/ns/javaee http://java.sun.com/xml/ns/javaee/web-app_2_5.xsd"
id="WebApp_ID" version="2.5">
<display-name>B06_spring_cxf</display-name>
<!-- 配置spring容器 -->
<!--
使用spring來加載cxf的服務類,服務類的對象由spring來創建,服務類的對象存在springIoc的容器中
-->
<context-param>
<param-name>contextConfigLocation</param-name>
<param-value>classpath:applicationContext.xml</param-value>
</context-param>
<listener>
<listener-class>org.springframework.web.context.ContextLoaderListener</listener-class>
</listener>
<!-- cxf的配置 -->
<!-- servlet負責發布服務類 -->
<servlet>
<servlet-name>cxf</servlet-name>
<servlet-class>org.apache.cxf.transport.servlet.CXFServlet</servlet-class>
<!--設置隨著
服務器啟動而載servlet,不設置訪問時才會加載顯示數據慢 -->
<load-on-startup>1</load-on-startup>
</servlet>
<servlet-mapping>
<servlet-name>cxf</servlet-name>
<url-pattern>/ws/*</url-pattern>
</servlet-mapping>
</web-app>
applicationContext.xml發布自己的服務
<?xml version="1.0" encoding="UTF⑻"?>
<beans xmlns="http://www.springframework.org/schema/beans"
xmlns:xsi="http://www.w3.org/2001/XMLSchema-instance" xmlns:jaxws="http://cxf.apache.org/jaxws"
xmlns:jaxrs="http://cxf.apache.org/jaxrs" xmlns:cxf="http://cxf.apache.org/core"
xsi:schemaLocation="http://www.springframework.org/schema/beans
http://www.springframework.org/schema/beans/spring-beans.xsd
http://cxf.apache.org/jaxrs http://cxf.apache.org/schemas/jaxrs.xsd
http://cxf.apache.org/jaxws http://cxf.apache.org/schemas/jaxws.xsd
http://cxf.apache.org/core http://cxf.apache.org/schemas/core.xsd">
<!-- 配置調用公網webservice的客戶端 -->
<!-- 相當于1個普通的bean,可以當作對象使用 -->
<jaxws:client id="mobileCodeWSSoap" address="http://webservice.webxml.com.cn/WebServices/MobileCodeWS.asmx"
serviceClass="cn.com.webxml.MobileCodeWSSoap"/>
<!-- 把SEI的實現類配置到spring容器 -->
<bean id="mobileInterfaceImpl" class="com.itheima.mobile.service.MobileInterfaceImpl">
<property name="mobileCodeWSSoap" ref="mobileCodeWSSoap"></property>
</bean>
<!-- 發布服務 -->
<!-- address就是服務發布的地址,只是從1個目錄開始 -->
<!-- serviceClass是發布服務的sei -->
<jaxws:server address="/mobile" serviceClass="com.itheima.mobile.service.MobileInterface">
<jaxws:serviceBean>
<ref bean="mobileInterfaceImpl"/>
</jaxws:serviceBean>
</jaxws:server>
<!-- rest服務的實現類 -->
<bean id="mobileRestImpl" class="com.itheima.mobile.rest.MobileRestImpl">
<property name="mobileCodeWSSoap" ref="mobileCodeWSSoap"></property>
</bean>
<!-- 發布rest服務 -->
<jaxrs:server address="/rest">
<jaxrs:serviceBeans>
<ref bean="mobileRestImpl"/>
</jaxrs:serviceBeans>
</jaxrs:server>
</beans>
3.6.1.7 訪問路徑
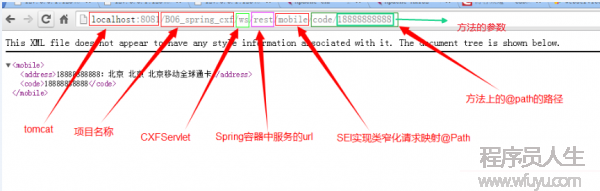
http://localhost:8081/B06_spring_cxf/ws/mobile?wsdl

3.6.2 客戶端
步驟:
1、生成客戶端調用代碼
2、創建服務視圖
3、取得porttype
4、調用服務端方法
3.7 Spring整合cxf發布rest服務
3.7.1 實現步驟
第1步:調用公網webservice查詢手機號,需要公網webservice的porttype。
第2步:發布rest服務
1、先寫1個pojo,需要加上@xmlrootElement注解。
2、編寫1個SEI,需要添加@path、@GET、@Produces
3、編寫1個SEI實現類,需要調用公網的webservice查詢手機號。
4、發布服務,使用spring容器發布服務。
3.7.2 代碼實現
3.7.2.1 SEI
rest風格的服務
@Path("/mobile")
public interface MobileRest {
@Path("/code/{code}")
@GET
@Produces({MediaType.APPLICATION_JSON+";charset=utf⑻", MediaType.APPLICATION_XML})
Mobile queryMobile(@PathParam(value = "code")String code);
}
3.7.2.2 SEI實現類
public class MobileRestImpl implements MobileRest {
//公網webservice的porttype
private MobileCodeWSSoap mobileCodeWSSoap;
public void setMobileCodeWSSoap(MobileCodeWSSoap mobileCodeWSSoap) {
this.mobileCodeWSSoap = mobileCodeWSSoap;
}
@Override
public Mobile queryMobile(String code) {
String address = mobileCodeWSSoap.getMobileCodeInfo(code, "");
Mobile mobile = new Mobile();
mobile.setAddress(address);
mobile.setCode(code);
return mobile;
}
}
3.7.2.3 發布服務
<!-- rest服務的實現類 -->
<bean id="mobileRestImpl" class="com.itheima.mobile.rest.MobileRestImpl">
<property name="mobileCodeWSSoap" ref="mobileCodeWSSoap"></property>
</bean>
<!-- 發布rest服務 -->
<jaxrs:server address="/rest">
<jaxrs:serviceBeans>
<ref bean="mobileRestImpl"/>
</jaxrs:serviceBeans>
</jaxrs:server>
3.7.2.4 Url的構成
使用jquery調用cxf(ws)
$(function(){
$("#mybutton").click(function(){
var data = '<soapenv:Envelope xmlns:soapenv="http://schemas.xmlsoap.org/soap/envelope/" xmlns:q0="http://server.web.cxf.rl.com/" xmlns:xsd="http://www.w3.org/2001/XMLSchema" xmlns:xsi="http://www.w3.org/2001/XMLSchema-instance">'
+'<soapenv:Body>'
+'<q0:sayHello>'
+' <arg0>sss</arg0>'
+' </q0:sayHello>'
+'</soapenv:Body>'
+'</soapenv:Envelope>';
$.ajax({
url:'http://localhost:8080/cxf-web-server/services/hello',
type:'post',
dataType:'xml',
contentType:'text/xml;charset=UTF⑻',
data:data,
success:function(responseText){
alert($(responseText).find('return').text());
},
error:function(){
alert("error");
}
})
})
})
生活不易,碼農辛苦
如果您覺得本網站對您的學習有所幫助,可以手機掃描二維碼進行捐贈


