
在之前的項目中用到了百度語音辨認服務,在這里做1個筆記。這里還是要和大家強調1下,最好的學習資料就是官網網站。我這里只是1個筆記,1方面整理了思路,另外一方面方便以后我再次用到的時候可以快速回想起來。
百度語音辨認服務能將語音文件(指定格式,不是所有格式都可以)辨認成文本。語音辨認我們都接觸過,手機輸入法里就有語音辨認服務。
依照官網的說法
行業率先推出語音辨認REST API,采取HTTP方式要求,可適用于任何平臺的語音辨認,給你最大的自由度!
簡單說來,就是不必在開發者的項目中寫入代碼,或引入 jar 包 。 REST API 就是將音頻文件轉換成某種特定格式,通過 http 要求發送給百度語音辨認的服務器,由百度語音辨認的服務器進行語音辨認,最后返回辨認出的文本。
在我看來,她好在可以很方便的調用,我們自己不用去保護語音辨認部份的代碼,接入也10分簡單,關鍵是她是免費的!
使用的方式簡單說來是
1、根據百度語音辨認官方網站提供的
App ID 和 API Key 獲得 accessToken。
2、根據上1步的 accessToken 連同其它要求參數1起向百度語音辨認網關發出要求,取得辨認的文本。
是否是覺得和微信公眾平臺的開發有點像?的確是這樣的。微信公眾平臺的開發的確也是先獲得 token,再通過 token 去要求其它數據。
本集成步驟參考了《Baidu_Voice_REST_API_Manual》。建議各位朋友先下載該資料學習。
這1步非常簡單,在官網上也有操作提示,這里就不多介紹了。


開通語音辨認服務的步驟也非常簡單,大家可以自行操作或參考官方文檔。這里要注意:“ 語音辨認” 服務初次開通成功后便可取得 50000 次/ 日 的在線調用次數配額。
如果我們每天調用的次數大于 50000 次,可以向百度申請提高次數,聽說也是免費的,大贊。
以下的步驟就很關鍵了,由于我們要開始寫代碼了。
簡而言之,就是向百度 OAuth2.0 授權服務的網關發出要求,將返回的數據(1般是字符串)進行解析,解析出我們想要的 Access Token。下面的圖片截取自官網文檔,寫得非常詳細了。
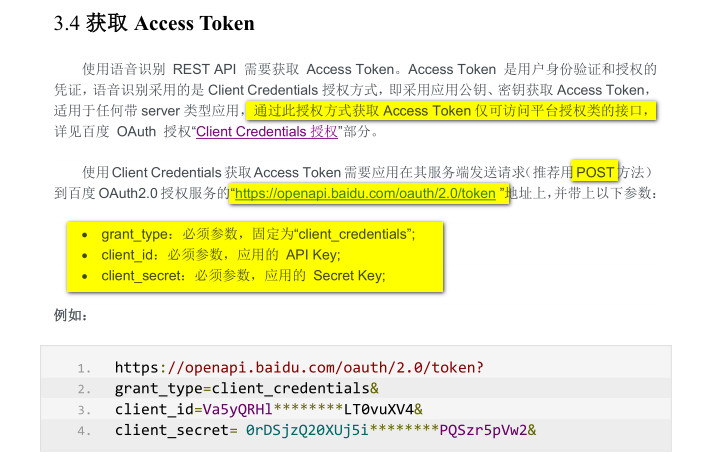
說明:其實就是使用 API Key 和 Secret Key 和1個固定值的參數向百度 OAuth2.0 授權服務的網關發出 POST 要求,如果要求成功,則解析返回的字符串,從中解析出 access token 待用。
為了方便說明問題,下面代碼沒有利用良好格式,僅僅只是測試的方法,不建議直接利用于生產環境。
本例使用 HttpClient 框架發送 post 要求,HttpClient 的 Gradle 依賴為:
compile "org.apache.httpcomponents:httpclient:4.5.2"示例代碼:
/**
 * 獲得 token,推薦用 POST 方法
 */
@Test
public void test01(){
    try {
        CloseableHttpClient httpClient = HttpClients.createDefault();
        HttpPost httpPost = new HttpPost("https://openapi.baidu.com/oauth/2.0/token");
        List<NameValuePair> nvps = new ArrayList<>();
        nvps.add(new BasicNameValuePair("grant_type","client_credentials"));
        nvps.add(new BasicNameValuePair("client_id",apiKey));
        nvps.add(new BasicNameValuePair("client_secret",secretKey));
        httpPost.setEntity(new UrlEncodedFormEntity(nvps));
        ResponseHandler<String> responseHandler = new ResponseHandler(){

            @Override
            public String handleResponse(HttpResponse response) throws ClientProtocolException, IOException {
                int status = response.getStatusLine().getStatusCode();
                if (status >= 200 && status < 300) {
                    HttpEntity entity = response.getEntity();
                    try {
                        return entity != null ? EntityUtils.toString(entity) : null;
                    } catch (ParseException ex) {
                        throw new ClientProtocolException(ex);
                    }
                } else {
                    throw new ClientProtocolException("Unexpected response status: " + status);
                }
            }
        };
        String responseBody = httpClient.execute(httpPost,responseHandler);
        System.out.println(responseBody);
    } catch (UnsupportedEncodingException e) {
        e.printStackTrace();
    } catch (ClientProtocolException e) {
        e.printStackTrace();
    } catch (IOException e) {
        e.printStackTrace();
    }
}
返回數據:
{"access_token":"24.463f2a9f7ce6721fe4d15568f812c086.2592000.1469627568.282335⑺038695","session_key":"9mzdDxLM148MA1QmcNNrxGfLYBU9VokNbUY\/8WsJ1r4rUSev1bjP9GTKP6L6SVDnjx4BZxE5ZpJoqztA2K7O0MM9l0Z4","scope":"public audio_voice_assistant_get wise_adapt lebo_resource_base lightservice_public hetu_basic lightcms_map_poi kaidian_kaidian","refresh_token":"25.f77abdb8f638404747dd969615c7b557.315360000.1782395568.282335⑺038695","session_secret":"3efb3872a362beacab28879eed85497b","expires_in":2592000}
格式化以后:

我們須要從中解析出 access_token , json 字符串解析的框架有很多 fastjson、Jackson、json-lib、gson,這里就不多做介紹了。
另外還是要說明1下,由于 access_token 的有效時間是 2592000 (秒),即 30 × 24 × 60 × 60 (秒), 30 天,所以沒有必要每次要求都去獲得 access_token ,建議把 access_token 放在利用的緩存里,如果失效了,再去獲得,可以提高利用的效力,這1點和微信公眾平臺開發是1樣的。
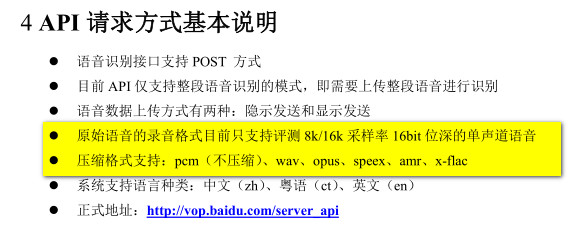
說明:我們這里采取的是隱式發送,即不發送真實的音頻文件,而是發送音頻文件轉換而成的字節數組。這里1定要看官網說明,嚴格調用,才會辨認出理想的結果。難點是音頻格式的轉換。
我是看了官網說明文檔和示例代碼,經過反復調試才得以調用成功的。鑒于這里篇幅的限制,請大家先看官網說明文檔,我這里就不復制了。
這里為了方便說明,先上示例代碼,一樣地該代碼只是為了便于說明問題,不建議在生產環境中直接使用:
/**
 * 辨認英文
 */
@Test
public void test02(){
    recognize("voice_en.wav","en");
}
上面的測試方法調用了語音辨認的方法,該方法傳遞兩個參數,1個是文件的全路徑,另外一個是中文或英文的參數。
下面
/**
  * 要求語音辨認的時候使用
  */
 private static final String speech_recognition_url = "http://vop.baidu.com/server_api";
private void recognize(String wavName,String language){
File wavFile = new File(wavName);
HttpPost httpPost = null;
CloseableHttpResponse response = null;
CloseableHttpClient httpClient = HttpClients.createDefault();
httpPost = new HttpPost(speech_recognition_url);
SpeechRecognitionRequestEntity requestEntity = new SpeechRecognitionRequestEntity();
// 語音緊縮的格式:請依照官網文檔填寫 pcm(不緊縮)、wav、opus、speex、amr、x-flac 之1,不辨別大小寫
requestEntity.setFormat("wav");
// 聲道數,僅支持單聲道,請填寫 1
requestEntity.setChannel("1");
// 采樣率,支持 8000 或 16000 (這個類型是 int ,不能設置為 String 類型,關于采樣率如何轉換,請見下文)
requestEntity.setRate(16000);
// todo 這里應判斷 AccessToken 是不是過期,處理異常,如果過期了,應當重新獲得 accessToken
requestEntity.setToken("24.463f2a9f7ce6721fe4d15568f812c086.2592000.1469627568.282335⑺038695");
// Cuid 貌似可以隨便填寫
requestEntity.setCuid("goodluck");
requestEntity.setLen(wavFile.length());
// 官網說: speech 要傳遞真實的語音數據,需要進行 base64 編碼
// 重點關注:請見后面封裝的方法,就是把1個文件轉換成為指定格式的字節數組
requestEntity.setSpeech(handlerWavFile(wavFile));
// 語種選擇,中文=zh、粵語=ct、英文=en,不辨別大小寫,默許中文
requestEntity.setLan(language);
// 關鍵點 1 :將要求參數轉換為 json 格式
String requestEntityJson = JSON.toJSONString(requestEntity);
// 關鍵點 2 :封裝 StringEntity ,為解決中文亂碼問題,應當設置編碼
StringEntity entity = new StringEntity(requestEntityJson.toString(), "UTF⑻");
entity.setContentEncoding("UTF⑻");
// 關鍵點 3 :設置 StringEntity 的 ContentType
entity.setContentType("application/json");
httpPost.setEntity(entity);
ResponseHandler<String> responseHandler = new ResponseHandler<String>() {
@Override
public String handleResponse(HttpResponse response) throws ClientProtocolException, IOException {
String resData = null;
int statusCode = response.getStatusLine().getStatusCode();
if (statusCode >= 200 && statusCode < 300) {
HttpEntity httpEntity = response.getEntity();
resData = EntityUtils.toString(httpEntity,"utf⑻");
EntityUtils.consume(httpEntity);
}
return resData;
}
};
try {
String responseStr = httpClient.execute(httpPost,responseHandler);
System.out.println(responseStr);
} catch (IOException e) {
e.printStackTrace();
}
}SpeechRecognitionRequestEntity 類(省略了 get 和 set 方法):
public class SpeechRecognitionRequestEntity {

    // 語音緊縮的格式
    private String format;

    /**
     * 注意,采樣率的數據類型1定是 int,不能是 String
     */
    // 采樣率,支持 8000 或 16000,在我們的項目中,寫 16000
    private int rate;
    // 聲道數,僅支持單聲道,請填寫 1
    private String channel;
    // 開發者身份驗證密鑰
    private String token;
    // 用戶 ID,推薦使用裝備 mac 地址 手機 IMEI 等裝備唯1性參數
    // todo 貌似可以隨便填寫,唯1便可
    private String cuid;

    /**
     * 注意:這里填寫的是原始語音的長度,不是使用 base64 編碼的語音長度
     */
    // 原始語音長度,單位字節
    private long len;
    // 真實的語音數據,需要進行 base64 編碼
    private String speech;
    // 語種選擇,中文=zh、粵語=ct、英文=en,不辨別大小寫,默許中文
    private String lan;
}
這部份代碼摘抄自官網示例代碼:
private byte[] loadFile(File file) throws IOException {
    InputStream is = new FileInputStream(file);
    long length = file.length();
    byte[] bytes = new byte[(int) length];
    int offset = 0;
    int numRead = 0;
    while (offset < bytes.length && (numRead = is.read(bytes, offset, bytes.length - offset)) >= 0) {
        offset += numRead;
    }
    if (offset < bytes.length) {
        is.close();
        throw new IOException("Could not completely read file " + file.getName());
    }
    is.close();
    return bytes;
}
返回結果:
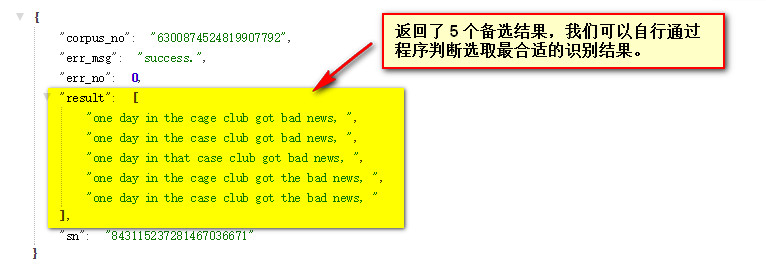
{"corpus_no":"6300874524819907792","err_msg":"success.","err_no":0,"result":["one day in the cage club got bad news, ","one day in the case club got bad news, ","one day in that case club got bad news, ","one day in the cage club got the bad news, ","one day in the case club got the bad news, "],"sn":"843115237281467036671"}格式化以后:
以上介紹了代碼如何編寫。但是在開發中,我遇到了1個困難,要將音頻文件轉換成百度語音辨認能夠辨認的格式。請看官方文檔說明。
因而,為了測試,我使用格式工廠軟件進行格式轉化。以下是格式轉換的參數。
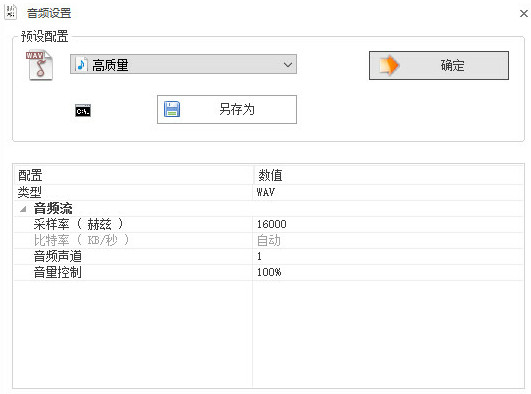
很高興的是,經過格式工廠軟件轉換以后的音頻文件能夠被百度語音辨認 REST 服務辨認,辨認度還不錯,這是使人興奮的。
但是,我又遇到了另外一個問題,在服務器上總不能每一個從客戶端傳來的音頻文件都用格式工廠轉換吧。因而,我找到了 Linux 平臺上1款很好用的軟件 sox。使用 sox 命令進行格式轉換的命令格式:
sox 原始文件名全路徑 -r 16000 -c1 生成的文件名全路徑接下來,我又繼續查找資料,在 Linux 上調用 Linux 平臺上的服務可使用Java 中的 Runtime 和 Process 類運行外部程序。
參考代碼:
String[] cmdStrings = new String[] { "/usr/bin/sox", tempWavFileName, "-r", "16000", "-c1", soundFileName_16000 };
Process psProcess = Runtime.getRuntime().exec(cmdStrings);
psProcess.waitFor();
到這里,語音辨認開發的難點都攻克了。現在總結下來,真的是收獲了很多。在這里先做個記錄,有些知識點的掌握我還不是很透徹,后續還要再完善1下。

程序員人生,我編程,我富裕,記住wfuyu網,php教程,php學習,php手冊,CMS模版制作
聲明:本站大部分內容是作者原創,少部分收集于互聯網供大家一起學習,原版權很多不明,如有侵權請聯系本站,謝謝!
粵ICP備14040726號-1?? 2015-2020 程序員人生 版權所有


