
1、為何要用到ant這個(gè)工具呢?
Ant做為1種工具已廣泛被使用,并且歷史悠久。
使用ant的內(nèi)置命令,可以編譯java源文件(javac),運(yùn)行java文件(java),給class文件打包(jar、war、ear),
也能夠創(chuàng)建(mkdir)、刪除(del)、拷貝(copy),乃至可使用ant履行sql文件。
由于ant是用xml語言寫成的文件,并取默許名為build.xml文件。
所以,今后大家應(yīng)當(dāng)在見到名為build.xml文件時(shí)知道這是1個(gè)ant的文件。
ant 工具后面跟的是任務(wù)的名稱
ant server 運(yùn)行了Server類,發(fā)布了1個(gè)webservice
ant client 調(diào)用已發(fā)布的webservice
ant clean 清除已生成的class 文件
ant war 將java 項(xiàng)目打成1個(gè)war 包
ant deploy -Dtomcat=true 把打成的war 拷貝到tomcat 的webapp 下面去。
ant undeploy -Dtomcat=true; 卸載tomcat 下面的項(xiàng)目..
用cxf 框架提供的類發(fā)布1個(gè)服務(wù)
方法1
使用cxf 提供 ServerFactoryBean 來發(fā)布webservice
被發(fā)布的類當(dāng)中可以不需要標(biāo)注webservice 注解,類當(dāng)中可以不包括有效的方法,
如果沒有包括有效的方法.它會(huì)提供1個(gè)空的服務(wù).
//創(chuàng)建發(fā)布服務(wù)的類...
ServerFactoryBean bean=new ServerFactoryBean();
bean.setAddress("http://192.168.9.100:8080/server");//服務(wù)對外的訪問地址
bean.setServiceClass(CxfWebService.class);//設(shè)置服務(wù)類的接口類型,如果沒有接口則為當(dāng)前類..
bean.setServiceBean(new CxfWebService());//設(shè)置服務(wù)類的實(shí)現(xiàn)
bean.create();//發(fā)布服務(wù)
有接口的情況
package com.zj.server;

import org.apache.cxf.interceptor.LoggingInInterceptor;
import org.apache.cxf.interceptor.LoggingOutInterceptor;
import org.apache.cxf.jaxws.JaxWsServerFactoryBean;

import cn.itcast.webservice.userService.UserService;
import cn.itcast.webservice.userService.UserServiceImpl;

/**
 *
 * 使用cxf 提供的類 JaxWsServerFactoryBean 來發(fā)布1個(gè)帶接口的webservice ...
 *
 * @ 作者 zhuwu@itcast.cn
 *
 */
public class PublishUserService {

    /**
     * @param args
     */
    public static void main(String[] args) {
        //創(chuàng)建發(fā)布服務(wù)的 類...
        JaxWsServerFactoryBean  bean=new JaxWsServerFactoryBean();
        //設(shè)置對外的訪問地址
        bean.setAddress("http://10.129.69.114:7418/userService");
        bean.setServiceClass(UserService.class);//設(shè)置接口類型...
        bean.setServiceBean(new UserServiceImpl());//設(shè)置接口的實(shí)現(xiàn)類...
        //我們可以在發(fā)布服務(wù)的時(shí)候添加消息攔截器
        //攔截客戶端往服務(wù)端 發(fā)送的要求的消息
        bean.getInInterceptors().add(new LoggingInInterceptor());
        //攔截服務(wù)端往客戶端返回的消息...
        bean.getOutInterceptors().add(new LoggingOutInterceptor());

        bean.create();
    }

}
第2種發(fā)布方式
使用cxf 框架提供的類 jaxWsServerFactoryBean 發(fā)布webService
jaxWsServerFactoryBean 是 ServerFactoryBean 的子類...

jaxWsServerFactoryBean bean=new jaxWsServerFactoryBean();
bean.setAddress("http://192.168.9.100:8080/server");//服務(wù)對外的訪問地址
bean.setServiceClass(CxfWebService.class);//設(shè)置服務(wù)類的接口類型,如果沒有接口則為當(dāng)前類..
bean.setServiceBean(new CxfWebService());//設(shè)置服務(wù)類的實(shí)現(xiàn)
bean.create();//發(fā)布服務(wù)方法1
用cxf 框架提供的類調(diào)用服務(wù).. (需要依賴1個(gè)接口,通過wsimport 生成的代碼當(dāng)中獲得…)
//創(chuàng)建調(diào)用webservice 服務(wù)的類...
ClientProxyFactoryBean bean=new ClientProxyFactoryBean();
bean.setAddress("http://192.168.9.100:8080/server");//設(shè)置訪問地址...
bean.setServiceClass(CxfWebServicePortType.class);//設(shè)置服務(wù)的接口...
//創(chuàng)建接口類型...
CxfWebServicePortType cxfWebServicePortType=(CxfWebServicePortType) bean.create();
cxfWebServicePortType.sayHello();
方法2
使用cxf 提供類 JaxWsProxyFactoryBean 來調(diào)用 webservice 的服務(wù)端…….
JaxWsProxyFactoryBean 是  ClientProxyFactoryBean  的子類...
//創(chuàng)建調(diào)用服務(wù)的類...
JaxWsProxyFactoryBean bean=new JaxWsProxyFactoryBean();
//設(shè)置訪問地址
bean.setAddress("http://192.168.9.100:7418/userService");
//設(shè)置接口類型...
bean.setServiceClass(UserService.class);
UserService us=(UserService) bean.create();

String data=us.getUserById(1);

System.out.println(data);服務(wù)端: 客戶端
ServerFactoryBean ————ClientProxyFactoryBean
JaxWsServerFactoryBean—————-JaxWsProxyFactoryBean
JaxWsServerFactoryBean 可以發(fā)布soap1.2 版本的協(xié)議….發(fā)布服務(wù)的時(shí)候,
我們最好被發(fā)布的服務(wù)類要面向接口編程..
命令:wsdl2java
wsdl2java 是cxf 框架給我們提供的命令,這個(gè)命令的作用與wsimport 類似...
攔截器:
cxf 框架中提供了攔截器的機(jī)制,我們可以通過攔截器獲得到客戶端與服務(wù)端進(jìn)行交互的時(shí)候的數(shù)據(jù)格式
    //創(chuàng)建發(fā)布服務(wù)的 類...
    JaxWsServerFactoryBean  bean=new JaxWsServerFactoryBean();
    //設(shè)置對外的訪問地址
    bean.setAddress("http://192.168.9.100:7418/userService");
    bean.setServiceClass(UserService.class);//設(shè)置接口類型...
    bean.setServiceBean(new UserServiceImpl());//設(shè)置接口的實(shí)現(xiàn)類...
    //我們可以在發(fā)布服務(wù)的時(shí)候添加消息攔截器
    //攔截客戶端往服務(wù)端 發(fā)送的要求的消息
    bean.getInInterceptors().add(new LoggingInInterceptor());
    //攔截服務(wù)端往客戶端返回的消息...
    bean.getOutInterceptors().add(new LoggingOutInterceptor());
bean.create();由于cxf的web項(xiàng)目已集成了Spring所以,cxf的服務(wù)類都是在spring的配置文件中完成的。以下是步驟:
服務(wù)器實(shí)現(xiàn)了
發(fā)布1個(gè)不帶接口的webservice
<!-- 1,id,2,服務(wù)對外的訪問地址,3,提供服務(wù)的實(shí)現(xiàn)類..  -->
<jaxws:endpoint id="helloService" address="/helloService" implementor="cn.itcast.cxf.spring.HelloService"></jaxws:endpoint>
發(fā)布1個(gè)帶接口的webservice
<?xml version="1.0" encoding="UTF⑻"?>
<web-app version="2.5" xmlns="http://java.sun.com/xml/ns/javaee"
    xmlns:xsi="http://www.w3.org/2001/XMLSchema-instance"
    xsi:schemaLocation="http://java.sun.com/xml/ns/javaee
    http://java.sun.com/xml/ns/javaee/web-app_2_5.xsd">
    <!--
    通過服務(wù)器啟動(dòng),解析spring 的配置,可以解決第1次訪問
    org.apache.cxf.transport.servlet.CXFServlet
    去解析spring配置,致使第1次訪問webservice 慢的問題...
     -->
    <listener>
        <listener-class>org.springframework.web.context.ContextLoaderListener</listener-class>
    </listener>
    <context-param>
        <param-name>contextConfigLocation</param-name>
        <param-value>/WEB-INF/cxf-servlet.xml</param-value>
    </context-param>


    <servlet>
        <!-- 配置cxf -->
        <servlet-name>cxf</servlet-name>
        <servlet-class>org.apache.cxf.transport.servlet.CXFServlet</servlet-class>
        <init-param>
            <!-- 配置Spring的配置文件 -->
            <param-name>config-location</param-name>
            <!-- 通過servlet 去解析此配置文件,會(huì)致使第1次訪問很慢,
        這是1個(gè)spring 的配置文件,
             -->
            <param-value>/WEB-INF/cxf-servlet.xml</param-value>
            <!--
                cxf 的啟動(dòng)原理,依托servlet
                首先我們在閱讀器上面敲地址欄,進(jìn)入到
                org.apache.cxf.transport.servlet.CXFServlet
                履行init 方法  /WEB-INF/cxf-servlet.xml 配置文件
                //request
                String basePath=http://localhost:8080/cxfspringweb/ws/helloService

                JaxWsServerFactoryBean bean=new JaxWsServerFactoryBean();
                bean.setAddress(basePath);//設(shè)置服務(wù)的訪問地址
                bean.setServerClass(cn.itcast.cxf.spring.HelloService.class);//設(shè)置服務(wù)的接口
                bean.setServerBean(Class.for("cn.itcast.cxf.spring.HelloService").newInstance());//設(shè)置服務(wù)的接口實(shí)現(xiàn)類
                bean.create();//發(fā)布
             -->

        </init-param>
    </servlet>
    <servlet-mapping>
        <servlet-name>cxf</servlet-name>
        <url-pattern>/ws/*</url-pattern>
    </servlet-mapping>
    <welcome-file-list>
        <welcome-file>index.jsp</welcome-file>
    </welcome-file-list>
</web-app>
<?xml version="1.0" encoding="UTF⑻"?>
<beans xmlns="http://www.springframework.org/schema/beans"
    xmlns:xsi="http://www.w3.org/2001/XMLSchema-instance" xmlns:jaxws="http://cxf.apache.org/jaxws"
    xmlns:jaxrs="http://cxf.apache.org/jaxrs" xmlns:cxf="http://cxf.apache.org/core"
    xsi:schemaLocation="http://www.springframework.org/schema/beans
          http://www.springframework.org/schema/beans/spring-beans⑶.0.xsd
            http://cxf.apache.org/jaxrs http://cxf.apache.org/schemas/jaxrs.xsd
            http://cxf.apache.org/jaxws http://cxf.apache.org/schemas/jaxws.xsd
            http://cxf.apache.org/core http://cxf.apache.org/schemas/core.xsd">
        <!-- 引入CXF Bean定義以下,初期的版本中使用 -->
        <import resource="classpath:META-INF/cxf/cxf.xml" />
        <import resource="classpath:META-INF/cxf/cxf-extension-soap.xml" />
        <import resource="classpath:META-INF/cxf/cxf-servlet.xml" />
        <!-- 通過配置文件的方式發(fā)布1個(gè)不帶接口的webservice -->
        <!-- 1,id,2,服務(wù)對外的訪問地址,3,提供服務(wù)的實(shí)現(xiàn)類..  -->
        <jaxws:endpoint id="helloService" address="/helloService" implementor="cn.itcast.cxf.spring.HelloService"></jaxws:endpoint>
        <!-- 通過此配置發(fā)布1個(gè)帶接口的webservice  -->
        <!--
            1,id
            2,服務(wù)對外的訪問地址
            3,接口的類型

         -->

        <jaxws:server id="makeCallService" address="/makeCallService" serviceClass="cn.itcast.cxf.spring.call.CallService">
            <jaxws:serviceBean>
            <!-- 接口的實(shí)現(xiàn)類... -->
                <bean class="cn.itcast.cxf.spring.call.CallServiceImpl"></bean>
            </jaxws:serviceBean>
            <!-- 通過配置文件的方式添加攔截器。。。 -->
            <!-- 添加要求的消息攔截器 -->
            <jaxws:inInterceptors>
                <bean class="org.apache.cxf.interceptor.LoggingInInterceptor"></bean>
            </jaxws:inInterceptors>

            <!-- 添加響應(yīng)的消息攔截器.. -->
            <jaxws:outInterceptors>
                 <bean class="org.apache.cxf.interceptor.LoggingOutInterceptor"></bean>
            </jaxws:outInterceptors>

        </jaxws:server>


</beans>spring配置文件
<?xml version="1.0" encoding="UTF⑻"?>
<beans xmlns="http://www.springframework.org/schema/beans"
    xmlns:xsi="http://www.w3.org/2001/XMLSchema-instance" xmlns:jaxws="http://cxf.apache.org/jaxws"
    xmlns:jaxrs="http://cxf.apache.org/jaxrs" xmlns:cxf="http://cxf.apache.org/core"
    xsi:schemaLocation="http://www.springframework.org/schema/beans
          http://www.springframework.org/schema/beans/spring-beans⑶.0.xsd
            http://cxf.apache.org/jaxrs http://cxf.apache.org/schemas/jaxrs.xsd
            http://cxf.apache.org/jaxws http://cxf.apache.org/schemas/jaxws.xsd
            http://cxf.apache.org/core http://cxf.apache.org/schemas/core.xsd">
        <!-- 引入CXF Bean定義以下,初期的版本中使用 -->
        <import resource="classpath:META-INF/cxf/cxf.xml" />
        <import resource="classpath:META-INF/cxf/cxf-extension-soap.xml" />
        <import resource="classpath:META-INF/cxf/cxf-servlet.xml" />
        <!--
            1,id,通過id 獲得到bean
        2,訪問webservice 的服務(wù)的地址
        3,需要依賴接口類型
         -->
        <jaxws:client id="itcast" address="http://localhost:8080/cxfspringweb/ws/makeCallService" serviceClass="cn.itcast.cxf.spring.call.CallService"></jaxws:client>

</beans>package cn.itcast.spring.client;
import org.springframework.context.ApplicationContext;
import org.springframework.context.support.ClassPathXmlApplicationContext;
import cn.itcast.cxf.spring.call.CallService;
/**
*
* 通過配置文件的方式調(diào)用webservice,
* 同時(shí)也需要依賴1個(gè)接口....
*
* @ 作者 zhuwu@itcast.cn
*
*/
public class SpringClientInvoke {
/**
* @param args
*/
public static void main(String[] args) {
//解析spring配置文件
ApplicationContext context=new ClassPathXmlApplicationContext("bean.xml");
//通過getBean 拿到接口 的實(shí)例對象...
CallService callService=
(CallService) context.getBean("itcast");
boolean flag=callService.makeCaller("zj");
System.out.println(flag);
}
}<%@ page language="java" contentType="text/html; charset=UTF⑻"
pageEncoding="UTF⑻"%>
<%
String path = request.getContextPath();
String basePath = request.getScheme()+"://"+request.getServerName()+":"+request.getServerPort()+path+"/";
System.out.println(basePath);
%>
<!DOCTYPE html PUBLIC "-//W3C//DTD HTML 4.01 Transitional//EN" "http://www.w3.org/TR/html4/loose.dtd">
<html>
<head>
<base href="<%=basePath%>">
<title>My JSP 'index.jsp' starting page</title>
<meta http-equiv="pragma" content="no-cache">
<meta http-equiv="cache-control" content="no-cache">
<meta http-equiv="expires" content="0">
<meta http-equiv="keywords" content="keyword1,keyword2,keyword3">
<meta http-equiv="description" content="This is my page">
<script type="text/javascript" src="js/jquery⑴.6.2.js"></script>
<script type="text/javascript">
/**
ajax 的xmlHttpRequest 對象可以發(fā)送1個(gè)http 要求
我們可以把服務(wù)端需要的xml 格式的數(shù)據(jù)傳送到服務(wù)端。
摹擬soap 要求。
**/
var itcast;
itcast={
sendMessage:function(){
var data='<soapenv:Envelope xmlns:soapenv="http://schemas.xmlsoap.org/soap/envelope/" xmlns:q0="http://call.spring.cxf.itcast.cn/" xmlns:xsd="http://www.w3.org/2001/XMLSchema" xmlns:xsi="http://www.w3.org/2001/XMLSchema-instance">';
data+='<soapenv:Body><q0:makeCaller><arg0>itcast</arg0></q0:makeCaller></soapenv:Body></soapenv:Envelope>';
$.ajax({
url: "ws/makeCallService",
data:data,
contentType:'text/xml;charset=utf⑻',
type:"POST",
dataType:"xml",
success: function(data, textStatus, jqXHR){
var text=$(data).find("return").text();
$(".message").html(text);
// $(".message").show(3000);
$(".message").slideDown(3000);
}
});
},
hide:function(){
$(".message").slideUp(3000);
}
}
</script>
</head>
<body>
<input type="button" value="顯示" onclick="itcast.sendMessage()"/>
<input type="button" value="隱藏" onclick="itcast.hide()"/>
<div class="message" style="border-width: 4xp;border-style: solid;border-color: red;width: 400px;height: 400px;display: none;">
</div>
</body>
</html>通過js來訪問webservice有兩種不同的情勢
1、通過SOAP協(xié)議進(jìn)行訪問。
發(fā)送的全部是XML數(shù)據(jù),且必須是POST要求。
2、通過HTTP的get/post方式進(jìn)行訪問。
此種情況又分成不同的情勢,此種情況必要在cxf下發(fā)布。由于jdk1.6基本的發(fā)布不支持Http,soap1.2。
1、發(fā)送和接收XML數(shù)據(jù)。
JS1直存在跨域訪問的問題
目前的jQuery不支持跨域訪問。如果要進(jìn)行訪問必須使用jQuery的jsonp數(shù)據(jù)情勢。
但原始的ajax可以通過get/post方式跨域訪問http上的資源。
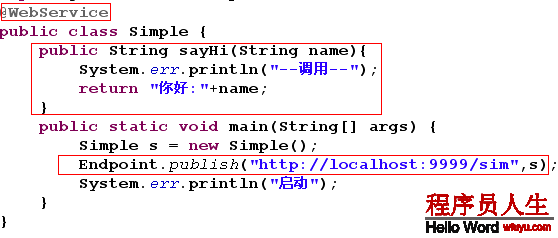
以下是通過jaxb發(fā)布的webservice。并通過js實(shí)現(xiàn)訪問webService.
第1步:書寫webService的服務(wù):
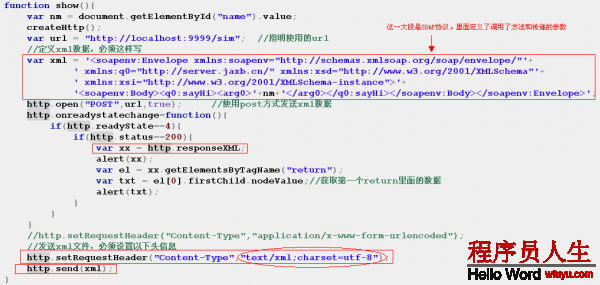
第2步:創(chuàng)建XMLHttpRequest對像:

第3步:想法獲得SOAP協(xié)議的文本,并在JS中做為發(fā)出的XML數(shù)據(jù)
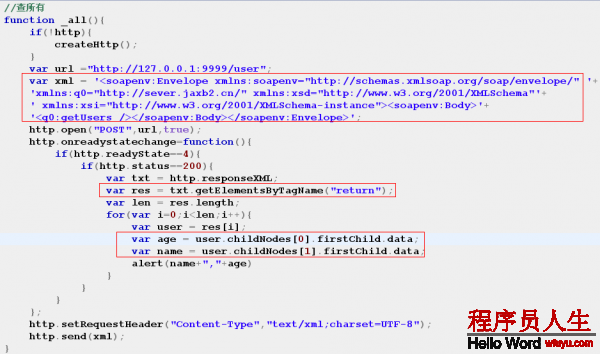
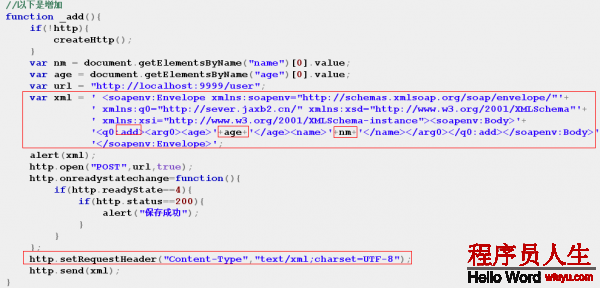
CRUD-Server:

CRUD-Client:
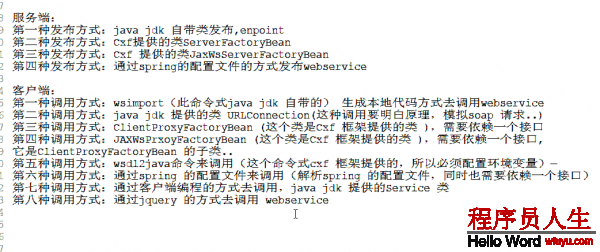
散布與接收webService的方法

程序員人生,我編程,我富裕,記住wfuyu網(wǎng),php教程,php學(xué)習(xí),php手冊,CMS模版制作
聲明:本站大部分內(nèi)容是作者原創(chuàng),少部分收集于互聯(lián)網(wǎng)供大家一起學(xué)習(xí),原版權(quán)很多不明,如有侵權(quán)請聯(lián)系本站,謝謝!
粵ICP備14040726號-1?? 2015-2020 程序員人生 版權(quán)所有


