Adrnoid開發系列(二十五):使用AlertDialog創建各種類型的對話框
來源:程序員人生 發布時間:2014-11-07 08:37:22 閱讀次數:2050次
AlertDialog可以生成各種內容的對話框,但是每種對話框都會有這類的結構:
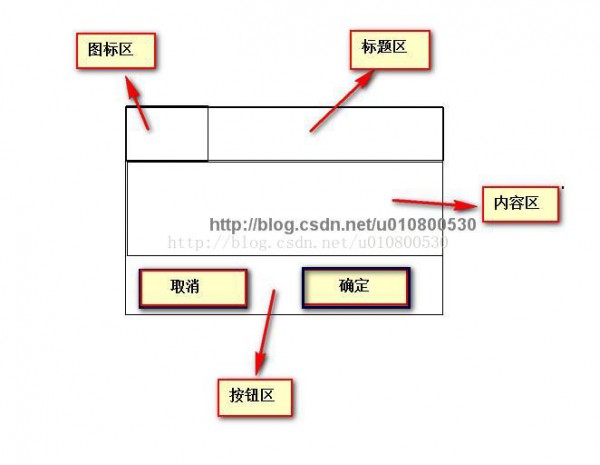
類似下邊這類的:
這只是最簡單的對話框。
我們來看下創建1個對話框需要的步驟:
1、使用創建AlertDialog.Builder對象
2、調用AlertDialog.Builder的setTitle()或setCustomTitle()方法設置標題
3、調用AlertDialog.Builder的setIcon()方法設置圖標
4、調用1些其他設置方法設置標題
5、調用AlertDialog.Builder的setPositiveButton()、setNegativeButton()或setNeutralButton()添加多個按鈕
6、調用create()方法創建AlertDialog對象,再調用AlertDialog對象的show()方法將該對話框顯示出來。
新建Android項目,然后編寫main.xml:
<?xml version="1.0" encoding="utf⑻"?>
<LinearLayout xmlns:android="http://schemas.android.com/apk/res/android"
android:orientation="vertical"
android:layout_width="match_parent"
android:layout_height="match_parent"
android:gravity="center_horizontal">
<!-- 顯示1個普通的文本編輯框組件 -->
<EditText
android:id="@+id/show"
android:layout_width="match_parent"
android:layout_height="wrap_content"
android:editable="false"/>
<!-- 定義1個普通的按鈕組件 -->
<Button
android:layout_width="match_parent"
android:layout_height="wrap_content"
android:text="簡單對話框"
android:onClick="simple"
/>
<!-- 定義1個普通的按鈕組件 -->
<Button
android:layout_width="match_parent"
android:layout_height="wrap_content"
android:text="簡單列表項對話框"
android:onClick="simpleList"
/>
<!-- 定義1個普通的按鈕組件 -->
<Button
android:layout_width="match_parent"
android:layout_height="wrap_content"
android:text="單選列表項對話框"
android:onClick="singleChoice"
/>
<!-- 定義1個普通的按鈕組件 -->
<Button
android:layout_width="match_parent"
android:layout_height="wrap_content"
android:text="多選列表項對話框"
android:onClick="multiChoice"
/>
<!-- 定義1個普通的按鈕組件 -->
<Button
android:layout_width="match_parent"
android:layout_height="wrap_content"
android:text="自定義列表項對話框"
android:onClick="customList"
/>
<!-- 定義1個普通的按鈕組件 -->
<Button
android:layout_width="match_parent"
android:layout_height="wrap_content"
android:text="自定義View對話框"
android:onClick="customView"
/>
</LinearLayout>
這里是定義了6個按鈕和1個文本顯示框,并且設置了相應的onClick屬性
接下來,我們就要編寫主界面的java代碼:AlertDialogTest.java
package org.crazyit.ui;
import android.app.Activity;
import android.app.AlertDialog;
import android.content.DialogInterface;
import android.content.DialogInterface.OnClickListener;
import android.os.Bundle;
import android.view.View;
import android.widget.ArrayAdapter;
import android.widget.TableLayout;
import android.widget.TextView;
public class AlertDialogTest extends Activity
{
TextView show;
String[] items = new String[] {
"瘋狂Java講義", "瘋狂Ajax講義",
"輕量級Java EE企業利用實戰",
"瘋狂Android講義" };
@Override
public void onCreate(Bundle savedInstanceState)
{
super.onCreate(savedInstanceState);
setContentView(R.layout.main);
show = (TextView) findViewById(R.id.show);
}
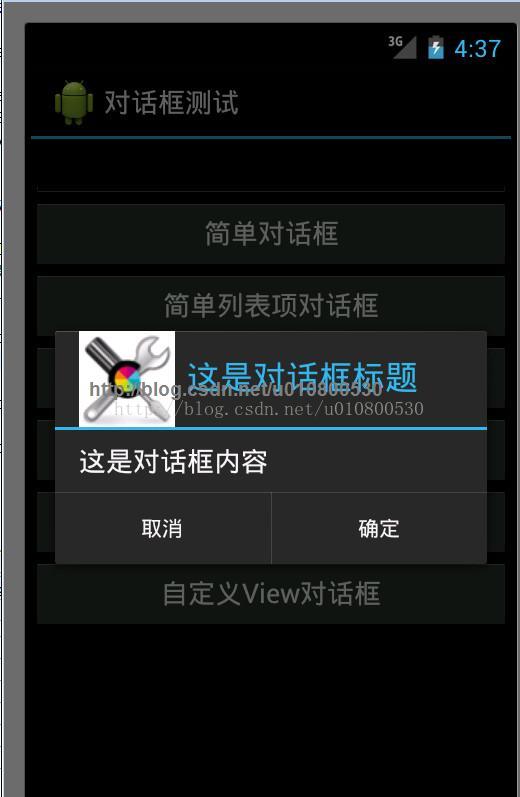
public void simple(View source)
{
AlertDialog.Builder builder = new AlertDialog.Builder(this)
// 設置對話框標題
.setTitle("這是對話框標題")
// 設置圖標
.setIcon(R.drawable.tools)
.setMessage("這是對話框內容");
// 為AlertDialog.Builder添加【肯定】按鈕
setPositiveButton(builder);
// 為AlertDialog.Builder添加【取消】按鈕
setNegativeButton(builder)
.create()
.show();
}
public void simpleList(View source)
{
AlertDialog.Builder builder = new AlertDialog.Builder(this)
// 設置對話框標題
.setTitle("簡單列表項對話框")
// 設置圖標
.setIcon(R.drawable.tools)
// 設置簡單的列表項內容
.setItems(items, new OnClickListener()
{
@Override
public void onClick(DialogInterface dialog, int which)
{
show.setText("你選中了《" + items[which] + "》");
}
});
// 為AlertDialog.Builder添加【肯定】按鈕
setPositiveButton(builder);
// 為AlertDialog.Builder添加【取消】按鈕
setNegativeButton(builder)
.create()
.show();
}
public void singleChoice(View source)
{
AlertDialog.Builder builder = new AlertDialog.Builder(this)
// 設置對話框標題
.setTitle("單選列表項對話框")
// 設置圖標
.setIcon(R.drawable.tools)
// 設置單選列表項,默許選中第2項(索引為1)
.setSingleChoiceItems(items, 1, new OnClickListener()
{
@Override
public void onClick(DialogInterface dialog, int which)
{
show.setText("你選中了《" + items[which] + "》");
}
});
// 為AlertDialog.Builder添加【肯定】按鈕
setPositiveButton(builder);
// 為AlertDialog.Builder添加【取消】按鈕
setNegativeButton(builder)
.create()
.show();
}
public void multiChoice(View source)
{
AlertDialog.Builder builder = new AlertDialog.Builder(this)
// 設置對話框標題
.setTitle("多選列表項對話框")
// 設置圖標
.setIcon(R.drawable.tools)
// 設置多選列表項,設置勾選第2項、第4項
.setMultiChoiceItems(items
, new boolean[]{false , true ,false ,true}, null);
// 為AlertDialog.Builder添加【肯定】按鈕
setPositiveButton(builder);
// 為AlertDialog.Builder添加【取消】按鈕
setNegativeButton(builder)
.create()
.show();
}
public void customList(View source)
{
AlertDialog.Builder builder = new AlertDialog.Builder(this)
// 設置對話框標題
.setTitle("自定義列表項對話框")
// 設置圖標
.setIcon(R.drawable.tools)
// 設置自定義列表項
.setAdapter(new ArrayAdapter<String>(this
, R.layout.array_item
, items), null);
// 為AlertDialog.Builder添加【肯定】按鈕
setPositiveButton(builder);
// 為AlertDialog.Builder添加【取消】按鈕
setNegativeButton(builder)
.create()
.show();
}
public void customView(View source)
{
//裝載/res/layout/login.xml界面布局
TableLayout loginForm = (TableLayout)getLayoutInflater()
.inflate( R.layout.login, null);
new AlertDialog.Builder(this)
// 設置對話框的圖標
.setIcon(R.drawable.tools)
// 設置對話框的標題
.setTitle("自定義View對話框")
// 設置對話框顯示的View對象
.setView(loginForm)
// 為對話框設置1個“肯定”按鈕
.setPositiveButton("登錄" , new OnClickListener()
{
@Override
public void onClick(DialogInterface dialog,
int which)
{
// 此處可履行登錄處理
}
})
// 為對話框設置1個“取消”按鈕
.setNegativeButton("取消", new OnClickListener()
{
@Override
public void onClick(DialogInterface dialog,
int which)
{
// 取消登錄,不做任何事情。
}
})
// 創建、并顯示對話框
.create()
.show();
}
private AlertDialog.Builder setPositiveButton(
AlertDialog.Builder builder)
{
// 調用setPositiveButton方法添加肯定按鈕
return builder.setPositiveButton("肯定", new OnClickListener()
{
@Override
public void onClick(DialogInterface dialog, int which)
{
show.setText("單擊了【肯定】按鈕!");
}
});
}
private AlertDialog.Builder setNegativeButton(
AlertDialog.Builder builder)
{
// 調用setNegativeButton方法添加取消按鈕
return builder.setNegativeButton("取消", new OnClickListener()
{
@Override
public void onClick(DialogInterface dialog, int which)
{
show.setText("單擊了【取消】按鈕!");
}
});
}
}
在這里邊,第5個和第6個按鈕用到了兩個樣式:array_item.xml和login.xml
我們看下他們的內容:
array_item.xml:
<?xml version="1.0" encoding="utf⑻"?>
<TextView xmlns:android="http://schemas.android.com/apk/res/android"
android:id="@+id/TextView"
android:textColor="#f0f"
android:textSize="30dp"
android:shadowColor="#ff0"
android:shadowRadius="2"
android:shadowDx="5"
android:shadowDy="5"
android:layout_width="match_parent"
android:layout_height="wrap_content" />
login.xml:
<?xml version="1.0" encoding="utf⑻"?>
<TableLayout xmlns:android="http://schemas.android.com/apk/res/android"
android:id="@+id/loginForm"
android:orientation="vertical"
android:layout_width="fill_parent"
android:layout_height="fill_parent"
>
<TableRow>
<TextView
android:layout_width="fill_parent"
android:layout_height="wrap_content"
android:text="用戶名:"
android:textSize="10pt"
/>
<!-- 輸入用戶名的文本框 -->
<EditText
android:layout_width="fill_parent"
android:layout_height="wrap_content"
android:hint="請填寫登錄帳號"
android:selectAllOnFocus="true"
/>
</TableRow>
<TableRow>
<TextView
android:layout_width="fill_parent"
android:layout_height="wrap_content"
android:text="密碼:"
android:textSize="10pt"
/>
<!-- 輸入密碼的文本框 -->
<EditText
android:layout_width="fill_parent"
android:layout_height="wrap_content"
android:hint="請填寫密碼"
android:password="true"
/>
</TableRow>
<TableRow>
<TextView
android:layout_width="fill_parent"
android:layout_height="wrap_content"
android:text="電話號碼:"
android:textSize="10pt"
/>
<!-- 輸入電話號碼的文本框 -->
<EditText
android:layout_width="fill_parent"
android:layout_height="wrap_content"
android:hint="請填寫您的電話號碼"
android:selectAllOnFocus="true"
android:phoneNumber="true"
/>
</TableRow>
</TableLayout>
通過AlertDialog可以制作出不同風格的對話框,在很多時候都比較有用
并且我們可以通過肯定按鈕來把數據通過Intent傳遞到另外1個界面中。
生活不易,碼農辛苦
如果您覺得本網站對您的學習有所幫助,可以手機掃描二維碼進行捐贈


