我們前面創建項目的時候是一個java web project,現在在項目中需要加入spring,hibernate,sqlserver連接的jar包以及加入配置文件。spring我現在使用的是3.1版本,hibernate使用的是3.0,具體的jar包以及一些附加包,請自行下載后加到工程中。(所有的jar包在我的前一個博客中提供的演示軟件中有)
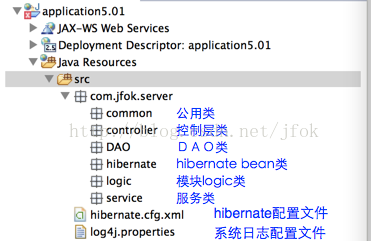
一、在java Resources的src中加入一些package。在src目錄下建立文件hibernate.cfg.xml和log4j.properties。
hibenate的配置文件如下:/application5.01/src/hibernate.cfg.xml(使用的是sql server數據庫,用其他數據庫也可以。)<?xml version="1.0" encoding="UTF-8"?> <!DOCTYPE hibernate-configuration PUBLIC "-//Hibernate/Hibernate Configuration DTD 3.0//EN" "http://hibernate.sourceforge.net/hibernate-configuration-3.0.dtd"> <hibernate-configuration> <session-factory> <property name="hibernate.connection.driver_class">com.microsoft.sqlserver.jdbc.SQLServerDriver</property> <property name="hibernate.connection.url">jdbc:sqlserver://10.211.55.5:1433;databaseName=haiyu</property> <property name="hibernate.dialect">org.hibernate.dialect.SQLServerDialect</property> <property name="hibernate.connection.username">sa</property> <property name="hibernate.connection.password"></property> <property name="hibernate.connection.autocommit">false</property> <property name="format_sql">true</property> <property name="show_sql">true</property> </session-factory> </hibernate-configuration>系統日志配置文件:/application5.01/src/log4j.properties 。
log4j.rootCategory=error, console log4j.appender.console=org.apache.log4j.ConsoleAppender log4j.appender.console.layout=org.apache.log4j.PatternLayout log4j.appender.console.layout.ConversionPattern=%-4r [%t] %-5p %c %x - %m%n log4j.logger.org.hibernate=error log4j.logger.org.hibernate.SQL=error log4j.logger.com.jfok=error log4j.logger.org.springframework=error #log4j.category.org.hibernate.type=debug
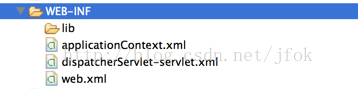
二、修改web.xml文件,加入spring的設置。在WEB-INF目錄下需要修改web.xml ,并加入二個spring 的配置文件applicationContext.xml和dispatcherServlet-servlet.xml。
web.xml的文件內容:<?xml version="1.0" encoding="UTF-8"?> <web-app xmlns:xsi="http://www.w3.org/2001/XMLSchema-instance" xsi:schemaLocation="http://java.sun.com/xml/ns/javaee http://java.sun.com/xml/ns/javaee/web-app_2_5.xsd" version="2.5" xmlns="http://java.sun.com/xml/ns/javaee"> <!-- spring 監聽器 --> <listener> <listener-class>org.springframework.web.context.ContextLoaderListener</listener-class> </listener> <!-- spring 配置文件地址 --> <context-param> <param-name>ContextConfigLocation</param-name> <param-value> /WEB-INF/applicationContext.xml </param-value> </context-param> <!-- Servlets --> <!-- spring MVC,其配置文件為 <servlet-name>-servlet.xml,這里為“dispatcherServlet-servlet.xml” --> <servlet> <servlet-name>dispatcherServlet</servlet-name> <servlet-class>org.springframework.web.servlet.DispatcherServlet</servlet-class> <load-on-startup>1</load-on-startup> </servlet> <servlet-mapping> <servlet-name>dispatcherServlet</servlet-name> <url-pattern>*.do</url-pattern> <!-- 用于匹配/rest/module/remove.do/{id} 之類的調用 --> <url-pattern>/rest/*</url-pattern> </servlet-mapping> <!-- 字符集編碼過濾,防止某些亂碼 --> <filter> <filter-name>encodingFilter</filter-name> <filter-class>org.springframework.web.filter.CharacterEncodingFilter</filter-class> <init-param> <param-name>encoding</param-name> <param-value>UTF-8</param-value> </init-param> <init-param> <param-name>forceEncoding</param-name> <param-value>true</param-value> </init-param> </filter> <filter-mapping> <filter-name>encodingFilter</filter-name> <url-pattern>/*</url-pattern> </filter-mapping> <!-- Default page to serve 180 --> <welcome-file-list> <welcome-file>/index.jsp</welcome-file> </welcome-file-list> <session-config> <session-timeout>180</session-timeout> </session-config> <jsp-config> <jsp-property-group> <url-pattern>*.jsp</url-pattern> <trim-directive-whitespaces>true</trim-directive-whitespaces> </jsp-property-group> </jsp-config> </web-app>
applicationContext.xml的內容:<?xml version="1.0" encoding="UTF-8"?> <beans xmlns="http://www.springframework.org/schema/beans" xmlns:xsi="http://www.w3.org/2001/XMLSchema-instance" xmlns:p="http://www.springframework.org/schema/p" xmlns:tx="http://www.springframework.org/schema/tx" xmlns:context="http://www.springframework.org/schema/context" xsi:schemaLocation=" http://www.springframework.org/schema/beans http://www.springframework.org/schema/beans/spring-beans-3.1.xsd http://www.springframework.org/schema/tx http://www.springframework.org/schema/tx/spring-tx-3.1.xsd http://www.springframework.org/schema/context http://www.springframework.org/schema/context/spring-context-3.1.xsd"> <context:annotation-config /> <context:component-scan base-package="com.jfok"> <!-- 將控制層排除在外,只掃描生成服務層的DAO層的類 --> <context:exclude-filter type="annotation" expression="org.springframework.stereotype.Controller" /> </context:component-scan> <tx:annotation-driven transaction-manager="transactionManager" proxy-target-class="true"/> <!-- spring用于替換hibernateSessionFactory.java的sessionFactory --> <bean id="sessionFactory" class="org.springframework.orm.hibernate3.LocalSessionFactoryBean"> <property name="configLocation" value="classpath:hibernate.cfg.xml"> </property> </bean> <!-- 事務管理器 --> <bean id="transactionManager" class="org.springframework.orm.hibernate3.HibernateTransactionManager"> <property name="sessionFactory"> <ref local="sessionFactory" /> </property> </bean> </beans>
dispatcherServlet-servlet.xml的內容:<?xml version="1.0" encoding="UTF-8"?> <beans xmlns="http://www.springframework.org/schema/beans" xmlns:xsi="http://www.w3.org/2001/XMLSchema-instance" xmlns:p="http://www.springframework.org/schema/p" xmlns:mvc="http://www.springframework.org/schema/mvc" xmlns:context="http://www.springframework.org/schema/context" xsi:schemaLocation=" http://www.springframework.org/schema/beans http://www.springframework.org/schema/beans/spring-beans-3.1.xsd http://www.springframework.org/schema/mvc http://www.springframework.org/schema/mvc/spring-mvc-3.1.xsd http://www.springframework.org/schema/context http://www.springframework.org/schema/context/spring-context-3.1.xsd "> <!-- ①:對web包中的所有類進行掃描,以完成Bean創建和自動依賴注入的功能 , 只對標注為@Controller 的類進行分成,這些類是mvc的控制層 --> <context:component-scan base-package="com.jfok" use-default-filters="false"> <context:include-filter type="annotation" expression="org.springframework.stereotype.Controller" /> </context:component-scan> <!-- ②:啟動Spring MVC的注解功能,完成請求和注解POJO的映射 --> <mvc:annotation-driven /> <bean class="org.springframework.web.servlet.mvc.annotation.DefaultAnnotationHandlerMapping" /> <bean class="org.springframework.web.servlet.mvc.annotation.AnnotationMethodHandlerAdapter" /> <bean class="org.springframework.web.servlet.mvc.SimpleControllerHandlerAdapter"></bean> <!-- Configure the multipart resolver --> <bean id="multipartResolver" class="org.springframework.web.multipart.commons.CommonsMultipartResolver"> <!-- one of the properties available; the maximum file size in bytes --> <property name="maxUploadSize" value="10000000" /> </bean> </beans>(由于使用的spring的annotation注解進行開發,因此配置文件在以后開發過程中基本上不用修改。)
三、將index.html改名為index.jsp。
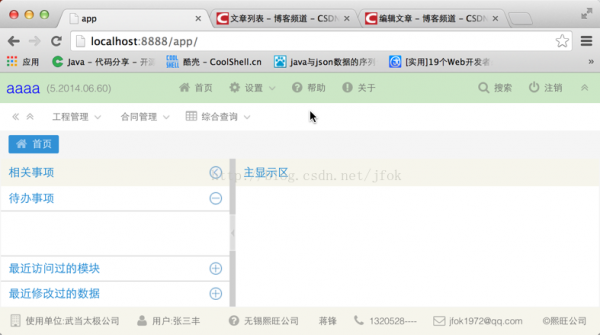
四、在tomcat中發布此工程。如果運行時沒有出錯信息,則說明所有的配置和jar包都正確了。

程序員人生,我編程,我富裕,記住wfuyu網,php教程,php學習,php手冊,CMS模版制作
聲明:本站大部分內容是作者原創,少部分收集于互聯網供大家一起學習,原版權很多不明,如有侵權請聯系本站,謝謝!
粵ICP備14040726號-1?? 2015-2020 程序員人生 版權所有