iOS_自定義毛玻璃效果
來源:程序員人生 發布時間:2014-09-24 20:11:27 閱讀次數:3031次
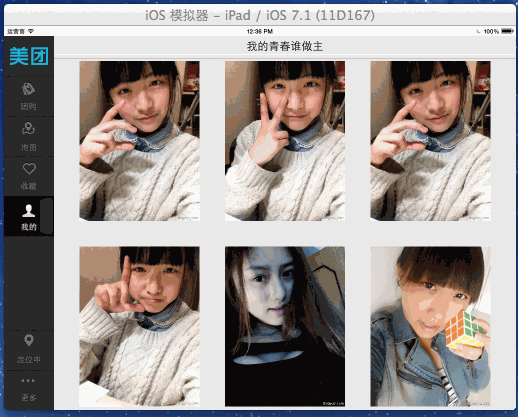
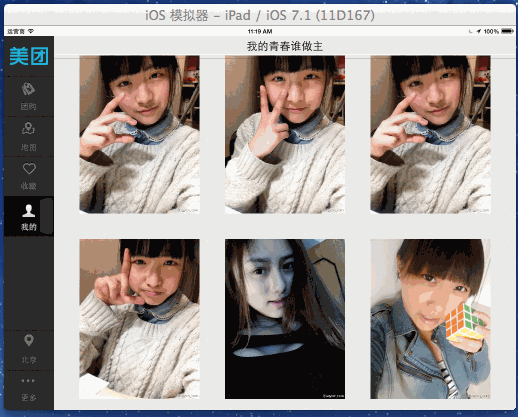
最終效果圖:

關鍵代碼:
UIImage分類代碼
//
// UIImage+BlurGlass.h
// 帥哥_團購
//
// Created by beyond on 14-8-30.
// Copyright (c) 2014年 com.beyond. All rights reserved.
// 毛玻璃效果 UIImage分類
#import <UIKit/UIKit.h>
@interface UIImage (BlurGlass)
/*
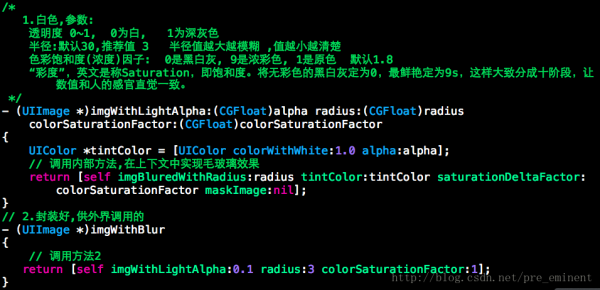
1.白色,參數:
透明度 0~1, 0為白, 1為深灰色
半徑:默認30,推薦值 3 半徑值越大越模糊 ,值越小越清楚
色彩飽和度(濃度)因子: 0是黑白灰, 9是濃彩色, 1是原色 默認1.8
“彩度”,英文是稱Saturation,即飽和度。將無彩色的黑白灰定為0,最鮮艷定為9s,這樣大致分成十階段,讓數值和人的感官直覺一致。
*/
- (UIImage *)imgWithLightAlpha:(CGFloat)alpha radius:(CGFloat)radius colorSaturationFactor:(CGFloat)colorSaturationFactor;
// 2.封裝好,供外界調用的
- (UIImage *)imgWithBlur;
@end
//
// UIImage+BlurGlass.m
// 帥哥_團購
//
// Created by beyond on 14-8-30.
// Copyright (c) 2014年 com.beyond. All rights reserved.
//
#import "UIImage+BlurGlass.h"
#import <Accelerate/Accelerate.h>
@implementation UIImage (BlurGlass)
/*
1.白色,參數:
透明度 0~1, 0為白, 1為深灰色
半徑:默認30,推薦值 3 半徑值越大越模糊 ,值越小越清楚
色彩飽和度(濃度)因子: 0是黑白灰, 9是濃彩色, 1是原色 默認1.8
“彩度”,英文是稱Saturation,即飽和度。將無彩色的黑白灰定為0,最鮮艷定為9s,這樣大致分成十階段,讓數值和人的感官直覺一致。
*/
- (UIImage *)imgWithLightAlpha:(CGFloat)alpha radius:(CGFloat)radius colorSaturationFactor:(CGFloat)colorSaturationFactor
{
UIColor *tintColor = [UIColor colorWithWhite:1.0 alpha:alpha];
return [self imgBluredWithRadius:radius tintColor:tintColor saturationDeltaFactor:colorSaturationFactor maskImage:nil];
}
// 2.封裝好,供外界調用的
- (UIImage *)imgWithBlur
{
// 調用方法1
return [self imgWithLightAlpha:0.1 radius:3 colorSaturationFactor:1];
}
// 內部方法,核心代碼,封裝了毛玻璃效果 參數:半徑,顏色,色彩飽和度
- (UIImage *)imgBluredWithRadius:(CGFloat)blurRadius tintColor:(UIColor *)tintColor saturationDeltaFactor:(CGFloat)saturationDeltaFactor maskImage:(UIImage *)maskImage
{
CGRect imageRect = { CGPointZero, self.size };
UIImage *effectImage = self;
BOOL hasBlur = blurRadius > __FLT_EPSILON__;
BOOL hasSaturationChange = fabs(saturationDeltaFactor - 1.) > __FLT_EPSILON__;
if (hasBlur || hasSaturationChange) {
UIGraphicsBeginImageContextWithOptions(self.size, NO, [[UIScreen mainScreen] scale]);
CGContextRef effectInContext = UIGraphicsGetCurrentContext();
CGContextScaleCTM(effectInContext, 1.0, -1.0);
CGContextTranslateCTM(effectInContext, 0, -self.size.height);
CGContextDrawImage(effectInContext, imageRect, self.CGImage);
vImage_Buffer effectInBuffer;
effectInBuffer.data = CGBitmapContextGetData(effectInContext);
effectInBuffer.width = CGBitmapContextGetWidth(effectInContext);
effectInBuffer.height = CGBitmapContextGetHeight(effectInContext);
effectInBuffer.rowBytes = CGBitmapContextGetBytesPerRow(effectInContext);
UIGraphicsBeginImageContextWithOptions(self.size, NO, [[UIScreen mainScreen] scale]);
CGContextRef effectOutContext = UIGraphicsGetCurrentContext();
vImage_Buffer effectOutBuffer;
effectOutBuffer.data = CGBitmapContextGetData(effectOutContext);
effectOutBuffer.width = CGBitmapContextGetWidth(effectOutContext);
effectOutBuffer.height = CGBitmapContextGetHeight(effectOutContext);
effectOutBuffer.rowBytes = CGBitmapContextGetBytesPerRow(effectOutContext);
if (hasBlur) {
CGFloat inputRadius = blurRadius * [[UIScreen mainScreen] scale];
NSUInteger radius = floor(inputRadius * 3. * sqrt(2 * M_PI) / 4 + 0.5);
if (radius % 2 != 1) {
radius += 1; // force radius to be odd so that the three box-blur methodology works.
}
vImageBoxConvolve_ARGB8888(&effectInBuffer, &effectOutBuffer, NULL, 0, 0, radius, radius, 0, kvImageEdgeExtend);
vImageBoxConvolve_ARGB8888(&effectOutBuffer, &effectInBuffer, NULL, 0, 0, radius, radius, 0, kvImageEdgeExtend);
vImageBoxConvolve_ARGB8888(&effectInBuffer, &effectOutBuffer, NULL, 0, 0, radius, radius, 0, kvImageEdgeExtend);
}
BOOL effectImageBuffersAreSwapped = NO;
if (hasSaturationChange) {
CGFloat s = saturationDeltaFactor;
CGFloat floatingPointSaturationMatrix[] = {
0.0722 + 0.9278 * s, 0.0722 - 0.0722 * s, 0.0722 - 0.0722 * s, 0,
0.7152 - 0.7152 * s, 0.7152 + 0.2848 * s, 0.7152 - 0.7152 * s, 0,
0.2126 - 0.2126 * s, 0.2126 - 0.2126 * s, 0.2126 + 0.7873 * s, 0,
0, 0, 0, 1,
};
const int32_t divisor = 256;
NSUInteger matrixSize = sizeof(floatingPointSaturationMatrix)/sizeof(floatingPointSaturationMatrix[0]);
int16_t saturationMatrix[matrixSize];
for (NSUInteger i = 0; i < matrixSize; ++i) {
saturationMatrix[i] = (int16_t)roundf(floatingPointSaturationMatrix[i] * divisor);
}
if (hasBlur) {
vImageMatrixMultiply_ARGB8888(&effectOutBuffer, &effectInBuffer, saturationMatrix, divisor, NULL, NULL, kvImageNoFlags);
effectImageBuffersAreSwapped = YES;
}
else {
vImageMatrixMultiply_ARGB8888(&effectInBuffer, &effectOutBuffer, saturationMatrix, divisor, NULL, NULL, kvImageNoFlags);
}
}
if (!effectImageBuffersAreSwapped)
effectImage = UIGraphicsGetImageFromCurrentImageContext();
UIGraphicsEndImageContext();
if (effectImageBuffersAreSwapped)
effectImage = UIGraphicsGetImageFromCurrentImageContext();
UIGraphicsEndImageContext();
}
// 開啟上下文 用于輸出圖像
UIGraphicsBeginImageContextWithOptions(self.size, NO, [[UIScreen mainScreen] scale]);
CGContextRef outputContext = UIGraphicsGetCurrentContext();
CGContextScaleCTM(outputContext, 1.0, -1.0);
CGContextTranslateCTM(outputContext, 0, -self.size.height);
// 開始畫底圖
CGContextDrawImage(outputContext, imageRect, self.CGImage);
// 開始畫模糊效果
if (hasBlur) {
CGContextSaveGState(outputContext);
if (maskImage) {
CGContextClipToMask(outputContext, imageRect, maskImage.CGImage);
}
CGContextDrawImage(outputContext, imageRect, effectImage.CGImage);
CGContextRestoreGState(outputContext);
}
// 添加顏色渲染
if (tintColor) {
CGContextSaveGState(outputContext);
CGContextSetFillColorWithColor(outputContext, tintColor.CGColor);
CGContextFillRect(outputContext, imageRect);
CGContextRestoreGState(outputContext);
}
// 輸出成品,并關閉上下文
UIImage *outputImage = UIGraphicsGetImageFromCurrentImageContext();
UIGraphicsEndImageContext();
return outputImage;
}
@end
控制器代碼
//
// MineController.m
// 帥哥_團購
//
// Created by beyond on 14-8-14.
// Copyright (c) 2014年 com.beyond. All rights reserved.
// dock上面的【我的】按鈕對應的控制器
#import "MineController.h"
#import "ImgDownloadTool.h"
#import <Accelerate/Accelerate.h>
#import "UIImage+BoxBlur.h"
#import "GirlCell.h"
// 每一個格子的寬和高
#define kItemW 240
#define kItemH 320
@interface MineController ()<UICollectionViewDataSource,UICollectionViewDelegate>
{
NSMutableArray *_imgArr;
UIWebView *_webView;
// 添加一個coverImgView,用于點擊了cell時,進行屏幕截圖并加上毛玻璃效果,置于最上方作為蒙板
UIImageView *_coverBlurImgView;
// 點擊cell,彈出一個大圖(必須在控制器顯示之前 再確定frame,真實的frame)
UIImageView *_showingImgView;
}
@end
@implementation MineController
#pragma mark - 生命周期方法
- (void)viewDidLoad
{
[super viewDidLoad];
self.title = @"我的青春誰做主";
// 0.加載plist文件保存的url數組
// sg_bundle模板代碼,1,獲得.app主要的包;2,返回主要的包中某個文件的fullPath全路徑
NSBundle *mainBundle = [NSBundle mainBundle];
NSString *fullPath = [mainBundle pathForResource:@"sinaImgArr.plist" ofType:nil];
_imgArr = [NSArray arrayWithContentsOfFile:fullPath];
// 1.創建自己的collectionView
[self addCollectionView];
// 2.注冊cell格子要用到的xib文件
[self.collectionView registerNib:[UINib nibWithNibName:@"GirlCell" bundle:nil] forCellWithReuseIdentifier:@"GirlCell"];
// 3.設置collectionView永遠支持垂直滾動,為下拉刷新準備(彈簧)
self.collectionView.alwaysBounceVertical = YES;
// 4.設置collectionView的背景色
self.collectionView.backgroundColor = kGlobalBg;
// 5.添加一個coverImgView,用于點擊了cell時,進行屏幕截圖并加上毛玻璃效果,置于最上方作為蒙板
_coverBlurImgView = [[UIImageView alloc]init];
[self.view addSubview:_coverBlurImgView];
// 6.點擊cell,彈出一個大圖(必須在控制器顯示之前 再確定frame,真實的frame)
_showingImgView = [[UIImageView alloc]init];
_showingImgView.backgroundColor = [UIColor clearColor];
[self.view addSubview:_showingImgView];
_showingImgView.contentMode = UIViewContentModeScaleAspectFit;
_showingImgView.userInteractionEnabled = YES;
[_showingImgView addGestureRecognizer:[[UITapGestureRecognizer alloc] initWithTarget:self action:@selector(showingImgTap)]];
}
// 1.創建自己的collectionView
- (void)addCollectionView
{
// 創建一個流布局,必須指定
UICollectionViewFlowLayout *layout = [[UICollectionViewFlowLayout alloc] init];
// 設置流布局里面的每一個格子寬和高,即每一個網格的尺寸
layout.itemSize = CGSizeMake(kItemW, kItemH);
// 每一行之間的間距
layout.minimumLineSpacing = 20;
// 指定的流布局創建一個collectionView,并且用成員變量記住
self.collectionView = [[UICollectionView alloc] initWithFrame:self.view.bounds collectionViewLayout:layout];
// 高度和寬度自動伸縮
self.collectionView.autoresizingMask = UIViewAutoresizingFlexibleHeight | UIViewAutoresizingFlexibleWidth;
self.collectionView.delegate = self;
self.collectionView.dataSource = self;
[self.view addSubview:self.collectionView];
}
#pragma mark 在viewWillAppear和viewDidAppear中可以取得view最準確的寬高(width和height)
// 重要~~~因為在控制器創建時,寬默認是768,高默認是1024,不管橫豎屏
// 只有在viewWillAppear和viewDidAppear方法中,可以取得view最準確的(即實際的)寬和高(width和height)
- (void)viewWillAppear:(BOOL)animated
{
// 默認計算layout
[self didRotateFromInterfaceOrientation:0];
}
#pragma mark - 父類方法
// 攔截,屏幕即將旋轉的時候調用(控制器監控屏幕旋轉)
- (void)willRotateToInterfaceOrientation:(UIInterfaceOrientation)toInterfaceOrientation duration:(NSTimeInterval)duration
{
//log(@"屏幕即將旋轉");
}
#pragma mark 屏幕旋轉完畢的時候調用
// 攔截,屏幕旋轉完畢的時候調用
- (void)didRotateFromInterfaceOrientation:(UIInterfaceOrientation)fromInterfaceOrientation
{
// 1.取出創建CollectionViewController時傳入的的UICollectionViewFlowLayout
UICollectionViewFlowLayout *layout = (UICollectionViewFlowLayout *)self.collectionView.collectionViewLayout;
// 2.計算間距
CGFloat v = 0;
CGFloat h = 0;
CGFloat height = self.view.frame.size.height -44;
CGFloat width = self.view.frame.size.width;
if (UIInterfaceOrientationIsLandscape(self.interfaceOrientation)
) {
// 橫屏的間距
v = (height - 2 * kItemH) / 3;
h = (width - 3 * kItemW) / 4;
} else {
// 豎屏的間距
v = (height - 3 * kItemH) / 4;
h = (width - 2 * kItemW) / 3;
}
// 3.動畫調整格子之間的距離
[UIView animateWithDuration:4.0 animations:^{
// 上 左 下 右 四個方向的margin
layout.sectionInset = UIEdgeInsetsMake(h, h, v, h);
// 每一行之間的間距
layout.minimumLineSpacing = h;
}];
// 4.旋轉完成之后,才可以得到真實的frame,暫時隱藏起來,當點擊cell的時侯才展示 -5
_coverBlurImgView.frame = CGRectMake(0, 0, self.view.bounds.size.width, self.view.bounds.size.height);
_coverBlurImgView.hidden = YES;
_showingImgView.hidden = YES;
CGRect temp = _showingImgView.frame;
CGFloat x =self.view.frame.size.width * 0.5;
CGFloat y =self.view.frame.size.height * 0.5;
temp = CGRectMake(x,y, 0, 0);
_showingImgView.frame = temp;
}
#pragma mark - collectionView代理方法
// 共有多少個Item(就是格子Cube),詢問子類
- (NSInteger)collectionView:(UICollectionView *)collectionView numberOfItemsInSection:(NSInteger)section
{
return _imgArr.count;
}
#pragma mark 刷新數據的時候會調用(reloadData)
#pragma mark 每當有一個cell重新進入屏幕視野范圍內就會調用
// 生成每一個獨一無二的格子,詢問子類
- (UICollectionViewCell *)collectionView:(UICollectionView *)collectionView cellForItemAtIndexPath:(NSIndexPath *)indexPath
{
static NSString *ID = @"GirlCell";
GirlCell *cell = [collectionView dequeueReusableCellWithReuseIdentifier:ID forIndexPath:indexPath];
cell.imgSrc = _imgArr[indexPath.row];
return cell;
}
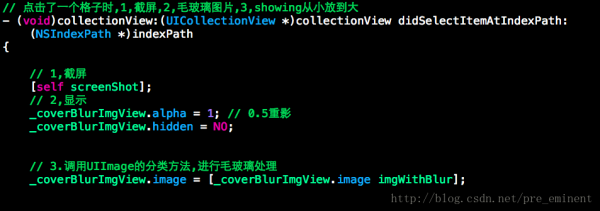
// 點擊了一個格子時,1,截屏,2,動畫毛玻璃圖片,3,showing從小放到大
- (void)collectionView:(UICollectionView *)collectionView didSelectItemAtIndexPath:(NSIndexPath *)indexPath
{
// 1,截屏
[self screenShot];
// 2,顯示
_coverBlurImgView.alpha = 1;
_coverBlurImgView.hidden = NO;
// 3.調用UIImage的分類方法,進行毛玻璃處理
_coverBlurImgView.image = [_coverBlurImgView.image imgWithBlur];
// 4.展示_showingImgView
_showingImgView.hidden = NO;
// 點擊cell,彈出一個大圖
CGRect temp = _showingImgView.frame;
CGFloat x =self.view.frame.size.width * 0.5;
CGFloat y =self.view.frame.size.height * 0.5;
temp = CGRectMake(x,y, 0, 0);
_showingImgView.frame = temp;
_showingImgView.alpha = 0;
[UIView animateWithDuration:0.5 animations:^{
[ImgDownloadTool imgDownloadWithUrl:_imgArr[indexPath.row] tmpImgName:kImgPlaceHolder imageView:_showingImgView];
_showingImgView.alpha = 1;
_showingImgView.frame = self.view.bounds;
}];
}
// 使用上下文截圖,并使用指定的區域裁剪,模板代碼
- (void)screenShot
{
// 將要被截圖的view
// 背景圖片 總的大小
CGSize size = self.view.frame.size;
UIGraphicsBeginImageContext(size);
// 開啟上下文,使用參數之后,截出來的是原圖(YES 0.0 質量高)
UIGraphicsBeginImageContextWithOptions(size, YES, 0.0);
// 裁剪的關鍵代碼,要裁剪的矩形范圍
CGRect rect = CGRectMake(0, 0, size.width, size.height );
//注:iOS7以后renderInContext:由drawViewHierarchyInRect:afterScreenUpdates:替代
[self.view drawViewHierarchyInRect:rect afterScreenUpdates:NO];
// 從上下文中,取出UIImage
UIImage *snapshot = UIGraphicsGetImageFromCurrentImageContext();
// 添加截取好的圖片到圖片View里面
_coverBlurImgView.image = snapshot;
// 千萬記得,結束上下文(移除棧頂上下文)
UIGraphicsEndImageContext();
}
// 正在顯示的大圖被點了
- (void)showingImgTap
{
[UIView animateWithDuration:0.5 animations:^{
CGRect temp = _showingImgView.frame;
CGFloat x =self.view.frame.size.width * 0.5;
CGFloat y =self.view.frame.size.height * 0.5;
temp = CGRectMake(x,y, 0, 0);
_showingImgView.frame = temp;
_showingImgView.alpha = 0;
} completion:^(BOOL finished) {
// 隱藏起來
_showingImgView.hidden = YES;
_coverBlurImgView.hidden = YES;
}];
}
#pragma mark - 生命周期方法
- (void)dealloc
{
[[NSNotificationCenter defaultCenter] removeObserver:self];
}
@end
生活不易,碼農辛苦
如果您覺得本網站對您的學習有所幫助,可以手機掃描二維碼進行捐贈


