Android Handler 詳解
來源:程序員人生 發布時間:2014-09-24 21:31:26 閱讀次數:3423次
Android開發中經常使用Handler來實現“跨越線程(Activity)更新UI”。本文將從源碼角度回答:為什么使用Handler能夠跨線程更新UI?為什么跨線程更新UI一定要用Handler?
Demo
Demo1. 用Handler更新UI
下面這個Demo完全是為了演示“跨線程更新UI”而寫的。界面上只有一個TextView和一個Button,按下Button創建一個后臺線程,該后臺線程每隔一秒更新一次TextView,連續更新10次,結束。
Activity的代碼如下:
public class MainActivity extends Activity {
static final String TAG = "MainActivity";
Handler handler = null;
@Override
protected void onCreate(Bundle savedInstanceState) {
super.onCreate(savedInstanceState);
setContentView(R.layout.activity_main);
final TextView text = (TextView)findViewById(R.id.txtHello);
Button button = (Button)findViewById(R.id.btnRun);
button.setOnClickListener(new OnClickListener(){
@Override
public void onClick(View v) {
Log.d(TAG, "clicked!");
new Thread() {
public void run() {
for(int i=0; i<10; i++) {
Message msg = new Message();
msg.what = 1;
msg.obj = "item-"+i;
handler.sendMessage(msg);
Log.d(TAG, "sended "+"item-"+i);
try {
Thread.sleep(1000);
} catch (InterruptedException e) {
e.printStackTrace();
}
}
}
}.start();
}
});
handler = new Handler() {
@Override
public void handleMessage(Message msg) {
String str = "unknow";
switch(msg.what) {
case 1:
str = (String)msg.obj;
break;
default:
break;
}
Log.d(TAG, "recv " + str);
text.setText(str);
super.handleMessage(msg);
}
};
}
@Override
public boolean onCreateOptionsMenu(Menu menu) {
// Inflate the menu; this adds items to the action bar if it is present.
getMenuInflater().inflate(R.menu.main, menu);
return true;
}
}
布局文件較為簡單:
<RelativeLayout xmlns:android="http://schemas.android.com/apk/res/android"
xmlns:tools="http://schemas.android.com/tools"
android:layout_width="match_parent"
android:layout_height="match_parent"
android:paddingBottom="@dimen/activity_vertical_margin"
android:paddingLeft="@dimen/activity_horizontal_margin"
android:paddingRight="@dimen/activity_horizontal_margin"
android:paddingTop="@dimen/activity_vertical_margin"
tools:context=".MainActivity" >
<TextView
android:id="@+id/txtHello"
android:layout_width="wrap_content"
android:layout_height="wrap_content"
android:text="@string/hello_world" />
<Button
android:id="@+id/btnStart"
android:layout_width="wrap_content"
android:layout_height="wrap_content"
android:text="Start"
/>
</RelativeLayout>
這里展示的是Handler的典型用法――用來更新UI控件。
下面再展示一個非典型用法,僅僅是為了后面的分析方便。
Demo2. 自制ActivityThread模擬Activity
本例是為了分析方便而創建的;使用一個線程LooperThread來模擬Activity。
后面闡述為什么要這么做,代碼如下:
package com.example.handlerdemo;
import android.os.Bundle;
import android.os.Message;
import android.app.Activity;
import android.util.Log;
import android.view.Menu;
import android.view.View;
import android.widget.Button;
import android.widget.TextView;
public class MainActivity extends Activity {
static final String TAG = "MainActivity";
ActivityThread acitivityThread = null;
@Override
protected void onCreate(Bundle savedInstanceState) {
super.onCreate(savedInstanceState);
setContentView(R.layout.activity_main);
setupViews();
}
private void setupViews() {
TextView tv = (TextView)findViewById(R.id.txtHello);
Button bt = (Button)findViewById(R.id.btnStart);
Log.d(TAG, String.format("[MainActivity] Thread %s(%d)",
Thread.currentThread().getName(), Thread.currentThread().getId()));
acitivityThread = new ActivityThread();
acitivityThread.start();
acitivityThread.waitForHandlerReady();
bt.setOnClickListener(new View.OnClickListener() {
@Override
public void onClick(View v) {
new Thread() {
@Override
public void run() {
for(int i=0; i<10; i++) {
Message msg = new Message();
msg.what = i;
acitivityThread.mHandler.sendMessage(msg);
try {
Thread.sleep(1000);
} catch (InterruptedException e) {
e.printStackTrace();
}
}
}
}.start();
}
});
}
@Override
public boolean onCreateOptionsMenu(Menu menu) {
// Inflate the menu; this adds items to the action bar if it is present.
getMenuInflater().inflate(R.menu.main, menu);
return true;
}
}
MainActivity.java
package com.example.handlerdemo;
import android.os.Handler;
import android.os.Looper;
import android.os.Message;
import android.util.Log;
public class ActivityThread extends Thread {
static final String TAG = "LooperThread";
public Handler mHandler = null;
public ActivityThread() {
super("LooperThread");
}
@Override
public void run() {
Looper.prepare();
synchronized(this) {
mHandler = new Handler() {
@Override
public void handleMessage(Message msg) {
Log.d(TAG, String.format("recv msg.what: %d in Thread: %s(%d)", msg.what,
Thread.currentThread().getName(),Thread.currentThread().getId()));
}
};
this.notify();
}
Looper.loop();
}
public void waitForHandlerReady() {
try {
synchronized(this) {
while(mHandler == null)
this.wait();
}
} catch (InterruptedException e) {
e.printStackTrace();
}
}
}
ActivityThread.java
這個Demo的布局文件很簡單,就不貼出來了。
為什么使用Handler能夠跨線程更新UI?
概覽
以Demo2為例,這個Demo至少涉及三個線程:GodActivity線程,ActivityThread線程(模擬UI),匿名線程(GodActivity創建的,叫他aThread)。暫且把GodActivity當做上帝,把ActivityThread看做Demo1里的Activity。現在,我們先預覽一下為什么aThread可以通過Handler來更新ActivityThread的UI(純屬虛構),這兩個線程的交互關系如下圖所示:
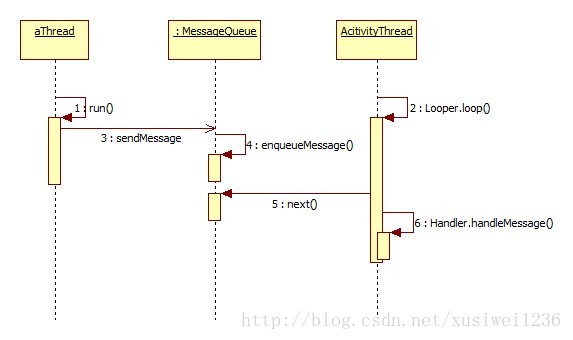
(PS:此前的版本畫了很多對象的生命線,結果很混亂,刪了一堆無關緊要的之后,立刻清晰了,^_^)
這個序列圖(Sequence Diagram)已經簡潔明了地給出了答案:
- Activity線程的幕后還有一個MessageQueue;MessageQueue故名思議是一個Message組成的Queue;
- aThread只是將數據以Message的形式掛到了Activity幕后的MessageQueue上了;
- Activity線程從MessageQueue上取Message并調用Handler.handlerMessage,所以實際的“更新動作”還是發生在Activity線程內;
詳解
下面將從Android 4.4.4源碼的角度分析Handler的“幕后黑手”。
幾個關鍵類
Demo2中和Handler有關的類除了MessageQueue還有Message和Looper,這幾個類的關系如下:
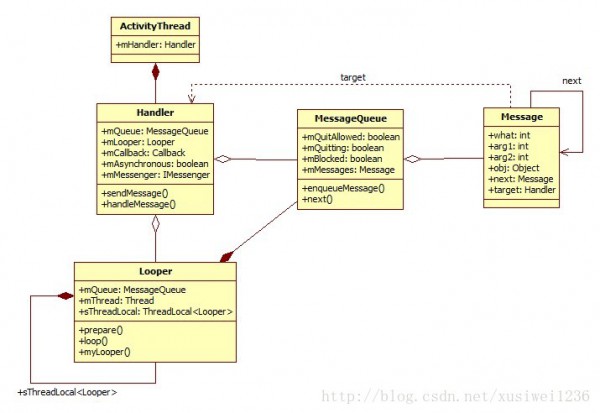
關鍵點:
- MessageQueue通過Message.next維護鏈表結構(java引用即指針);
- ActivityThread的消息循環被封裝在Looper.loop()內,Looper.prepare()用于創建屬于當前線程的Looper和MessageQueue;
- 每個Message可以通過target指向一個Handler,Handler實際上就是一個用來處理Message的callback;
接下來的代碼,只貼代碼片段(方法),如果對各類的屬性有所疑惑,可以回頭查看此圖。
Looper.prepare()
根據Looper的注釋可以看到,Looper線程“三部曲”:
- Looper.prepare()
- new Handler() { /* override handleMessage() */ }
- Looper.loop();
下面逐漸切入Looper.prepare():
public static void prepare() {
prepare(true);
}
Looper.java
無參數版本調用了有參數版本:
private static void prepare(boolean quitAllowed) {
if (sThreadLocal.get() != null) {
throw new RuntimeException("Only one Looper may be created per thread");
}
sThreadLocal.set(new Looper(quitAllowed)); // 放入“單例”中
}
Looper.java
這段代碼中引用了sThreadLocal,它被定義為ThreadLocal類型,即線程私有數據類型(或者叫做線程級別單例)
ThreadLocal<T>可以理解為Map<Thread,T>的一層包包裝(實際上Android,JVM都是按Map實現的,感興趣的同學可自行研究;set(value)時,以當前線程對象為key,所以每個線程能夠保存一份value。)
可見Looper.prepare()調用使得AcitivityThread通過Looper.sThreadLocal<Looper>持有了一個Looper對象。
繼續看Looper的構造方法Looper(quitAllowed):
private Looper(boolean quitAllowed) {
mQueue = new MessageQueue(quitAllowed);
mThread = Thread.currentThread(); // 和當前線程關聯
}
Handler.java
可以看到Looper的構造函數中創建了一個MessageQueue。
流程又轉到了MessageQueue的構造函數MessageQueue(quitAllowed):
MessageQueue(boolean quitAllowed) {
mQuitAllowed = quitAllowed;
mPtr = nativeInit();
}
MessageQueue.java
Handler()
首先看上面調用的默認構造方法:
/**
* Default constructor associates this handler with the {@link Looper} for the
* current thread. 將當前線程的Looper與此handler關聯。
* 如果當前線程沒有looper,這個handler將不能接收消息,從而導致異常拋出
* If this thread does not have a looper, this handler won't be able to receive messages
* so an exception is thrown.
*/
public Handler() {
this(null, false);
}
Handler.java
默認構造方法又調用了另一版本的構造方法,如下:
public Handler(Callback callback, boolean async) {
if (FIND_POTENTIAL_LEAKS) { // FIND_POTENTIAL_LEAKS 為 false;
final Class<? extends Handler> klass = getClass();
if ((klass.isAnonymousClass() || klass.isMemberClass() || klass.isLocalClass()) &&
(klass.getModifiers() & Modifier.STATIC) == 0) {
Log.w(TAG, "The following Handler class should be static or leaks might occur: " +
klass.getCanonicalName());
}
}
mLooper = Looper.myLooper(); // 獲取當前線程(調用者)的Looper
if (mLooper == null) { // 如果當前線程沒有Looper,則拋異常
throw new RuntimeException(
"Can't create handler inside thread that has not called Looper.prepare()");
}
mQueue = mLooper.mQueue; // 這里引用的MessageQueue是Looper()中創建的
mCallback = callback;
mAsynchronous = async;
}
Handler.java
Handler()調用了Looper.myLooper():
public static Looper myLooper() {
return sThreadLocal.get(); // 從該線程的“單例”中取出Looper對象
}
Looper.java
Looper.loop()
Looper.loop()封裝了消息循環,所以我們現在看看Looper.loop()的“真面目”:
public static void loop() {
final Looper me = myLooper();
if (me == null) {
throw new RuntimeException("No Looper; Looper.prepare() wasn't called on this thread.");
}
final MessageQueue queue = me.mQueue;
// Make sure the identity of this thread is that of the local process,
// and keep track of what that identity token actually is.
Binder.clearCallingIdentity();
final long ident = Binder.clearCallingIdentity();
for (;;) {
Message msg = queue.next(); // might block, 取出消息
if (msg == null) {
// No message indicates that the message queue is quitting.
return;
}
// This must be in a local variable, in case a UI event sets the logger
Printer logging = me.mLogging;
if (logging != null) {
logging.println(">>>>> Dispatching to " + msg.target + " " +
msg.callback + ": " + msg.what);
}
// mLatencyLock is only initialized for non USER builds
// (e.g., USERDEBUG and ENG)
if ((!sLatencyEnabled) || (me != sMainLooper)) {
msg.target.dispatchMessage(msg); // 通過msg.target分派消息
}
else { // 記錄性能數據
long t1 = SystemClock.uptimeMillis(); // 獲得當前毫秒數(自啟動)
msg.target.dispatchMessage(msg);
long t2 = SystemClock.uptimeMillis() - t1; // t2就是dispatchMessage(msg)所用時間
if (t2 < 50) {
// We don't care about these from a latency perspective
}
else if (t2 < 250) {
// Fast response that usually has low impact on user experience
sLatencyCountFast++;
sLatencySumFast += t2;
if (sLatencyCountFast >= 100) {
String name = getProcessName();
long avg = sLatencySumFast / sLatencyCountFast;
EventLog.writeEvent(2731, "mainloop2_latency1", name, avg);
sLatencyCountFast = 0;
sLatencySumFast = 0;
}
}
else if (t2 < 1000) {
sLatencyCountSlow++;
sLatencySumSlow += t2;
if (sLatencyCountSlow >= 10) {
String name = getProcessName();
long avg = sLatencySumSlow / sLatencyCountSlow;
EventLog.writeEvent(2731, "mainloop2_latency2", name, avg);
sLatencyCountSlow = 0;
sLatencySumSlow = 0;
}
}
else {
String name = getProcessName();
EventLog.writeEvent(2731, "mainloop2_bad", name, t2);
}
}
if (logging != null) {
logging.println("<<<<< Finished to " + msg.target + " " + msg.callback);
}
// Make sure that during the course of dispatching the
// identity of the thread wasn't corrupted.
final long newIdent = Binder.clearCallingIdentity();
if (ident != newIdent) {
Log.wtf(TAG, "Thread identity changed from 0x"
+ Long.toHexString(ident) + " to 0x"
+ Long.toHexString(newIdent) + " while dispatching to "
+ msg.target.getClass().getName() + " "
+ msg.callback + " what=" + msg.what);
}
msg.recycle();
}
}
Looper.java
可以看到,Looper.loop()的for循環實際上就是“消息循環”,它負責從消息隊列(MessageQueue)中不斷地取出消息(MessageQueue.next),然后通過msg.target來派發(dispatch)消息。
How to dispatch?
下面看看Message到底是如何被dispatch的:
public void dispatchMessage(Message msg) {
if (msg.callback != null) { // 方法 1
handleCallback(msg);
} else {
if (mCallback != null) {
if (mCallback.handleMessage(msg)) { // 方法 2
return;
}
}
handleMessage(msg); // 方法 3
}
}
Handler.java
從這段代碼可以看出,實現正常的Message處理有三種方式:
- 為Message.callback注冊一個Runnable實例。
- 為Handler.mCallback注冊一個Handler.Callback實例。
- 重寫Handler的handleMessage方法。
另外,這三種方法優先級依次降低,且一個Message只能有一種處理方式。
Message的發送與獲取
對于一個后臺線程,它要發出消息(Handler.sendMessage);對于Activity線程,它要得到其他線程發來的消息(MessageQueue.next);而這兩種工作都是以MessageQueue為基礎的。下面,分別分析發送和接收的具體流程:
Handler.sendMessage()
Demo中后臺線程正是通過Handler.sendMessage實現向Activity發消息的,Handler.sendMessage方法的代碼如下:
public final boolean sendMessage(Message msg)
{
return sendMessageDelayed(msg, 0);
}
Handler.java
public final boolean sendMessageDelayed(Message msg, long delayMillis)
{
if (delayMillis < 0) {
delayMillis = 0;
}
return sendMessageAtTime(msg, SystemClock.uptimeMillis() + delayMillis);
}
Handler.java
其中,其中SystemClock.uptimeMillis()返回自啟動以來CPU經過的毫秒數。
public boolean sendMessageAtTime(Message msg, long uptimeMillis) {
MessageQueue queue = mQueue;
if (queue == null) {
RuntimeException e = new RuntimeException(
this + " sendMessageAtTime() called with no mQueue");
Log.w("Looper", e.getMessage(), e);
return false;
}
return enqueueMessage(queue, msg, uptimeMillis);
}
Handler.java
Handler.enqueMessage其實只是對MessageQueue.enqueueMessage的簡單包裝:
private boolean enqueueMessage(MessageQueue queue, Message msg, long uptimeMillis) {
msg.target = this; // 將當前Handler(通常已重寫handleMessage方法)與該Message綁定(通過target)
if (mAsynchronous) {
msg.setAsynchronous(true);
}
return queue.enqueueMessage(msg, uptimeMillis); // 調用MessageQueue.enqueueMessage
}
Handler.java
這里看到了Looper.loop()里引用的target的來源。
流程轉到了MessageQueue.enqueueMessage(),看命名基本知道它是入隊操作,代碼如下:
boolean enqueueMessage(Message msg, long when) {
if (msg.isInUse()) {
throw new AndroidRuntimeException(msg + " This message is already in use.");
}
if (msg.target == null) {
throw new AndroidRuntimeException("Message must have a target.");
}
synchronized (this) { // 臨界區
if (mQuitting) {
RuntimeException e = new RuntimeException(
msg.target + " sending message to a Handler on a dead thread");
Log.w("MessageQueue", e.getMessage(), e);
return false;
}
msg.when = when;
Message p = mMessages; // 鏈表頭
boolean needWake;
if (p == null || when == 0 || when < p.when) {
// p == null 隊列為空
// when == 0 由 Handler.sendMessageAtFrontOfQueue() 發出
// when < p.when 新消息的when比隊頭要早
// New head, wake up the event queue if blocked.
msg.next = p; // 將msg放到隊頭,step 1
mMessages = msg; // 將msg放到隊頭,step 2
needWake = mBlocked;
} else {
// Inserted within the middle of the queue. Usually we don't have to wake 插到隊列中間。通常我們不必喚醒
// up the event queue unless there is a barrier at the head of the queue 事件(event)隊列,除非隊頭有一個barrier,
// and the message is the earliest asynchronous message in the queue.且消息是隊列中最早的同步消息。
needWake = mBlocked && p.target == null && msg.isAsynchronous();
Message prev;
for (;;) { // 遍歷鏈表
prev = p;
p = p.next;
if (p == null || when < p.when) { // 到“尾部”了 或 新消息比當前消息更早
break;
}
if (needWake && p.isAsynchronous()) {
needWake = false;
}
}
// 以下兩行將msg插入prev和p之間
msg.next = p; // invariant: p == prev.next
prev.next = msg;
}
// We can assume mPtr != 0 because mQuitting is false.
if (needWake) {
nativeWake(mPtr); // 通知前臺線程“有消息來啦”
}
}
return true;
}
MessageQueue.java
根據這段代碼可知,MessageQueue上的Message是按照when大小排列的。唯一可能讓人疑惑的是最后的nativeWake,稍后討論。
MessageQueue.next()
前文的Looper.loop方法通過MessageQueue.next()取出消息,現在看看它是如何實現的:
Message next() {
int pendingIdleHandlerCount = -1; // -1 only during first iteration
int nextPollTimeoutMillis = 0;
for (;;) {
if (nextPollTimeoutMillis != 0) {
Binder.flushPendingCommands();
}
// We can assume mPtr != 0 because the loop is obviously still running.
// The looper will not call this method after the loop quits.
nativePollOnce(mPtr, nextPollTimeoutMillis); // 等待通知,可能阻塞
synchronized (this) {
// Try to retrieve the next message. Return if found.
final long now = SystemClock.uptimeMillis();
Message prevMsg = null;
Message msg = mMessages; // 鏈表頭
if (msg != null && msg.target == null) {
// Stalled by a barrier. Find the next asynchronous message in the queue.
do { // 遍歷鏈表
prevMsg = msg;
msg = msg.next;
} while (msg != null && !msg.isAsynchronous());
}
if (msg != null) {
if (now < msg.when) {
// Next message is not ready. Set a timeout to wake up when it is ready.
nextPollTimeoutMillis = (int) Math.min(msg.when - now, Integer.MAX_VALUE);
} else {
// Got a message.
mBlocked = false;
if (prevMsg != null) {
prevMsg.next = msg.next; // 將msg節點摘下
} else { // prevMsg == null, msg是鏈表頭
mMessages = msg.next;
}
msg.next = null; // msg與MessageQueue“斷絕關系”
if (false) Log.v("MessageQueue", "Returning message: " + msg);
msg.markInUse();
return msg; // 退出點1 到這為止,是常規邏輯
}
} else {
// No more messages.
nextPollTimeoutMillis = -1;
}
// Process the quit message now that all pending messages have been handled.
if (mQuitting) {
dispose();
return null; // 退出點2
}
// If first time idle, then get the number of idlers to run.
// Idle handles only run if the queue is empty or if the first message
// in the queue (possibly a barrier) is due to be handled in the future.
if (pendingIdleHandlerCount < 0
&& (mMessages == null || now < mMessages.when)) {
pendingIdleHandlerCount = mIdleHandlers.size();
}
if (pendingIdleHandlerCount <= 0) {
// No idle handlers to run. Loop and wait some more.
mBlocked = true;
continue;
}
if (mPendingIdleHandlers == null) {
mPendingIdleHandlers = new IdleHandler[Math.max(pendingIdleHandlerCount, 4)];
}
mPendingIdleHandlers = mIdleHandlers.toArray(mPendingIdleHandlers);
}
// Run the idle handlers.
// We only ever reach this code block during the first iteration.
for (int i = 0; i < pendingIdleHandlerCount; i++) {
final IdleHandler idler = mPendingIdleHandlers[i];
mPendingIdleHandlers[i] = null; // release the reference to the handler
boolean keep = false;
try {
keep = idler.queueIdle();
} catch (Throwable t) {
Log.wtf("MessageQueue", "IdleHandler threw exception", t);
}
if (!keep) {
synchronized (this) {
mIdleHandlers.remove(idler);
}
}
}
// Reset the idle handler count to 0 so we do not run them again.
pendingIdleHandlerCount = 0;
// While calling an idle handler, a new message could have been delivered
// so go back and look again for a pending message without waiting.
nextPollTimeoutMillis = 0;
}
}
MessageQueue.java
MessageQueue.next()同樣讓人疑惑的是nativePollOnce,稍后也將見分曉。
小結
MessageQueue.next()和MessageQueue.sendMessage()分別被Activity線程、后臺線程調用,而他們兩個線程可能同時在調用這兩個方法,所以他們共享并修改的成員變量需要加鎖,這就是synchronized (this)出現的原因。
至此,已經能夠完整的回答“為什么用Handler能夠實現跨線程更新UI”。簡單的說,Activity線程的背后都有一個消息隊列(MessageQueue),后臺線程通過Handler的sendMessage方法向這個消息隊列上放消息;Activity線程將消息從消息隊列上取下來之后,通過具體Handler的handleMessage方法處理消息,而更新UI的代碼就在這個handleMessage中;所以,后臺線程并沒有做實際的“更新”,只是將要更新的內容以借助MessageQueue告訴了Activity線程,Activity線程才是實際做“更新”動作的人。
簡言之,Handler并沒有真正的實現“跨線程”更新UI,而是將要更新的數據(Message攜帶)和如何更新(Handler攜帶)通過消息隊列告訴了UI線程,UI線程才是真正的“幕后英雄”。
真正的ActivityThread
Demo2中的ActivityThread完全是虛構出來的,下面來看看Android的Activity到底是不是想我虛構的那樣有一個Looper。
經過上面的分析,可以從兩方面驗證:
- 看看Activity源碼中執行onCreate之前是否調用了Looper.prepare()。
- 執行onXXX方法時的CallStack上是否有Looper.loop();
第二點很容易驗證,只需在任意onXXX方法中打一個斷點,然后看程序的CallStack,就一面了然了:
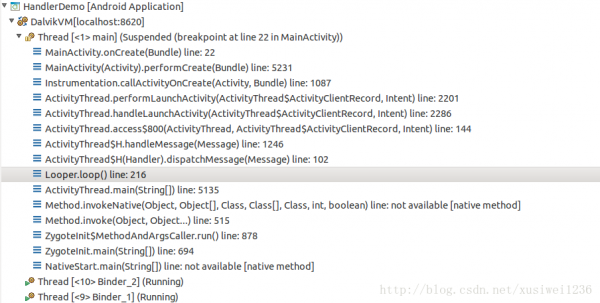
根據這個調用棧,可以很明顯的看到有Looper.loop;同時還能看到是ActivityThread.main調用它的,所以可以看看ActivityThread.main的源碼:
public static void main(String[] args) {
SamplingProfilerIntegration.start();
// CloseGuard defaults to true and can be quite spammy. We
// disable it here, but selectively enable it later (via
// StrictMode) on debug builds, but using DropBox, not logs.
CloseGuard.setEnabled(false);
Environment.initForCurrentUser();
// Set the reporter for event logging in libcore
EventLogger.setReporter(new EventLoggingReporter());
Security.addProvider(new AndroidKeyStoreProvider());
Process.setArgV0("<pre-initialized>");
Looper.prepareMainLooper(); // 它和Looper.prepare類似
ActivityThread thread = new ActivityThread();
thread.attach(false);
if (sMainThreadHandler == null) {
sMainThreadHandler = thread.getHandler();
}
AsyncTask.init();
if (false) {
Looper.myLooper().setMessageLogging(new
LogPrinter(Log.DEBUG, "ActivityThread"));
}
Looper.loop();
throw new RuntimeException("Main thread loop unexpectedly exited");
}
ActivityThread.java
所以,上面提到的兩方面都得到了驗證。即真正的ActivityThread是有Looper的。
Native浮云
細心的朋友可能會發現,上面MessageQueue的代碼中還遺留幾個native開頭方法:nativeInit,nativePollOnce,nativeWake。
下面就來掃清這些“遮眼”的浮云。和這幾個native方法直接對應的是:
static JNINativeMethod gMessageQueueMethods[] = {
/* name, signature, funcPtr */
{ "nativeInit", "()I", (void*)android_os_MessageQueue_nativeInit },
{ "nativeDestroy", "(I)V", (void*)android_os_MessageQueue_nativeDestroy },
{ "nativePollOnce", "(II)V", (void*)android_os_MessageQueue_nativePollOnce },
{ "nativeWake", "(I)V", (void*)android_os_MessageQueue_nativeWake },
{ "nativeIsIdling", "(I)Z", (void*)android_os_MessageQueue_nativeIsIdling }
};
android_os_MessageQueue.cpp
nativeInit
下面從adnroid_os_MessageQueue_nativeInit開始,顧名思義,nativeInit當然是完成一些初始化工作的。
static jint android_os_MessageQueue_nativeInit(JNIEnv* env, jclass clazz) {
NativeMessageQueue* nativeMessageQueue = new NativeMessageQueue(); // 創建了NativeMessageQueue
if (!nativeMessageQueue) {
jniThrowRuntimeException(env, "Unable to allocate native queue");
return 0;
}
nativeMessageQueue->incStrong(env);
return reinterpret_cast<jint>(nativeMessageQueue);
}
android_os_MessageQueue.cpp
看看NativeMessageQueue的聲明:
class NativeMessageQueue : public MessageQueue {
public:
NativeMessageQueue();
virtual ~NativeMessageQueue();
virtual void raiseException(JNIEnv* env, const char* msg, jthrowable exceptionObj);
void pollOnce(JNIEnv* env, int timeoutMillis);
void wake();
private:
bool mInCallback;
jthrowable mExceptionObj;
};
android_os_MessageQueue.cpp
NativeMessageQueue繼承了MessageQueue,再來看看MessageQueue的聲明:
class MessageQueue : public RefBase {
public:
/* Gets the message queue's looper. */
inline sp<Looper> getLooper() const {
return mLooper;
}
/* Checks whether the JNI environment has a pending exception.
*
* If an exception occurred, logs it together with the specified message,
* and calls raiseException() to ensure the exception will be raised when
* the callback returns, clears the pending exception from the environment,
* then returns true.
*
* If no exception occurred, returns false.
*/
bool raiseAn
生活不易,碼農辛苦
如果您覺得本網站對您的學習有所幫助,可以手機掃描二維碼進行捐贈

------分隔線----------------------------
------分隔線----------------------------


