一直知道Fragment很強(qiáng)大,但是一直都沒(méi)有去學(xué)習(xí),現(xiàn)在有些空閑的時(shí)間,所以就去學(xué)習(xí)了一下Fragment的簡(jiǎn)單入門(mén)。我也會(huì)把自己的學(xué)習(xí)過(guò)程寫(xiě)下來(lái),如果有什么不足的地方希望大牛指正,共同進(jìn)步!
一、Fragment簡(jiǎn)介
1.Fragment作為Activity界面的一部分組成出現(xiàn);
2.可以在一個(gè)Activity中同時(shí)出現(xiàn)多個(gè)Fragment,并且,一個(gè)Fragment亦可在多個(gè)Activity中使用;
3.在Activity運(yùn)行過(guò)程中,可以添加、移除或者替換Fragment(add()、remove()、replace());
4.Fragment可以響應(yīng)自己的輸入事件,并且有自己的生命周期,當(dāng)然,它們的生命周期直接被其所屬的activity的生命周期影響。
那我們?yōu)槭裁匆肍ragment呢?主要目的是用在大屏幕設(shè)備上--例如平板電腦上,支持更加動(dòng)態(tài)和靈活的UI設(shè)計(jì)。平板電腦的屏幕要比手機(jī)的大得多,有更多的空間來(lái)放更多的UI組件,并且這些組件之間會(huì)產(chǎn)生更多的交互。我們可以把Fragment認(rèn)為是“小的Activity”,F(xiàn)ragment更加簡(jiǎn)潔。
二、Fragment的簡(jiǎn)單使用
那我們就簡(jiǎn)單的顯示2個(gè)Fragment為例來(lái)講解一下。
1.在XML中添加Fragment:
新建Fragment1、Fragment2(注意:這里可能有2個(gè)包可以選擇導(dǎo)入android.app.Fragment或android.support.v4.app.Fragment都是可以的,我這里選擇使用了前者,但是兩者使用時(shí)有區(qū)別的,在結(jié)尾中我會(huì)講到):
Fragment1代碼:
package com.example.fragment;
import android.app.Fragment;
import android.os.Bundle;
import android.util.Log;
import android.view.LayoutInflater;
import android.view.View;
import android.view.ViewGroup;
import com.example.fragmentdemo.R;
public class Fragment1 extends Fragment {
@Override
public View onCreateView(LayoutInflater inflater, ViewGroup container,
Bundle savedInstanceState) {
Log.e("TAG", "in");
return inflater.inflate(R.layout.fragment1, container, false);
}
}
Fragment2代碼:
package com.example.fragment;
import android.app.Fragment;
import android.os.Bundle;
import android.view.LayoutInflater;
import android.view.View;
import android.view.ViewGroup;
import com.example.fragmentdemo.R;
public class Fragment2 extends Fragment {
@Override
public View onCreateView(LayoutInflater inflater, ViewGroup container,
Bundle savedInstanceState) {
return inflater.inflate(R.layout.fragment2, container, false);
}
}
Fragment1的xml代碼:
<?xml version="1.0" encoding="utf-8"?>
<LinearLayout xmlns:android="http://schemas.android.com/apk/res/android"
android:layout_width="match_parent"
android:layout_height="match_parent"
android:background="#FF69B4"
android:orientation="vertical" >
<TextView
android:layout_width="wrap_content"
android:layout_height="wrap_content"
android:layout_gravity="center"
android:text="這是第一個(gè)Fragment" />
</LinearLayout>
Fragment2的xml代碼:
<?xml version="1.0" encoding="utf-8"?>
<LinearLayout xmlns:android="http://schemas.android.com/apk/res/android"
android:layout_width="match_parent"
android:layout_height="match_parent"
android:background="#EECBAD"
android:orientation="vertical" >
<TextView
android:layout_width="wrap_content"
android:layout_height="wrap_content"
android:layout_gravity="center"
android:text="這是第二個(gè)Fragment" />
</LinearLayout>
我們?cè)赼ctivity_main.xml中添加兩個(gè)Fragment,代碼如下:
<LinearLayout xmlns:android="http://schemas.android.com/apk/res/android"
android:layout_width="match_parent"
android:layout_height="match_parent"
android:baselineAligned="false" >
<fragment
android:id="@+id/fragment1"
android:name="com.example.fragment.Fragment1"
android:layout_width="wrap_content"
android:layout_height="match_parent"
android:layout_weight="1" />
<fragment
android:id="@+id/fragment2"
android:name="com.example.fragment.Fragment2"
android:layout_width="wrap_content"
android:layout_height="match_parent"
android:layout_weight="1" />
</LinearLayout>
MainActivity代碼如下:
package com.example.fragmentdemo;
import android.app.Activity;
import android.os.Bundle;
public class MainActivity extends Activity {
@Override
protected void onCreate(Bundle savedInstanceState) {
super.onCreate(savedInstanceState);
setContentView(R.layout.activity_main);
}
}
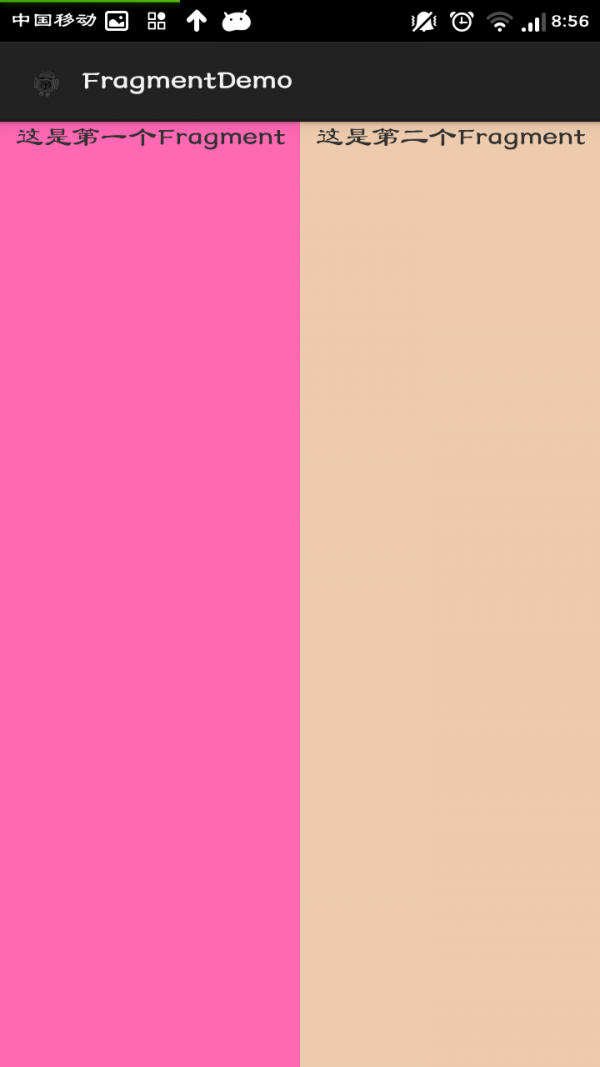
然后運(yùn)行工程就可以顯示Fragment了,下面是效果圖。
2.動(dòng)態(tài)添加Fragment:
我們只需要修改MainActivity和activity_main.xml中的代碼就可以了。
activity_main.xml代碼:
<LinearLayout xmlns:android="http://schemas.android.com/apk/res/android"
android:layout_width="match_parent"
android:layout_height="match_parent"
android:baselineAligned="false"
android:orientation="vertical" >
<LinearLayout
android:id="@+id/main"
android:layout_width="match_parent"
android:layout_height="match_parent"
android:orientation="vertical" />
</LinearLayout>
MainActivity代碼:
package com.example.fragmentdemo;
import android.app.Activity;
import android.os.Bundle;
import com.example.fragment.Fragment1;
public class MainActivity extends Activity {
@Override
protected void onCreate(Bundle savedInstanceState) {
super.onCreate(savedInstanceState);
setContentView(R.layout.activity_main);
getFragmentManager().beginTransaction()
.replace(R.id.main, new Fragment1()).commit();
}
}
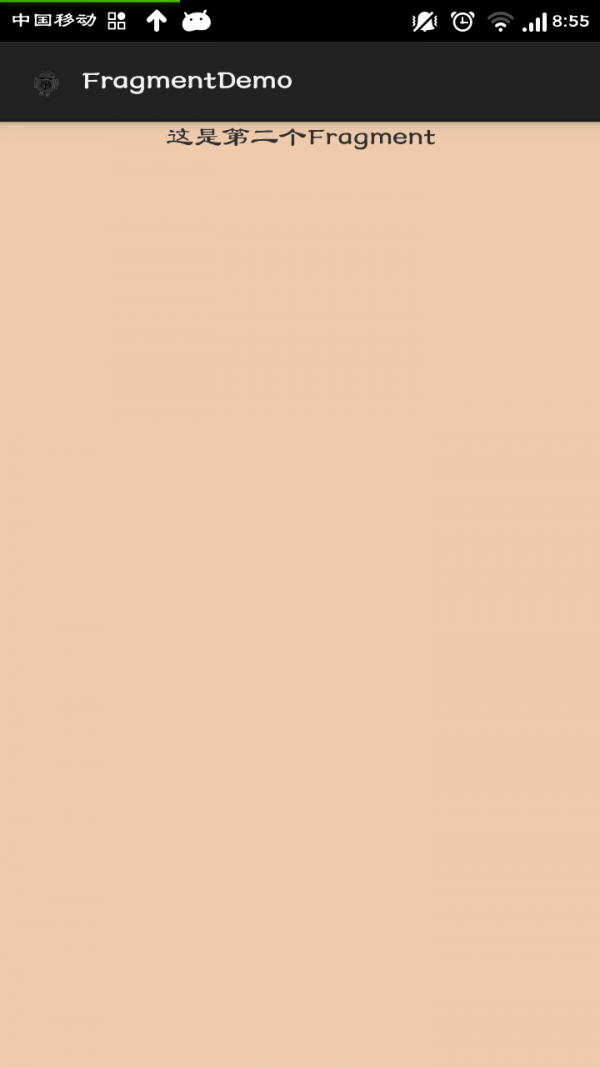
然后運(yùn)行工程就可以動(dòng)態(tài)的顯示Fragment了,下面是效果圖。
三、app包下和V4包下的Fragment的區(qū)別
1、盡量不要用app包中的fragment,因?yàn)檫@個(gè)是在3.0之后才有的,支持的版本太高,在低版本中是是用不了的;
2、android.support.v4.app.Fragment:可以兼容到1.6的版本;
3、關(guān)于這兩個(gè)fragment使用<fragment>標(biāo)簽的問(wèn)題:
(1)app.fragment和v4.fragment都是可以使用<fragment>標(biāo)簽的只是在在使用的時(shí)候如果是app.fragment則沒(méi)有什么特殊的地方繼承Activity即可。
(2)當(dāng)v4.fragment使用<fragment>標(biāo)簽的時(shí)候就要特別注意了:當(dāng)這個(gè)Activity的布局中有<fragment>標(biāo)簽的時(shí)候,這個(gè)Activity必須繼承FragmentActivity,否則就會(huì)報(bào)錯(cuò)。此時(shí)如果不卜繼成FragmentActivity的話
編譯系統(tǒng)會(huì)把<fragment>認(rèn)為是app包中的Fragment來(lái)處理。但是此時(shí)我們導(dǎo)入的是v4包中的FragmentAndroid官方文檔中的Fragment的例子就是以app包中的Fragment來(lái)講解的。
(3)app包中關(guān)于Fragment的類和方法在V4包中都是有相應(yīng)的對(duì)應(yīng)的。
轉(zhuǎn)載自:http://blog.csdn.net/a465456465/article/details/10415211,感謝。
上面就是Fragment的簡(jiǎn)單使用方法,Demo下載,下一節(jié)我會(huì)講Fragment的詳細(xì)使用。歡迎關(guān)注,我的博客園地址:http://www.cnblogs.com/getherBlog/p/3943547.html。


